What is classed as a poor pencil grip?

Once a child has gone through the five pencil grip stages, so after the age of about 6, a poor pencil grip is any that causes:

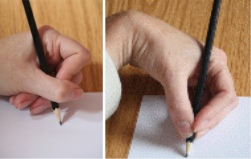
  • a very small or closed web space (as seen in the two photos below),
  • restricting the movement of the fingers and wrist,
  • makes handwriting hard work.

This is sometimes referred to as a “death grip” pencil grip.

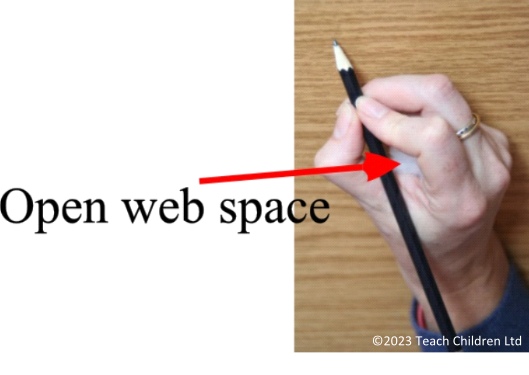
The most effective grip recommended for children by Occupational Therapists and Handwriting Specialists worldwide is the dynamic tripod grip, which gives an open web space. This allows the fingers to move freely so that a fluid handwriting style can be achieved.

For an explanation of what the dynamic tripod grip looks like for left and right-handed writers:  https://teachhandwriting.co.uk/tripod-pencil-grip.html

For videos on how to use our quick drawbridge flip, self-correcting method to help children pick up a pencil so they have holding it correctly in the tripod grip for both left and right-handed writers:  https://teachhandwriting.co.uk/teaching-tripod-pencil-grip.html

Why do Children Fidget or Appear Bored When Handwriting?

There are two key elements that can cause a child to fidget or appear bored when handwriting, both relate to being able to sit correctly:

  1. The height of the table and chair.
  2. The child’s physical core strength.

Table and Chair Height

A poor and uncomfortable sitting position that causes a child to fidget and wriggle about affects their ability to concentrate and pay attention; for example, when listening to a teacher, as well as distracting them from the task and breaking their train of thought. It also puts unnecessary strain on the body, making sitting tasks such as handwriting more tiring.

When a child is sitting on a chair too high for them, they may sit swinging their legs, causing the body to rock slightly. They might wrap their legs around the legs of the chair to stop them aching, which is not good for their circulation and can cause them to lean back away from the table top. Some children will sit with their legs underneath their bottom which often causes them to lean too far over the table due to being off balance, once again not good for their circulation or for handwriting and other fine motor skill activities such as eating or drawing.

If a table is too high for a child, they will have their arms raised too high, causing tension in the upper arms and shoulders or they may rest their head on the table. Both have a profound effect on a child’s ability to handwrite with fluidity, comfort and for any period of time. Another result of this is a child fidgets as they try to readjust their position to get comfortable, which in turn distracts them from the task at hand. 

For tips and ideas on how to help a child develop a good sitting posture and position for handwriting check out our FAQ section of the ‘Sitting’ section on the Parent area of our website: https://teachhandwriting.co.uk/sitting-faq.html

Teachers will find useful information using this link to our website:

website: https://teachhandwriting.co.uk/handwriting-sitting-position-desk.html

Sitting and Core Strength

We often see children slouched over a desk, laying their head on the table or with their head propped up by their hand and arm, or fidgeting about while they are sitting at the desk writing. This can look as if they are bored and disinterested in what they are doing. However, this is not generally the case.

A poor posture position is not always due to boredom or incorrect chair and table height. For some children it is a lack of body strength or core muscle tone (the large muscle groups that control shoulder stability and the trunk of the body) that work to enable us to sit and stand upright for sustained periods of time.

We expect our children to sit at a desk for long periods of time at school. To be able to maintain a good sitting position for writing over any length of time requires good core strength. Those who lack strong core strength tend to slouch over the desk, lay their head on the desk, hold their head in their hand or pull their chair in so far that they can rest their tummy on the edge of the table to help them keep a more upright position.

This is bad for them, as it puts unnecessary strain on the body, causing neck or backache and discomfort, which in turn make them fidget as they try to get comfortable. All this can distract them from the task in hand and limit their handwriting ability as it reduces their hand and fingers movements to handwrite freely.

For more information, games and activities on developing a child’s core strengths check out our ‘Play’ section of the Parents area of our website: https://teachhandwriting.co.uk/games.html

Teachers will find useful information using this link to our website: https://teachhandwriting.co.uk/handwriting-difficulties.html

Hand Dominance!

Hand dominance is where one hand has more influence or control than the other. This is sometimes referred to as hand preference, where one hand is preferred or chosen over the other, as it is more reliable in performing a range of skilled activities (handedness).

Children tend to develop hand dominance between the ages of 3-5 years old, for some it may be slightly later and for a few it does not become a subconscious decision until they are 8 or 9 years old. Many children will naturally develop a clear right or left-hand dominance which is greatly influenced by their genetics.

Some can develop a mixed dominance; this is where a child finds they have more control and greater skills for handwriting with say the left hand but prefer and display more precise skills with the right hand in tasks such as using scissors. Studies have shown handedness can be based on the type of muscles used in controlling gross and fine motor skills for completing particular tasks. The control of various muscle types is located in different hemispheres of the brain. Those relating to dexterity (fine motor skills), required for writing, are strongly related to hand dominance, whereas the larger muscle groups (gross motor skills), involving strength, rely less on hand dominance.

Whether a child is right or left-handed does not affect their academic ability or progress, if they have developed and been taught the appropriate key skills. The important thing is not to force particular hand dominance on a child. It will never feel natural for them and the acquisition of gross and fine motor skills will feel awkward and may well appear clumsy, delaying their development, skills ability, confidence and self-esteem.

Only about 1% of the population are truly ambidextrous, which means they are able to perform tasks using either hand with equal skill and proficiency; a rare trait indeed.

Our link to games ideas to help develop and support hand dominance: https://teachhandwriting.co.uk/hand-dominance.html

How Poor Eye Tracking and Spatial Awareness Skills Impact on #Handwriting!

Eye tracking and/or spatial awareness difficulties can have a dramatic effect on a child’s handwriting ability.  Weak skills in these key areas make it difficult for children to form letters correctly (curves and lines often not joining to complete the letter shape), as well as being unable to appropriately space letters in words and words in sentences. Other poor presentation skills include being unable to write on lines and often missing lines out when following on with a sentence.

It is also worth pointing out that a child with poor eye tracking and/or spatial awareness skills will also find reading difficult.

Eye tracking is the ability to control and coordinate the fine eye movements needed:

  • For left to right eye movements, without moving the head, needed to follow a line of writing as the letters are formed or for reading a line of print.
  • To focus and move the eyes to follow an object without moving the head, in all directions.
  • To track/follow objects near and far.
  • To focus on one object without moving the eyes.

Poor eye tracking skills can make handwriting very difficult, causing letter formation, spacing and positioning problems, leading to poor presentation. Often words are missed out or repeated, causing composition and legibility issues.

Activities that help to build these strengths and skills are: Swing Ball, target games and catching games.

Game idea: Goal post skittles

You need: Posts/marker, large plastic drink bottles/skittles and a range of ball sizes.

How to do it:

Place the posts about 2 metres away from the start position and about half a metre apart. Place the skittles about half a metre behind the posts but directly between them. The child starts by rolling a large ball through the posts to knock the skittles over. Before they roll the ball explain to get a maximum score, they need to knock all the skittles over in one roll and that the best way to do this is to look directly ahead through the posts at the skittles, NOT at the ball or their hand.

It may take a little practise, as they improve, they can use a different size ball or move the skittles so that they form different patterns which means they have to be more accurate with the roll.

This game can also be used as a foot and eye activity, the same rules apply, they must look to where they want the ball to end up not at their feet or the ball, tricky!

Spatial awareness is the ability to be aware of:

  • The space around you and your position in that space.
  • The position and relationship of other objects in relation to one another and yourself.

Poor spatial awareness skills make handwriting difficult as it affects the ability to understand and produce the directional pushes and pulls required to form letters; as well as difficulties with spacing and positioning. Combined, these difficulties can cause poor presentation and possible legibility issues.

Activities that help to build these strengths and skills are: games such as ‘Twister’ or ‘Simon Says’ and jigsaws and pattern making.

Games idea: Pattern making

You need: Beads, building blocks, Lego or shapes.

How to do it:

Talk through the process of making the same pattern as shown on a card or already produced; for instance, the red square goes on the right of the blue square and the yellow square is below the blue square. Ask the child to verbalise what they see and are doing to recreate the pattern.

Patterns can be created and copied with all sorts of items – beads, building blocks, Lego and shapes.

As skill levels improve tessellation (a pattern of shapes that fit perfectly together) activities and square or patterned paper for colouring and creating their own pattern designs are enjoyable.

Other Skills Areas that Affect #Handwriting Development

Back in January we explained how handwriting is a complex skill that requires good:

  • Gross and fine motor skills,
  • Motor memory skills,
  • Visual memory skills,
  • Spatial awareness skills,
  • Eye tracking skills.

Since then, we have looked at the importance of good gross and fine motor skills in regards to handwriting. So, over the coming weeks we will look at the other areas and other early development areas that are import on the journey to developing a good handwriting style.

Poor Motor Memory and Visual Memory Skills and #Handwriting

Motor memory and visual memory difficulties can have a dramatic effect on a child’s handwriting ability. Possible signs of poor motor memory or visual memory skills can be that their handwriting is slow and deliberate or fast and messy (as they try to hide their letter formation issues), making it difficult to read. They can spend so much time on trying to remember how to form the letters, they have no working memory space left for the important tasks of composing their writing and spelling.

Poor motor memory skills can make handwriting difficult as shapes and letter formation movements are often forgotten, causing letter reversals and incorrectly formed letter shapes, which can make joining a very slow process to learn. A poor and often slow handwriting style can develop as font styles are mixed and capital letters are used inappropriately. Combined, these difficulties can cause poor presentation, spelling and legibility issues.

Poor visual memory skills make handwriting difficult as the ability to recall how letters look and reproduce them with appropriate spacing and positioning is partially or completely lost. This leads to poor letter formation skills, letter reversal along with spelling and presentation difficulties.

Visual memory and motor memory skills are linked and so a game or activity that supports one is likely to support the other.

For games and activities ideas to support and develop these skills use this links: https://teachhandwriting.co.uk/handwriting-motor-skills.html

Is your child reluctant to handwrite or has a poor writing speed?

There are a number of possible reasons why a child may reluctant to write or have a poor writing speed. Over the last few months, we have looked at a number of these:

  • Having the right writing tool
  • Hand swapping
  • Letter and word spacing
  • Too much or not enough pressure
  • Visual and Motor Memory issues
  • Spatial Awareness and eye tracking issues
  • Copying from the board

Other key areas to look at we have also cover are:

  • Sitting correctly and why they may find this difficult.
  • The importance of learning to position and tilt the paper appropriately.
  • Pencil grip – is the grip appropriate for their age and ability and when to support them.
  • Having the writing hand under the writing line.
  • Learning to write their letter correctly.

Tips for a Child who Actively Avoids, or is Reluctant, to do Writing or Drawing Activities

  • Best tip – Don’t force them, the more you push the more reluctant they will become.
  • Assess their physical ability.
  • If weaknesses are found play the games that will build the appropriate muscles groups.
  • Develop directional skills and shape formation through activities that don’t require a pencil so that they are still developing their motor memory skills which will help them later on when they do start to draw and write.
  • When ready, try timed drawing and writing activities after your child has had a good run around or physical activity (but not when they are tired).
  • Set up a good writing environment where they are sitting comfortably and without distractions, such as the TV.
  • Correct poor posture and keep the activity short. One minute of happy drawing is better than no minutes.
  • Try a ‘Playtime Drawing /Writing Session’ (see below).
  • End the sessions with a fun activity or treat.
  • This will take time, patience and encouragement, each improvement, no matter how small, needs to be recognised and positively praised.
  • Remember as your child’s skills develop so does their confidence to try, and their self-esteem, as they succeed where once they felt they failed.

How to Organise a Playtime Drawing/Writing Session

  • When ready, try timed drawing or writing activities after your child has had a good run around or other physical activity (but not when they are tired).
  • Set up a good writing environment where they are sitting comfortably and without distraction, such as having the TV on.
  • Correct poor posture and keep the activity short – up to 5 minutes initially. However, one minute of happy drawing/writing is better than no minutes.
  • After the drawing/writing play a non-drawing activity or game with your child. Make this break between 3 and 5 minutes long, ensuring your child knows when it will end (use a timer so they can see when they will need to stop)
  • Return to the original drawing/writing activity for up to another 5 minutes.
  • End the sessions with a fun activity or treat.

Tips on Running the Session

  • Start with 2 drawing/writing activities and then slowly increase the drawing/writing time and/or the number of activities and reduce the playtime slot times.
  • You could try to do a couple of these kind of sessions at different times during the day.
  • It may take time for your child to be comfortable with the sessions. You need to show a lot of patience and encouragement, each improvement no matter how small needs to be recognised and positively praised.
  • Remember as your child’s skills develop so does their confidence to try and their self-esteem grows as they succeed where once they felt they failed.

Too much Pressure or not Enough – #Handwriting?

Some children may hold a pencil correctly but struggle to maintain and control the pressure required to handwrite.

Here are some additional tips to help support a child who is pressing down too hard with their pencil:

Some children may hold a pencil correctly but struggle to maintain and control the pressure required to handwrite.
Here are some additional tips to help support a child who is pressing down too hard with their pencil:
Focused games and activities can help develop both the physical strength and sensory perception areas.
• Make sure that the pencil isn’t gripped too close to the tip of the pencil (check out the how to teach section for more information).
• Play dough writing – flatten a large piece of play dough/clay on to a desk and using a pencil write or draw onto it. The idea is to create smooth lines, not torn ones, which pressing too hard will create. The advantage of this activity is it gives a child instant feedback about whether they are pressing too hard or not. When a good pressure has been found ask the child to try doing it with their eyes closed and talk through how their body feels when they are using the right amount of pressure.
• Corrugated card – place some corrugated card under the writing paper – the aim is to try not to flatten the bumps in the card.
• Tin foil writing board – wrap a piece of card in tin foil and place the paper on top, the aim is to not rip the foil when writing.
• Carbon copies – use carbon paper to create an extra copy, start with two or three sheets of paper on top of the carbon paper then move to two and then one, so that your child starts developing an understanding of how much pressure is needed for a task and how that feels. Talk through with them how it feels as they need less pressure to create a copy.
• Pattern work – look at and discuss light and dark line patterns and how to create them. Then using different writing tools ask the child to try and create their own. Talk through how it feels when they are making dark lines compared to faint/pale colour lines using the same pencil or crayon.
Here are some additional tips to help support a child who is Not pressing down hard enough with their pencil:

Focused games and activities can help develop the physical strength and sensory perception areas.

• Crayon rubbings – when a good pressure has been found ask the child to try doing it with their eyes closed and talk through how their body feels when they are using the right amount of pressure.
• Wax drawings – rub a wax crayon all over a piece of paper then turn it over on to a plain piece of paper. Draw on the back of the wax crayoned paper and when finished lift and see another copy of the picture. The greater the pressure the more complete the hidden picture will appear.
• Carbon copies – use carbon paper to create an extra copy, start with one sheet of paper on top of the carbon paper then move to two so that the child starts to develop an understanding of how much pressure is needed for a task and how that feels.
• Use a softer pencil such as a B6 or B4 and slowly change the pencils so that they work up to a HB. Each pencil change will mean they have to exert a little more pressure to create the same line mark. B marked pencils are softer than H.
• Pattern work – look at and discuss light and dark line patterns and how to create them. Then using different writing tools ask the child to try and create their own. Talk through how it feels when they are making dark lines compared to faint/pale colour lines using the same pencil or crayon.

  • Make sure that the pencil isn’t gripped too close to the tip of the pencil (check out the how to teach section for more information).
  • Play dough writing – flatten a large piece of play dough/clay on to a desk and using a pencil write or draw onto it. The idea is to create smooth lines, not torn ones, which pressing too hard will create. The advantage of this activity is it gives a child instant feedback about whether they are pressing too hard or not. When a good pressure has been found ask the child to try doing it with their eyes closed and talk through how their body feels when they are using the right amount of pressure.
  • Corrugated card – place some corrugated card under the writing paper – the aim is to try not to flatten the bumps in the card.
  • Tin foil writing board – wrap a piece of card in tin foil and place the paper on top, the aim is to not rip the foil when writing.
  • Carbon copies – use carbon paper to create an extra copy, start with two or three sheets of paper on top of the carbon paper then move to two and then one, so that your child starts developing an understanding of how much pressure is needed for a task and how that feels. Talk through with them how it feels as they need less pressure to create a copy.
  • Pattern work – look at and discuss light and dark line patterns and how to create them. Then using different writing tools ask the child to try and create their own. Talk through how it feels when they are making dark lines compared to faint/pale colour lines using the same pencil or crayon.

Here are some additional tips to help support a child who is Not pressing down hard enough with their pencil:

Focused games and activities can help develop the physical strength and sensory perception areas.

  • Crayon rubbings – when a good pressure has been found ask the child to try doing it with their eyes closed and talk through how their body feels when they are using the right amount of pressure.
  • Wax drawings – rub a wax crayon all over a piece of paper then turn it over on to a plain piece of paper. Draw on the back of the wax crayoned paper and when finished lift and see another copy of the picture. The greater the pressure the more complete the hidden picture will appear.
  • Carbon copies – use carbon paper to create an extra copy, start with one sheet of paper on top of the carbon paper then move to two so that the child starts to develop an understanding of how much pressure is needed for a task and how that feels.
  • Use a softer pencil such as a B6 or B4 and slowly change the pencils so that they work up to a HB. Each pencil change will mean they have to exert a little more pressure to create the same line mark. B marked pencils are softer than H.
  • Pattern work – look at and discuss light and dark line patterns and how to create them. Then using different writing tools ask the child to try and create their own. Talk through how it feels when they are making dark lines compared to faint/pale colour lines using the same pencil or crayon.

#Handwriting Letter & Word Spacing Issues

Some children find it difficult to space their letters in words correctly and to show spacing between words. There can be a number of reasons for this:

  1. They may not understand the concept or conventions of spacing words and letters and this needs to be explained.
  2. Other Physical Skills such as poor spatial awareness skills, eye tracking or general eyesight.
  3. Poor Key Strengths and/or Key Abilities elements, required for handwriting, such as sitting position, paper position, pencil grip, hand position and letter formation knowledge may also be hindering them.

 ‘Tips to support letter and word spacing’ will help you to identify if your child is having difficulty in understanding the spacing conventions and how to support them: https://teachhandwriting.co.uk/spacing-difficulties.html

Games and activity ideas to develop a child’s physical skills for handwriting: https://teachhandwriting.co.uk/handwriting-motor-skills.html

Hand Swapping Issues?

Hand Swapping is a normal developmental stage in infants and young children and therefore, at this stage, not a sign that a child is uncertain of their dominant hand. However, this is not ideal for a child who has started school.

Hand swapping throughout a task is not necessarily a sign that a child is uncertain of their dominant hand.

There are two routes to tackling the hand swapping issue, the one to use depends on your answers to the following questions.

1. Does the child usually start with the one hand and then swap when that hand gets tired?

You can usually tell if this is the case because they may shake out or rub the tired hand and once it is rested go back to using it again. This is probably because their fine motor skills are weak. Through focused games and activities (https://teachhandwriting.co.uk/handwriting-muscles.html#hand ), the muscle strength and dexterity can be gradually built up in the dominant hand, which in turn will build their stamina so that the hand swapping will reduce until they stop it altogether.

Once you are sure of dominance gently discourage swapping hands by taking a break from the activity and coming back to it a couple of minutes later using the preferred hand.

2. Does the child use their left hand if items are presented on their left-hand side and their right hand if they are presented on the right-hand side?

In toddlers and young children this is expected. In older children however it could mean that they have developed a delay in their skill to cross the mid-line point. This developmental bilateral coordination skill is vital to develop and can be addresses through a range of simple games and activities (https://teachhandwriting.co.uk/handwriting-muscles.html#bilat ).

Poor hand position can cause a poor pen grip

We often talk about the most appropriate grip for handwriting being the tripod grip; but this usually only refers to finger position. It is easy to forget the importance of the actual hand position in relation to the pen and paper for handwriting.

The ideal position is for the hand, wrist and elbow to be below the tip of the pencil and under the writing line for both left and right-handed writers.

Some children will hold the pencil in a tripod grip but develop a hooked hand position or move the elbow too far up the table, causing the forearm and wrist to be nearly horizontal with the table edge, because they feel they can see what they are writing more clearly.

A hooked grip puts unnecessary strain on the hand ligaments and forces the body into a poor sitting position, again putting extra strain on the body. This in turn makes handwriting a tiring and uncomfortable task, impacting on a child’s overall learning experience.

It takes time to correct a poor hand position but it is well worth the perseverance as it will enable a child to write freely and more comfortably.

When writing normally, encourage children to angle the paper appropriately as this will also help to correct a poor hand position. With the correct paper tilt they will always be able to see what they are writing. If the paper is tilted at the correct angle for them, they will find a hooked hand position, or having their forearm further up the table, more difficult and uncomfortable to maintain.

Some children will find writing on a sloped desk helpful. Not all are comfortable writing or drawing on a flat surface and may benefit from the paper being positioned on an angled or sloped board. If you are not sure, instead of buying a specialist board, you could make one. Try using a ring binder or lever arch file stuffed with magazines and newspaper to make a sloped board. Tape the edges to stop the papers falling out or you could cover it in sticky back plastic to give a smoother finish to the board. The advantage of this is that you can make them to any angle of slope. Try a few to see which, if any, your child prefers. You may find that they only need the sloped board for a short while. It may also help to reduce the angle of the slope over time so that they gradually get used to moving from a sloped to horizontal writing plane.