Paper Position & Tilt are Important for Good Handwriting

paper position 1

The correct paper position and tilt enables your child to handwrite comfortably while being able to see what they are writing. It also allows the non-writing hand to move the paper up the table so that the writing hand elbow can stay in the same position. The aim is to have the paper move up the table, rather than the writing hand moving down and eventually off the table.

As a class teacher I noticed that by the time children were about 8 or 9 years old it was very difficult to encourage them to move the paper up the table as they wrote. They would very often move their writing hand down the table, keeping the paper still, struggling to write properly as their hand hung over the edge of the table. Bad habits start early and can be difficult to change; good paper position and paper movement training at an early age can make such a difference to a child’s handwriting ability.

So why is paper position and tilt often ignored when teaching handwriting?

Maybe it is because experts disagree on what is the most appropriate paper tilt for right and left-handed writers. As there is no clear guidance people become uncomfortable about giving advice and so brush over the value of angling the paper for handwriting.

The most appropriate paper tilt angle is generally suggested as anywhere between 20 to 45 degrees anti-clockwise for right-handed writers and 30 to 45 degrees clockwise for left-handed writers.

For more tips and advice on developing a good paper tilt angle checkout this section of our website: http://bit.ly/2QSssWQ

Why do Children Fidget or Appear Bored When Handwriting?

Boy writng head leaning on handBoy writing with head on table

There are two key elements that can cause a child to fidget or appear bored when handwriting, both relate to being able to sit correctly:

  1. The height of the table and chair (http://bit.ly/2Oq29nP)
  2. The child’s physical core strength (http://bit.ly/2D1RKKs)

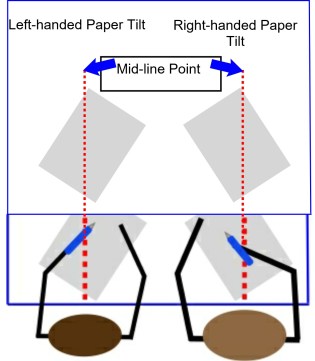
Table and Chair Height

A poor and uncomfortable sitting position that causes a child to fidget and wriggle about affects their ability to concentrate and pay attention; for example, when listening to a teacher, as well as distracting them from the task and breaking their train of thought. It also puts unnecessary strain on the body, making sitting tasks such as handwriting more tiring.

When a child is sitting on a chair too high for them they may sit swinging their legs, causing the body to rock slightly. They might wrap their legs around the legs of the chair to stop them aching, which is not good for their circulation and can cause them to lean back away from the table top. Some children will sit with their legs underneath their bottom which often causes them to lean too far over the table due to being off balance, once again not good for their circulation or for handwriting and other fine motor skill activities such as eating or drawing.

If a table is too high for a child they will have their arms raised too high, causing tension in the upper arms and shoulders or they may rest their head on the table. Both have a profound effect on a child’s ability to handwrite with fluidity, comfort and for any period of time. Another result of this is a child fidgets as they try to readjust their position to get comfortable, which in turn distracts them from the task at hand.

For tips and ideas on how to help a child develop a good sitting posture and position for handwriting check out our ‘Sitting’ section on the website.

Sitting and Core Strength

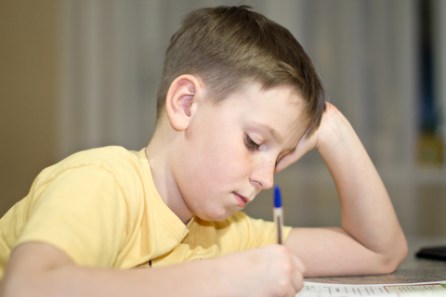
We often see children slouched over a desk, laying their head on the table or with their head propped up by their hand and arm, or fidgeting about while they are sitting at the desk writing. This can look as if they are bored and disinterested in what they are doing. However this is not generally the case.

A poor posture position is not always due to boredom or incorrect chair and table height. For some children it is a lack of body strength or core muscle tone (the large muscle groups that control shoulder stability and the trunk of the body) that work to enable us to sit and stand upright for sustained periods of time.

We expect our children to sit at a desk for long periods of time at school. To be able to maintain a good sitting position for writing over any length of time requires good core strength. Those who lack strong core strength tend to slouch over the desk, lay their head on the desk, hold their head in their hand or pull their chair in so far that they can rest their tummy on the edge of the table to help them keep a more upright position.

This is bad for them, as it puts unnecessary strain on the body, causing neck or backache and discomfort, which in turn make them fidget as they try to get comfortable. All this can distract them from the task in hand and limit their handwriting ability as it reduces their hand and fingers movements to handwrite freely.

For more information, games and activities on developing a child’s core strengths check out the Key Strengths section of our website.

The Five Stages of Pencil Grip Development

There are 5 developmental stages, that a child needs to go through, before they can successfully use a mature tripod grip. They need to work through each stage and as their hand, shoulder and arm strength and mobility increases so does the ability to move to the next developmental stage of the grip.

Stage 1. Palmer-supinate grasp

Stage 1

Holds the crayon/pencil in fist (whole hand) like a dagger. They use whole arm movements from the shoulder to mark-make. Due to this whole arm movement they prefer to work on a vertical surface.


Stage 2. Palmer or digital-pronate grasp

Stage 2

Holds a crayon/pencil with the palm of the hand facing down towards the paper. The crayon/pencil is held by all finger and the thumb. The movement comes from the shoulder and elbow. Again, due to the way the arm moves a vertical surface is preferred.


Stage 3. Four finger and thumb grip

Stage 3

Holds the crayon/pencil between the thumb and four fingers with the crayon/pencil nearly vertical up right position. Movement comes from the elbow and wrist.


Stage 4. Static Quadruped or tripod grip

Stage 4

Holds the pencil in very nearly in the correct position however the web space is narrower than it would be if held in a mature tripod grip. This means that the movement is coming from the wrist and large finger movements.


Stage 5. Mature/Dynamic tripod grip

This is traditionally considered the most appropriate pencil grip for handwriting. Holding the pencil between the thumb and index finger with pencil supported on the middle finger. The ring and little fingers are gently curled inwards. This give an open wide web space which means the movement comes from the fingers.


For more information on the five stage of pencil grip development click on the following link: http://bit.ly/2YFfqMp

Transferring handwriting skills from worksheets to paper

Worksheet Colours 2

At Teach Handwriting our aim is to move children off of worksheets as soon as possible. To achieve this, it is important to encourage them to transfer their skills to plain or lined paper whichever is most appropriate to their ability level. We realise that it is not always possible to buy paper with the appropriate line height in all cases, so would recommend creating your own on the computer.

  • Use a combination of worksheets and lined paper in each handwriting session with your child:
  1. Use the colour worksheet, or a grey scale version, and complete one or two rows.
  2. Then encourage the child to try the same patterns or letters on appropriately lined paper, again try one or two rows only.

Hopefully the worksheet will last over a couple of handwriting sessions and you and the child will see an improvement over the time. The sooner they learn to transfer their skills to paper the better.

We realise that printing off our worksheets and coloured lined paper can become costly so, to help reduce the costs:

  • Use a colour version of the appropriate worksheet initially and then try printing in grey scale. Children usually make the adjustment to grey scale well once they are used to how the picture clues and colours work.
  • You could also use the grey scale worksheets and colour the start of each row with the appropriate colour.