Half-term Fun – Clothes Peg Games

Clothes peg games 2

Some fun indoor activities may be the order of the day for this half term as the weather is not so hot.

This is a very simple idea which children love because they can take greater ownership of it. The aim of the activity is to help build up hand and finger strength through using the pegs; however it can have a dual purpose, helping to keep track of the week by using it as a timetable or for learning spellings or maths activities, as well as supporting the development of language skills.

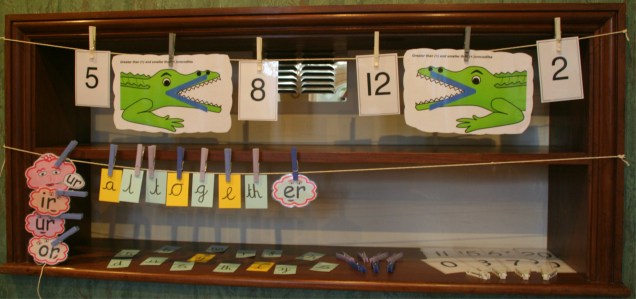
You do not need anything fancy, just some string (for the washing line), clothes pegs and pieces of paper or card to peg onto the washing line. The washing line can be a permanent fixture or you can just pop it up when you need to use it.

The clothes line needs to be at a height suitable for your child to peg things on to (placed against a wall is a safe option so that no-one can walk into it by accident and hurt themselves).

There are a whole range of games that can be played using this simple washing line and pegs concept:

  1. Memory games – Get your child to peg up 5 to 10 different pictures or items on the line. Then give them 1 minute to remember the items. Once the time is up ask them to look away, or close their eyes, and then you remove one or more of the items. Get them to look back at the line. Can they work out what is missing?
    • You could try just moving one or two of the items around. Can they figure out which ones are in the wrong place and put them back in their correct place?
    • Try swapping an item for something new, which your child did not hang up on the line. Can they work out which is the new item on the line?
  1. Odd One Out – Hang pictures on the line that belong together. Can they pick out the odd item on the line and explain why it is the odd one out.
    • They could all be pictures of fruit with a picture of some clothing
    • They could be shapes with straight sides and one with curves
    • They could all be animals but all are wild with only one being domestic
  1. Sorting – Ask your child to sort all the pictures or items from a selection and to hang all the identical things on the washing line. They could all be the same;
    • Colour
    • Shape
    • Type
  1. Pattern Work – Using pictures, different colour and shaped paper or items create different patterns. The patterns can be based on colour, size or type of object. You can create a pattern sequence on the washing line and then ask your child to try and copy the sequence. Can they explain the pattern and create their own for you to copy and explain?
  1. Pairing or What is the Same? – Hang a range of pictures or items on the line, making sure that some of the items can be paired together because they are exactly the same. They could match because;
    • They are exactly the same e.g. a pair of socks
    • Match numbers to a picture with the same number of items on
    • Match capital to lower-case letters
    • Or have items that can be put together because they are both from the same set, for example they are types of fruit or are the same colour.

Teaching Letter Joins – A Systematic Approach

Joins A & W 2

We would recommend teaching joins in join type groups, whether your child has learnt cursive or continuous cursive single letter fonts.

Teaching the join types in their groups helps a child to understand the directional pushes and pulls required to successfully join the different letter combinations.

There are 4 main groups of letter joins; bottom joins, bottom to “c” shape joins, “e” joins (top and bottom join strokes) and top joins.

Moving from Cursive Single Letters to Joining

There are seven join strokes to be taught. Most children will find the bottom joins the easiest to achieve, as it only requires the extension of the exit stroke they already put on the letters. The bottom to “c” shape joins can be tricky at first but soon mastered. The joins that tend to cause the most confusion and difficulty are the “e” joiners and top exit joiners.

I would recommend teaching the bottom joins first, then the ‘e’ joins and finally the top exit letter joins.

Moving from Continuous Cursive Single Letters to Joining

There are three join strokes to be taught. The easiest is the bottom exit letters (the majority of the letters), all a child has to do is write the letters closer together without lifting their pencil off the paper. Only the top to “e” and top joiners need to be taught for continuous cursive, as the nature of the font style means that the lead-in and exit strokes needed to join the majority of letter combinations have already been taught.

I would recommend teaching the bottom joins first, then the top exit to ‘e’ join and finally the top exit letter joins.

For our free join animations and worksheets: http://bit.ly/2F9P7cI

For tips to support the teaching of joins check out our Teaching Tips section:  http://bit.ly/2AaX8sk

When to Introduce Joined Handwriting

CC & Cursive 1

Here at Teach Children we believe that a child is only ready to start learning to join their handwriting when:

  • They have learnt to form all 26 lower case letters correctly
  • Letters are of a consistent and suitable size (not necessarily the perfect size, remember big is beautiful)
  • Letters are positioned appropriately on the writing line as well as in relation to one another.

Children generally begin to join letters between the ages of 6 to 7 years old, depending on the handwriting font style being taught. Those taught a continuous cursive font style from the beginning tend to join much earlier due to the nature of this font (for some by the end of their Reception Year).

Children do not need to be able to remember how to correctly form all their capital letters before they are taught how to join their letters. This is because capital letters never join to the lower-case letters in a word. However, for these children correct capital letter formation needs to be taught alongside the introduction of letter joins.

The ultimate aim is for a child to develop a good handwriting style; which means;

  • They can produce and maintain a good speed
  • Have a fluid hand movement that is comfortable
  • Letters are of a consistent and appropriate size, positioned correctly
  • Handwriting is legible (so others can read it easily).

For some children (mainly SEND pupils) this may mean that they will always print or use a single letter form of writing as learning to join is just not appropriate. But that does not mean they will not comply with the bullet points above.

Joining Letters – More Than Just Good Handwriting

join sentences

Research in recent years by psychologists, educationalists and neuroscientists has found that older children, with better handwriting skills showed greater neural activity in areas associated with working memory (used for planning, ideas generation and composition skills for written work).

Due to the way that our working memory functions the handwriting process can impact on the quality of the work. For instance, those who have poor handwriting ability use a disproportionate amount of their working memory capacity in recalling and forming the letters, effectively blocking the higher level composition process (Gathercole, Pickering, Knight & Stegmann 2004, cited Medwell et al. 2007).

This is because children with fluent handwriting skills have developed an automotive (instant, subconscious) ability to recall and reproduce letter patterns, making handwriting a lower level process within their working memory.

This would suggest that learning to handwrite with accuracy, fluidity, speed and legibility is a vital goal if we want our children to reach their full potential. Learning to join letters is therefore an important step to achieving this. Once handwriting has been mastered a child can focus more effectively on the composition and structure of the piece, which requires planning and logical thought processes, so that the plot or argument can be fully explored and presented.

Bibliography

Medwell. J, Wray. D: Handwriting: what do we know and what do we need to know, Literacy Vol. 41, No 1, April 2007.