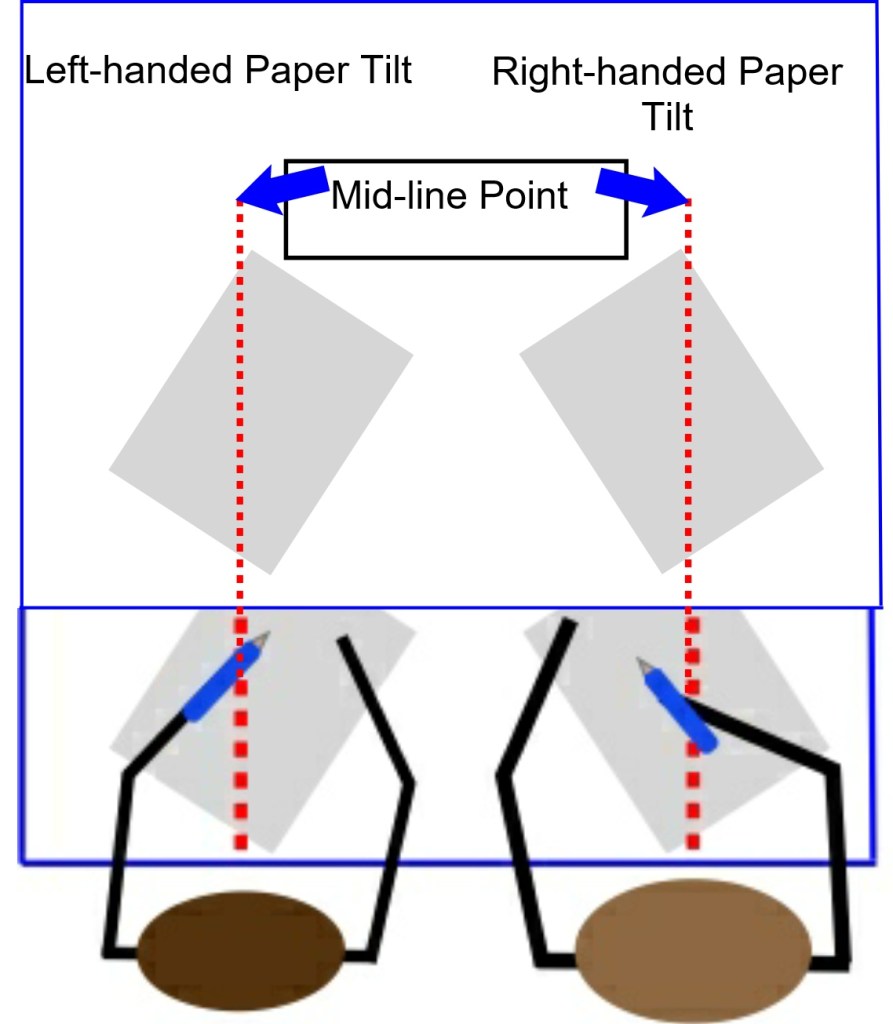
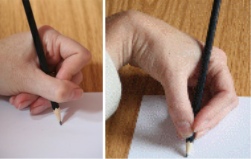
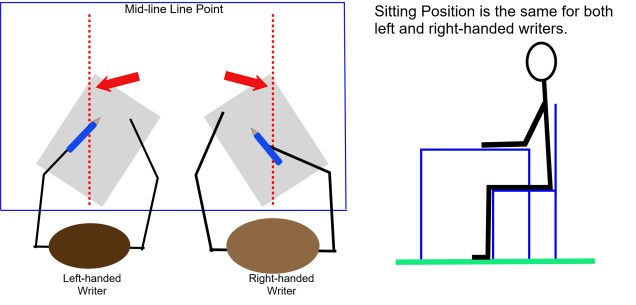
A Poor Hand Position Can Cause a Poor Pencil Grip

We often talk about the most appropriate grip for handwriting being the tripod grip; but this usually only refers to finger position. It is easy to forget the importance of the actual hand position in relation to the pen and paper for handwriting.

The ideal position is for the hand, wrist and elbow to be below the tip of the pencil and under the writing line for both left and right-handed writers.

Some children will hold the pencil in a tripod grip but develop a hooked hand position or move the elbow too far up the table, causing the forearm and wrist to be nearly horizontal with the table edge, because they feel they can see what they are writing more clearly.

A hooked grip puts unnecessary strain on the hand ligaments and forces the body into a poor sitting position, again putting extra strain on the body. This in turn makes handwriting a tiring and uncomfortable task, impacting on a child’s overall learning experience.

It takes time to correct a poor hand position but it is well worth the perseverance as it will enable a child to write freely and more comfortably.

When writing normally, encourage children to angle the paper appropriately as this will also help to correct a poor hand position. With the correct paper tilt they will always be able to see what they are writing. If the paper is tilted at the correct angle for them, they will find a hooked hand position, or having their forearm further up the table, more difficult and uncomfortable to maintain.

Some children will find writing on a sloped desk helpful. Not all are comfortable writing or drawing on a flat surface and may benefit from the paper being positioned on an angled or sloped board. If you are not sure, instead of buying a specialist board, you could make one. Try using a ring binder or lever arch file stuffed with magazines and newspaper to make a sloped board. Tape the edges to stop the papers falling out or you could cover it in sticky back plastic to give a smoother finish to the board. The advantage of this is that you can make them to any angle of slope. Try a few to see which, if any, your child prefers. You may find that they only need the sloped board for a short while. It may also help to reduce the angle of the slope over time so that they gradually get used to moving from a sloped to horizontal writing plane.

The Most Efficient Pencil Grip for #Handwriting – Tripod Grip

The Dynamic Tripod Grip is still the most efficient grip for handwriting, for those with good fine motor skills, as it allows the fingers to move freely; so, the writer can form the letters more smoothly.

The following link will take you to the grip section of our ‘Parents’ section of the teachhandwriting.co.uk website where you will find information on the tripod grip for left and right-handed writer: https://teachhandwriting.co.uk/tripod-pencil-grip.html

The Drawbridge Flip Method is a simple way of helping a child pick up a pencil and hold it correctly in the tripod grip for handwriting. This can also be used as a whole class approach to support correct pencil grip development for handwriting.

Follow this link for an instructional video for both left and right-handed writers on how to use the Drawbridge Flip method: https://teachhandwriting.co.uk/whole-class-tripod-pencil-grip-teaching-ks1.html

Drawbridge Flip instructions:

  • Place the pencil on the table in front of the writing hand, so it forms a straight line up the table with the writing tip of the pencil pointing towards you.
  • Then using your thumb and index finger pinch the pencil either side of the shaft about 2 cm up from the tip for a right-handed writer and about 3 cm up for a left-handed writer. Dots or sticker may be placed on the pencil to help thumb and finger placement.
  • Pick the pencil up off the table and place the fingernail of the middle finger on to the pencil just above the tip.
  • Keep the ring and little finger gently curled in.
  • Push down with the middle finger so that the pencil moves up and over like a drawbridge, keep pushing until the pencil is supported in the cup (web of skin that joins the thumb, hand and index finger) and the pencil is resting on the inner edge of middle finger.
  • When writing, the end of the pencil will be angled towards the shoulder for right-handed writers and the elbow for left-handed writers.

Hand Dominance!

Hand dominance is where one hand has more influence or control than the other. This is sometimes referred to as hand preference, where one hand is preferred or chosen over the other, as it is more reliable in performing a range of skilled activities (handedness).

Children tend to develop hand dominance between the ages of 3-5 years old, for some it may be slightly later and for a few it does not become a subconscious decision until they are 8 or 9 years old. Many children will naturally develop a clear right or left-hand dominance which is greatly influenced by their genetics.

Some can develop a mixed dominance; this is where a child finds they have more control and greater skills for handwriting with say the left hand but prefer and display more precise skills with the right hand in tasks such as using scissors. Studies have shown handedness can be based on the type of muscles used in controlling gross and fine motor skills for completing particular tasks. The control of various muscle types is located in different hemispheres of the brain. Those relating to dexterity (fine motor skills), required for writing, are strongly related to hand dominance, whereas the larger muscle groups (gross motor skills), involving strength, rely less on hand dominance.

Whether a child is right or left-handed does not affect their academic ability or progress, if they have developed and been taught the appropriate key skills. The important thing is not to force particular hand dominance on a child. It will never feel natural for them and the acquisition of gross and fine motor skills will feel awkward and may well appear clumsy, delaying their development, skills ability, confidence and self-esteem.

Only about 1% of the population are truly ambidextrous, which means they are able to perform tasks using either hand with equal skill and proficiency; a rare trait indeed.

Poor hand position can cause a poor pen grip

We often talk about the most appropriate grip for handwriting being the tripod grip; but this usually only refers to finger position. It is easy to forget the importance of the actual hand position in relation to the pen and paper for handwriting.

The ideal position is for the hand, wrist and elbow to be below the tip of the pencil and under the writing line for both left and right-handed writers.

Some children will hold the pencil in a tripod grip but develop a hooked hand position or move the elbow too far up the table, causing the forearm and wrist to be nearly horizontal with the table edge, because they feel they can see what they are writing more clearly.

A hooked grip puts unnecessary strain on the hand ligaments and forces the body into a poor sitting position, again putting extra strain on the body. This in turn makes handwriting a tiring and uncomfortable task, impacting on a child’s overall learning experience.

It takes time to correct a poor hand position but it is well worth the perseverance as it will enable a child to write freely and more comfortably.

When writing normally, encourage children to angle the paper appropriately as this will also help to correct a poor hand position. With the correct paper tilt they will always be able to see what they are writing. If the paper is tilted at the correct angle for them, they will find a hooked hand position, or having their forearm further up the table, more difficult and uncomfortable to maintain.

Some children will find writing on a sloped desk helpful. Not all are comfortable writing or drawing on a flat surface and may benefit from the paper being positioned on an angled or sloped board. If you are not sure, instead of buying a specialist board, you could make one. Try using a ring binder or lever arch file stuffed with magazines and newspaper to make a sloped board. Tape the edges to stop the papers falling out or you could cover it in sticky back plastic to give a smoother finish to the board. The advantage of this is that you can make them to any angle of slope. Try a few to see which, if any, your child prefers. You may find that they only need the sloped board for a short while. It may also help to reduce the angle of the slope over time so that they gradually get used to moving from a sloped to horizontal writing plane.

The Best Pencil Grip for #Handwriting – Tripod Grip

The Dynamic Tripod Grip is still the most appropriate grip for handwriting, for those with good fine motor skills, as it allows the fingers to move freely; so, the writer can form the letters more smoothly.

The following link will take you to the grip section of our ‘Parents’ section of the teachhandwriting.co.uk website where you will find information on the tripod grip for left and right-handed writer: https://teachhandwriting.co.uk/tripod-pencil-grip.html

The Drawbridge Flip Method is a simple way of helping a child pick up a pencil and hold it correctly in the tripod grip for handwriting. This can also be used as a whole class approach to support correct pencil grip development for handwriting.

Follow this link for an instructional video for both left and right-handed writers on how to use the Drawbridge Flip method: https://teachhandwriting.co.uk/whole-class-tripod-pencil-grip-teaching-ks1.html

Drawbridge Flip instructions:

  • Place the pencil on the table in front of the writing hand, so it forms a straight line up the table with the writing tip of the pencil pointing towards you.
  • Then using your thumb and index finger pinch the pencil either side of the shaft about 2 cm up from the tip for a right-handed writer and about 3 cm up for a left-handed writer. Dots or sticker may be placed on the pencil to help thumb and finger placement.
  • Pick the pencil up off the table and place the fingernail of the middle finger on to the pencil just above the tip.
  • Keep the ring and little finger gently curled in.
  • Push down with the middle finger so that the pencil moves up and over like a drawbridge, keep pushing until the pencil is supported in the cup (web of skin that joins the thumb, hand and index finger) and the pencil is resting on the inner edge of middle finger.
  • When writing, the end of the pencil will be angled towards the shoulder for right-handed writers and the elbow for left-handed writers.

Back to School – Ways to Support Your Child’s Pencil Grip Development

After such a long break from school it is good to take some time to check your child has not slipped back into some old, poor pencil grip habits.

Here is a recap of the things which may help them if they are still finding it difficult to form and maintain an appropriate pencil grip.

Remember it is important that you do not force a child to use the tripod grip if they are not developmentally ready. Just because they are starting school doesn’t mean they are ready to hold a pencil in the tripod grip for handwriting.

Have they reached the appropriate stage in their pencil grip development?

Every child develops at a different time and pace; find out which stage of development your child is at: https://teachhandwriting.co.uk/grip-development.html  

Have they been taught, & do they understand, how to form a Tripod pencil grip?

It may have been explained to them, but that does not mean your child has understood. ‘Drawbridge Flip’ videos may help them to learn more easily how to form a tripod grip for handwriting: https://teachhandwriting.co.uk/teaching-tripod-pencil-grip.html

You may our Pencil Grip Frequently Asked Question page helpful:  https://teachhandwriting.co.uk/grip-faq.html

Are they left or right-handed?

If they are of school age and do not have a clear hand dominance this can make it difficult to develop a good pencil grip. Our hand dominance information may help you here: https://teachhandwriting.co.uk/hand-dominance.html

Is your child left-handed? 

If your child is left-handed for writing then you may find this link useful: https://teachhandwriting.co.uk/left-handed.html

You may find our Hand Dominance Frequently Asked Questions page helpful: https://teachhandwriting.co.uk/hand-dominance-faq.html

The Adaptive Tripod Pencil Grip for #Handwriting

The Adaptive Tripod pencil grip is identical to the Dynamic Tripod grip (still considered the most appropriate for handwriting) in that the pencil is held between the tip of the thumb and index finger and rests on the middle finger. The main difference is that the shaft of the pencil rests in the ‘V between the index and middle finger. This gives an open web space which allows the fingers to move freely so that a fluid handwriting style can be achieved.

This grip is often more appropriate for children who have low muscle tone or hyper mobility of the finger joints. It can also benefit older children who:

  • Continue to hold a pencil too tightly
  • Hold the pencil lightly using just their fingertips (often writing using whole arm movements)
  • Hold a pencil with their thumb wrapped around and across the pencil and index finger.

Changing to the Adaptive Tripod grip is not a quick fix for children who have poor hand and finger strength. These strengths still need to be developed to make handwriting more comfortable.

How to form the Adaptive Tripod Grip for Right & Left-handed Writers

From the research I have done I cannot find any information that the grip needs to be adapted for left-handed writers. So, our step by step guide applies to both left and right-handed writers and can be accessed using the following link and scrolling down the page:  http://bit.ly/2XpuI8I

The Best Pencil Grip for #Handwriting – Tripod Grip

Left-handed Writer & Right-handed Writer

The Drawbridge Flip Method is a simple way of helping your child pick up a pencil and hold it correctly in the tripod grip for handwriting.

Follow this link for an instructional video for both left and right-handed writers on how to use the Drawbridge Flip method: https://bit.ly/2JiJrfH

Drawbridge Flip instructions:

  • Place the pencil on the table in front of the writing hand, so it forms a straight line up the table with the writing tip of the pencil pointing towards you.
  • Then using your thumb and index finger pinch the pencil either side of the shaft about 2 cm up from the tip for a right-handed writer and about 3 cm up for a left-handed writer. Dots or sticker may be placed on the pencil to help thumb and finger placement.
  • Pick the pencil up off the table and place the fingernail of the middle finger on to the pencil just above the tip.
  • Keep the ring and little finger gently curled in.
  • Push down with the middle finger so that the pencil moves up and over like a drawbridge, keep pushing until the pencil is supported in the cup (web of skin that joins the thumb, hand and index finger) and the pencil is resting on the inner edge of middle finger.
  • When writing, the end of the pencil will be angled towards the shoulder for right-handed writers and the elbow for left-handed writers.

Paper Position & Tilt are Important for Good Handwriting

The correct paper position and tilt enables your child to handwrite comfortably while being able to see what they are writing. It also allows the non-writing hand to move the paper up the table so that the writing hand elbow can stay in the same position. The aim is to have the paper move up the table, rather than the writing hand moving down and eventually off the table.

As a class teacher I noticed that by the time children were about 8 or 9 years old it was very difficult to encourage them to move the paper up the table as they wrote. They would very often move their writing hand down the table, keeping the paper still, struggling to write properly as their hand hung over the edge of the table. Bad habits start early and can be difficult to change; good paper position and paper movement training at an early age can make such a difference to a child’s handwriting ability.

So why is paper position and tilt often ignored when teaching handwriting?

Maybe it is because experts disagree on what is the most appropriate paper tilt for right and left-handed writers. As there is no clear guidance people become uncomfortable about giving advice and so brush over the value of angling the paper for handwriting.

The most appropriate paper tilt angle is generally suggested as anywhere between 20 to 45 degrees anti-clockwise for right-handed writers and 30 to 45 degrees clockwise for left-handed writers.

For more tips and advice on developing a good paper tilt angle checkout this section of our website: http://bit.ly/2QSssWQ