The Best Type of Paper for Teaching Handwriting

Just as the writing tool used by your child changes as they develop, so does the paper they write on.

Informal Pre-handwriting Pattern and Initial Letter Development

If your child is just starting out on the handwriting adventure then any type of plain paper (no ruled lines) is considered the best option, as many children find it less restrictive.

Young children, due to the stage of their physical development, use large movements to draw (from the shoulder rather than the wrist) which often creates larger shapes and lines; you don’t want to restrict this movement as it can cause handwriting difficulties later. As their gross and fine motor skills develop so does their pencil grip and ability to draw and write at a smaller scale, moving more from the shoulder to elbow and wrist.

Formal Pre-handwriting Pattern and Letter Development

When your child is ready to refine their pre-handwriting pattern skills, or move on to forming letters, it is a good idea to use plain paper. The aim at this stage is to learn how to form the letters correctly, not size or neatness as that comes later (Remember, Big is Beautiful).

Before moving to lined paper, to help your child begin to appreciate letter proportions and positioning, paper with picture clues can be used.

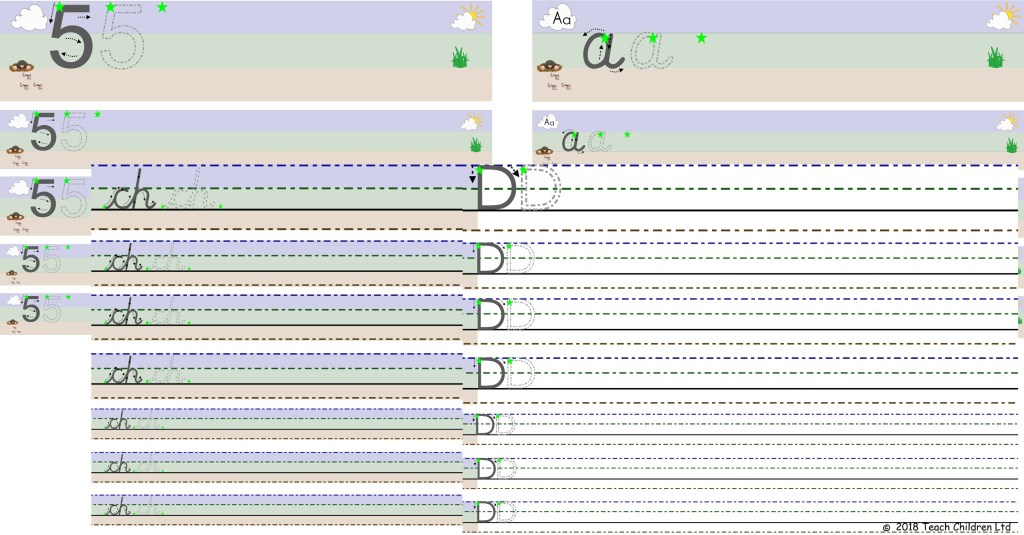
On our website the free writing paper and animations reinforce the idea of letter proportions and positioning by splitting the backgrounds into three colour zones to represent the sky, grass and earth. There are a number of reasons why this can be beneficial:

  • It can create a sub-conscious memory in your child’s mind of where particular letters sit in relation to others without the constraints of lines or obvious boundaries, especially as the picture can be any size. Children remember where to place the sun, grass or worms in their drawings; so why not letters?
  • It can be easier to talk through the formation of how a shape or letter is formed with pictorial and colour clues to guide and inform the direction of the movements required.     
  • As your child’s fine motor skills develop so the size of the picture/colour clues can be reduced to match their progress.

As your child’s fine motor skills develop it enables them to form smaller more refined versions of the letters and this is when it is more appropriate to use lined paper.

Tips for Supporting #Left-handed Writers

Surprisingly there are few differences when teaching left and right-handed children to handwrite. A left-handed child needs a slightly different pencil grip, and needs to hold the pencil slightly higher up the shaft, as well as a different paper position and tilt. Some left-handed children do find handwriting challenging to start with because they naturally want to draw straight lines right to left rather than left to right.

Check out our Left-handed Writers Page for more information and tips on how to support them: https://teachhandwriting.co.uk/left-handed.html

The Most Efficient Pencil Grip for #Handwriting – Tripod Grip

The Dynamic Tripod Grip is still the most efficient grip for handwriting, for those with good fine motor skills, as it allows the fingers to move freely; so, the writer can form the letters more smoothly.

The following link will take you to the grip section of our ‘Parents’ section of the teachhandwriting.co.uk website where you will find information on the tripod grip for left and right-handed writer: https://teachhandwriting.co.uk/tripod-pencil-grip.html

The Drawbridge Flip Method is a simple way of helping a child pick up a pencil and hold it correctly in the tripod grip for handwriting. This can also be used as a whole class approach to support correct pencil grip development for handwriting.

Follow this link for an instructional video for both left and right-handed writers on how to use the Drawbridge Flip method: https://teachhandwriting.co.uk/whole-class-tripod-pencil-grip-teaching-ks1.html

Drawbridge Flip instructions:

  • Place the pencil on the table in front of the writing hand, so it forms a straight line up the table with the writing tip of the pencil pointing towards you.
  • Then using your thumb and index finger pinch the pencil either side of the shaft about 2 cm up from the tip for a right-handed writer and about 3 cm up for a left-handed writer. Dots or sticker may be placed on the pencil to help thumb and finger placement.
  • Pick the pencil up off the table and place the fingernail of the middle finger on to the pencil just above the tip.
  • Keep the ring and little finger gently curled in.
  • Push down with the middle finger so that the pencil moves up and over like a drawbridge, keep pushing until the pencil is supported in the cup (web of skin that joins the thumb, hand and index finger) and the pencil is resting on the inner edge of middle finger.
  • When writing, the end of the pencil will be angled towards the shoulder for right-handed writers and the elbow for left-handed writers.

When to Introduce Joined Handwriting

Here at Teach Children we believe that a child is only ready to start learning to join their handwriting when:

  • They have learnt to form all 26 lower-case letters correctly
  • Letters are of a consistent and suitable size (not necessarily the perfect size, remember big is beautiful)
  • Letters are positioned appropriately on the writing line as well as in relation to one another.

Children generally begin to join letters between the ages of 6 to 7 years old, depending on the handwriting font style being taught. Those taught a continuous cursive font style from the beginning tend to join much earlier due to the nature of this font (for some by the end of their Reception Year).

Children do not need to be able to remember how to correctly form all their capital letters before they are taught how to join their letters. This is because capital letters never join to the lower-case letters in a word (UK). However, for these children correct capital letter formation needs to be taught alongside the introduction of letter joins.

The ultimate aim is for a child to develop a good handwriting style; which means;

  • They can produce and maintain a good speed
  • Have a fluid hand movement that is comfortable
  • Letters are of a consistent and appropriate size, positioned correctly
  • Handwriting is legible (so others can read it easily).

For some children (mainly SEND pupils) this may mean that they will always print or use a single letter form of writing as learning to join is just not appropriate. But that does not mean they will not comply with the bullet points above.