Poor Motor Memory and Visual Memory Skills and Handwriting

Motor memory and visual memory difficulties can have a dramatic effect on a child’s handwriting ability. Possible signs of poor motor memory or visual memory skills can be that their handwriting is slow and deliberate or fast and messy (as they try to hide their letter formation issues), making it difficult to read. They can spend so much time on trying to remember how to form the letters, they have no working memory space left for the important tasks of composing their writing and spelling.

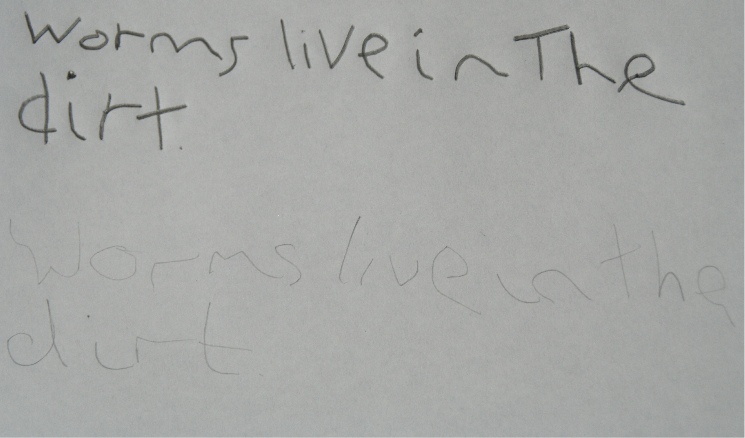
Poor motor memory skills can make handwriting difficult as shapes and letter formation movements are often forgotten, causing letter reversals and incorrectly formed letter shapes, which can make joining a very slow process to learn. A poor and often slow handwriting style can develop as font styles are mixed and capital letters are used inappropriately. Combined, these difficulties can cause poor presentation, spelling and legibility issues.

Poor visual memory skills make handwriting difficult as the ability to recall how letters look and reproduce them with appropriate spacing and positioning is partially or completely lost. This leads to poor letter formation skills, letter reversal along with spelling and presentation difficulties.

Visual memory and motor memory skills are linked and so a game or activity that supports one is likely to support the other.

For games and activities ideas to support and develop these skills use this links: https://teachhandwriting.co.uk/handwriting-motor-skills.html

Handwriting Letter & Word Spacing Issues

Some children find it difficult to space their letters in words correctly and to show spacing between words. There can be a number of reasons for this:

  1. They may not understand the concept or conventions of spacing words and letters and this needs to be explained.
  2. Other Physical Skills such as poor spatial awareness skills, eye tracking or general eyesight.
  3. Poor Key Strengths and/or Key Abilities elements, required for handwriting, such as sitting position, paper position, pencil grip, hand position and letter formation knowledge may also be hindering them.

 ‘Tips to support letter and word spacing’ will help you to identify if your child is having difficulty in understanding the spacing conventions and how to support them: https://teachhandwriting.co.uk/spacing-difficulties.html

Games and activity ideas to develop a child’s physical skills for handwriting: https://teachhandwriting.co.uk/handwriting-motor-skills.html

Too much Pressure or not Enough – #Handwriting?

Some children may hold a pencil correctly but struggle to maintain and control the pressure required to handwrite.

Here are some additional tips to help support a child who is pressing down too hard with their pencil:

Focused games and activities can develop both the physical strength and sensory perception areas.

  • Make sure that the pencil isn’t gripped too close to the tip of the pencil (check out the how to teach section for more information).
  • Play dough writing – flatten a large piece of play dough/clay on to a desk and using a pencil write or draw onto it. The idea is to create smooth lines, not torn ones, which pressing too hard will create. The advantage of this activity is it gives a child instant feedback about whether they are pressing too hard or not. When a good pressure has been found ask the child to try doing it with their eyes closed and talk through how their body feels when they are using the right amount of pressure.
  • Corrugated card – place some corrugated card under the writing paper – the aim is to try not to flatten the bumps in the card.
  • Tin foil writing board – wrap a piece of card in tin foil and place the paper on top, the aim is to not rip the foil when writing.
  • Carbon copies – use carbon paper to create an extra copy, start with two or three sheets of paper on top of the carbon paper then move to two and then one, so that your child starts developing an understanding of how much pressure is needed for a task and how that feels. Talk through with them how it feels as they need less pressure to create a copy.
  • Pattern work – look at and discuss light and dark line patterns and how to create them. Then using different writing tools ask the child to try and create their own. Talk through how it feels when they are making dark lines compared to faint/pale colour lines using the same pencil or crayon.

Here are some additional tips to help support a child who is Not pressing down hard enough with their pencil:

Focused games and activities can help develop the physical strength and sensory perception areas.

  • Crayon rubbings – when a good pressure has been found ask the child to try doing it with their eyes closed and talk through how their body feels when they are using the right amount of pressure.
  • Wax drawings – rub a wax crayon all over a piece of paper then turn it over on to a plain piece of paper. Draw on the back of the wax crayoned paper and when finished lift and see another copy of the picture. The greater the pressure the more complete the hidden picture will appear.
  • Carbon copies – use carbon paper to create an extra copy, start with one sheet of paper on top of the carbon paper then move to two so that the child starts to develop an understanding of how much pressure is needed for a task and how that feels.
  • Use a softer pencil such as a B6 or B4 and slowly change the pencils so that they work up to a HB. Each pencil change will mean they have to exert a little more pressure to create the same line mark. B marked pencils are softer than H.
  • Pattern work – look at and discuss light and dark line patterns and how to create them. Then using different writing tools ask the child to try and create their own. Talk through how it feels when they are making dark lines compared to faint/pale colour lines using the same pencil or crayon.

Hand Swapping Issues?

Hand Swapping is a normal developmental stage in infants and young children and therefore, at this stage, not a sign that a child is uncertain of their dominant hand. However, this is not ideal for a child who has started school.

Hand swapping throughout a task is not necessarily a sign that a child is uncertain of their dominant hand.

There are two routes to tackling the hand swapping issue, the one to use depends on your answers to the following questions.

1. Does the child usually start with the one hand and then swap when that hand gets tired?

You can usually tell if this is the case because they may shake out or rub the tired hand and once it is rested go back to using it again. This is probably because their fine motor skills are weak. Through focused games and activities (https://teachhandwriting.co.uk/handwriting-muscles.html#hand ), the muscle strength and dexterity can be gradually built up in the dominant hand, which in turn will build their stamina so that the hand swapping will reduce until they stop it altogether.

Once you are sure of dominance gently discourage swapping hands by taking a break from the activity and coming back to it a couple of minutes later using the preferred hand.

2. Does the child use their left hand if items are presented on their left-hand side and their right hand if they are presented on the right-hand side?

In toddlers and young children this is expected. In older children however it could mean that they have developed a delay in their skill to cross the mid-line point. This developmental bilateral coordination skill is vital to develop and can be addresses through a range of simple games and activities (https://teachhandwriting.co.uk/handwriting-muscles.html#bilat ).

Poor hand position can cause a poor pen grip

We often talk about the most appropriate grip for handwriting being the tripod grip; but this usually only refers to finger position. It is easy to forget the importance of the actual hand position in relation to the pen and paper for handwriting.

The ideal position is for the hand, wrist and elbow to be below the tip of the pencil and under the writing line for both left and right-handed writers.

Some children will hold the pencil in a tripod grip but develop a hooked hand position or move the elbow too far up the table, causing the forearm and wrist to be nearly horizontal with the table edge, because they feel they can see what they are writing more clearly.

A hooked grip puts unnecessary strain on the hand ligaments and forces the body into a poor sitting position, again putting extra strain on the body. This in turn makes handwriting a tiring and uncomfortable task, impacting on a child’s overall learning experience.

It takes time to correct a poor hand position but it is well worth the perseverance as it will enable a child to write freely and more comfortably.

When writing normally, encourage children to angle the paper appropriately as this will also help to correct a poor hand position. With the correct paper tilt they will always be able to see what they are writing. If the paper is tilted at the correct angle for them, they will find a hooked hand position, or having their forearm further up the table, more difficult and uncomfortable to maintain.

Some children will find writing on a sloped desk helpful. Not all are comfortable writing or drawing on a flat surface and may benefit from the paper being positioned on an angled or sloped board. If you are not sure, instead of buying a specialist board, you could make one. Try using a ring binder or lever arch file stuffed with magazines and newspaper to make a sloped board. Tape the edges to stop the papers falling out or you could cover it in sticky back plastic to give a smoother finish to the board. The advantage of this is that you can make them to any angle of slope. Try a few to see which, if any, your child prefers. You may find that they only need the sloped board for a short while. It may also help to reduce the angle of the slope over time so that they gradually get used to moving from a sloped to horizontal writing plane.