Is your child reluctant to handwrite or has a poor writing speed?

There are a number of possible reasons why a child may reluctant to write or have a poor writing speed. Over the last few months, we have looked at a number of these:

  • Having the right writing tool
  • Hand swapping
  • Letter and word spacing
  • Too much or not enough pressure
  • Visual and Motor Memory issues
  • Spatial Awareness and eye tracking issues
  • Copying from the board

Other key areas to look at we have also cover are:

  • Sitting correctly and why they may find this difficult.
  • The importance of learning to position and tilt the paper appropriately.
  • Pencil grip – is the grip appropriate for their age and ability and when to support them.
  • Having the writing hand under the writing line.
  • Learning to write their letter correctly.

Tips for a Child who Actively Avoids, or is Reluctant, to do Writing or Drawing Activities

  • Best tip – Don’t force them, the more you push the more reluctant they will become.
  • Assess their physical ability.
  • If weaknesses are found play the games that will build the appropriate muscles groups.
  • Develop directional skills and shape formation through activities that don’t require a pencil so that they are still developing their motor memory skills which will help them later on when they do start to draw and write.
  • When ready, try timed drawing and writing activities after your child has had a good run around or physical activity (but not when they are tired).
  • Set up a good writing environment where they are sitting comfortably and without distractions, such as the TV.
  • Correct poor posture and keep the activity short. One minute of happy drawing is better than no minutes.
  • Try a ‘Playtime Drawing /Writing Session’ (see below).
  • End the sessions with a fun activity or treat.
  • This will take time, patience and encouragement, each improvement, no matter how small, needs to be recognised and positively praised.
  • Remember as your child’s skills develop so does their confidence to try, and their self-esteem, as they succeed where once they felt they failed.

How to Organise a Playtime Drawing/Writing Session

  • When ready, try timed drawing or writing activities after your child has had a good run around or other physical activity (but not when they are tired).
  • Set up a good writing environment where they are sitting comfortably and without distraction, such as having the TV on.
  • Correct poor posture and keep the activity short – up to 5 minutes initially. However, one minute of happy drawing/writing is better than no minutes.
  • After the drawing/writing play a non-drawing activity or game with your child. Make this break between 3 and 5 minutes long, ensuring your child knows when it will end (use a timer so they can see when they will need to stop)
  • Return to the original drawing/writing activity for up to another 5 minutes.
  • End the sessions with a fun activity or treat.

Tips on Running the Session

  • Start with 2 drawing/writing activities and then slowly increase the drawing/writing time and/or the number of activities and reduce the playtime slot times.
  • You could try to do a couple of these kind of sessions at different times during the day.
  • It may take time for your child to be comfortable with the sessions. You need to show a lot of patience and encouragement, each improvement no matter how small needs to be recognised and positively praised.
  • Remember as your child’s skills develop so does their confidence to try and their self-esteem grows as they succeed where once they felt they failed.
Alternative Efficient Pencil Grips for Handwriting

Here at Teach Children Ltd we feel this a good definition of an efficient pencil grip for handwriting:

“A pencil hold that provides speed, legibility is comfortable and will not cause harm to the joints of the hand over time. If a hold satisfies these criteria there is no need to change it”

(Benrow 2002, cited: Foundation of Paediatric Practice for the Occupational Therapy Assistant, 2005)

The above publication, and those listed at the end of the articles, explain that there are three efficient pencil grips for handwriting:

1. The Dynamic Tripod Grip (https://teachhandwriting.co.uk/teaching-tripod-pencil-grip.html), is still the most appropriate grip for handwriting (‘Drawbridge Flip’ method), for those with good fine motor skills, as it allows the fingers to move freely; so, the writer can form the letters more smoothly.

2. The Quadrupod Grip (stage 4 of pencil grip development – https://teachhandwriting.co.uk/pencil-grip-development-foundation-stage.html), this grip is a little more restrictive because the fingers cannot move as freely as they would if using the Tripod grip.

However, if the child is complaining that their hand or fingers hurt or ache when they use the Quadrupod Grip, or that it is hindering their handwriting fluidity and speed, then we do need to support them in changing their grip. For some it may be more appropriate to introduce them to the Adaptive Tripod Grip rather than trying to force them to use the Dynamic Tripod Grip.

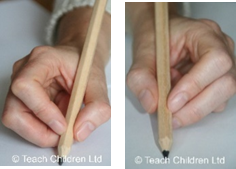
3. The Adaptive Tripod Grip (https://teachhandwriting.co.uk/adaptive-tripod-grip.html) , developed by the Belgian Neurologist Callewaert in 1963 (cited, Ann-Sofie Selin 2003) is a functional though not conventional grip for handwriting. This grip is often more appropriate to use with children who have low muscle tone or hyper mobility of the finger joints. It can also benefit older children who continue to hold a pencil too tightly, or who hold the pencil lightly using just their fingertips (often writing using whole arm movements), as well as those children who hold a pencil with their thumb wrapped around and across the pencil and index finger.

Changing to the Adaptive Tripod grip is not a quick fix for children who have poor hand and finger strength. These strengths still need to be developed to make handwriting more comfortable.

Bibliography

Ann-Sofie Selin, 2003: Pencil Grip A Descriptive Model and Four Empirical Studies; Abo Akademi University Press

A Wagenteld, J Kaldenberg (co-editors), 2005: Foundation of Paediatric Practice for the Occupational Therapy Assistant; Pub: Slack Incorporated, ISBN-10:1-55642-629-1

Web-sites:

https://www.ot-mom-learning-activities.com/correct-pencil-grasp.html

https://www.otplan.com/articles/pencil-grasp-patterns.aspx

The Most Efficient Pencil Grip for #Handwriting – Tripod Grip

The Dynamic Tripod Grip is still the most efficient grip for handwriting, for those with good fine motor skills, as it allows the fingers to move freely; so, the writer can form the letters more smoothly.

The following link will take you to the grip section of our ‘Parents’ section of the teachhandwriting.co.uk website where you will find information on the tripod grip for left and right-handed writer: https://www.teachhandwriting.co.uk/tripod-pencil-grip.html

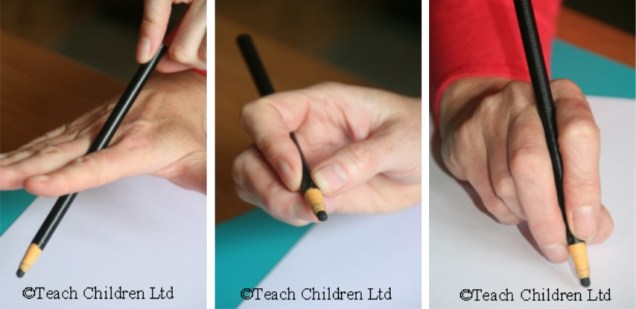
The Drawbridge Flip Method is a simple way of helping a child pick up a pencil and hold it correctly in the tripod grip for handwriting. This can also be used as a whole class approach to support correct pencil grip development for handwriting.

Follow this link for an instructional video for both left and right-handed writers on how to use the Drawbridge Flip method https://www.teachhandwriting.co.uk/whole-class-tripod-pencil-grip-teaching-ks1.html

Drawbridge Flip instructions:

  • Place the pencil on the table in front of the writing hand, so it forms a straight line up the table with the writing tip of the pencil pointing towards you.
  • Then using your thumb and index finger pinch the pencil either side of the shaft about 2 cm up from the tip for a right-handed writer and about 3 cm up for a left-handed writer. Dots or sticker may be placed on the pencil to help thumb and finger placement.
  • Pick the pencil up off the table and place the fingernail of the middle finger on to the pencil just above the tip.
  • Keep the ring and little finger gently curled in.
  • Push down with the middle finger so that the pencil moves up and over like a drawbridge, keep pushing until the pencil is supported in the cup (web of skin that joins the thumb, hand and index finger) and the pencil is resting on the inner edge of middle finger.
  • When writing, the end of the pencil will be angled towards the shoulder for right-handed writers and the elbow for left-handed writers.

Alternative Efficient Pencil Grips for Handwriting

Here at Teach Children Ltd we feel this a good definition of an efficient pencil grip for handwriting:

“A pencil hold that provides speed, legibility is comfortable and will not cause harm to the joints of the hand over time. If a hold satisfies these criteria there is no need to change it”

(Benrow 2002, cited: Foundation of Paediatric Practice for the Occupational Therapy Assistant, 2005)

The above publication, and those listed at the end of the articles, explain that there are three efficient pencil grips for handwriting:

1. The Dynamic Tripod Grip (https://teachhandwriting.co.uk/teaching-tripod-pencil-grip.html), is still the most appropriate grip for handwriting (‘Drawbridge Flip’ method), for those with good fine motor skills, as it allows the fingers to move freely; so, the writer can form the letters more smoothly.

2. The Quadrupod Grip (stage 4 of pencil grip development – https://teachhandwriting.co.uk/pencil-grip-development-foundation-stage.html), this grip is a little more restrictive because the fingers cannot move as freely as they would if using the Tripod grip.

However, if the child is complaining that their hand or fingers hurt or ache when they use the Quadrupod Grip, or that it is hindering their handwriting fluidity and speed, then we do need to support them in changing their grip. For some it may be more appropriate to introduce them to the Adaptive Tripod Grip rather than trying to force them to use the Dynamic Tripod Grip.

3. The Adaptive Tripod Grip (https://teachhandwriting.co.uk/adaptive-tripod-grip.html) , developed by the Belgian Neurologist Callewaert in 1963 (cited, Ann-Sofie Selin 2003) is a functional though not conventional grip for handwriting. This grip is often more appropriate to use with children who have low muscle tone or hyper mobility of the finger joints. It can also benefit older children who continue to hold a pencil too tightly, or who hold the pencil lightly using just their fingertips (often writing using whole arm movements), as well as those children who hold a pencil with their thumb wrapped around and across the pencil and index finger.

Changing to the Adaptive Tripod grip is not a quick fix for children who have poor hand and finger strength. These strengths still need to be developed to make handwriting more comfortable.

Bibliography

Ann-Sofie Selin, 2003: Pencil Grip A Descriptive Model and Four Empirical Studies; Abo Akademi University Press

A Wagenteld, J Kaldenberg (co-editors), 2005: Foundation of Paediatric Practice for the Occupational Therapy Assistant; Pub: Slack Incorporated, ISBN-10:1-55642-629-1

Web-sites:

https://www.ot-mom-learning-activities.com/correct-pencil-grasp.html

https://www.otplan.com/articles/pencil-grasp-patterns.aspx

Alternative Pencil Grips for Handwriting

We thought we would re-run this series of articles due to the number of questions we receive regarding pencil grips and what is OK or NOT.

What is an efficient pencil grip?

“A pencil hold that provides speed, legibility is comfortable and will not cause harm to the joints of the hand over time. If a hold satisfies these criteria there is no need to change it”

(Benrow 2002, cited: Foundation of Paediatric Practice for the Occupational Therapy Assistant, 2005)

The above publication, and those listed at the end of the articles, explain that there are three efficient pencil grips for handwriting:

1. The Dynamic Tripod Grip is still the most appropriate grip for handwriting (we looked at this last week using our ‘Drawbridge Flip’ method), for those with good fine motor skills, as it allows the fingers to move freely; so the writer can form the letters more smoothly.

2. The Quadrupod Grip, this grip is a little more restrictive because the fingers cannot move as freely as they would if using the Tripod grip.

3. The Adaptive Tripod Grip, developed by the Belgian Neurologist Callewaert in 1963 (cited, Ann-Sofie Selin 2003) is a functional though not conventional grip for handwriting. This grip is often more appropriate to use with children who have low muscle tone or hyper mobility of the finger joints. It can also benefit older children who continue to hold a pencil too tightly, or who hold the pencil lightly using just their fingertips (often writing using whole arm movements), as well as those children who hold a pencil with their thumb wrapped around and across the pencil and index finger.

Bibliography

Ann-Sofie Selin, 2003: Pencil Grip A Descriptive Model and Four Empirical Studies; Abo Akademi University Press

A Wagenteld, J Kaldenberg (co-editors), 2005: Foundation of Paediatric Practice for the Occupational Therapy Assistant; Pub: Slack Incorporated, ISBN-10:1-55642-629-1

Web-sites:

https://www.ot-mom-learning-activities.com/correct-pencil-grasp.html

https://www.otplan.com/articles/pencil-grasp-patterns.aspx

The Most Efficient Pencil Grip for #Handwriting – Tripod Grip

The Dynamic Tripod Grip is still the most efficient grip for handwriting, for those with good fine motor skills, as it allows the fingers to move freely; so, the writer can form the letters more smoothly.

The following link will take you to the grip section of our ‘Parents’ section of the teachhandwriting.co.uk website where you will find information on the tripod grip for left and right-handed writer: https://teachhandwriting.co.uk/tripod-pencil-grip.html

The Drawbridge Flip Method is a simple way of helping a child pick up a pencil and hold it correctly in the tripod grip for handwriting. This can also be used as a whole class approach to support correct pencil grip development for handwriting.

Follow this link for an instructional video for both left and right-handed writers on how to use the Drawbridge Flip method: https://teachhandwriting.co.uk/whole-class-tripod-pencil-grip-teaching-ks1.html

Drawbridge Flip instructions:

• Place the pencil on the table in front of the writing hand, so it forms a straight line up the table with the writing tip of the pencil pointing towards you.

• Then using your thumb and index finger pinch the pencil either side of the shaft about 2 cm up from the tip for a right-handed writer and about 3 cm up for a left-handed writer. Dots or sticker may be placed on the pencil to help thumb and finger placement.

• Pick the pencil up off the table and place the fingernail of the middle finger on to the pencil just above the tip.

• Keep the ring and little finger gently curled in.

• Push down with the middle finger so that the pencil moves up and over like a drawbridge, keep pushing until the pencil is supported in the cup (web of skin that joins the thumb, hand and index finger) and the pencil is resting on the inner edge of middle finger.

• Then writing, the end of the pencil will be angled towards the shoulder for right-handed writers and the elbow for left-handed writers.

What is an efficient pencil grip?

“A pencil hold that provides speed, legibility is comfortable and will not cause harm to the joints of the hand over time. If a hold satisfies these criteria there is no need to change it”

(Benrow 2002, cited: Foundation of Paediatric Practice for the Occupational Therapy Assistant, 2005)

The above publication, and those listed at the end of the articles, explain that there are three efficient pencil grips for handwriting:

1. The Dynamic Tripod Grip is still the most appropriate grip for handwriting (we looked at this last week using our ‘Drawbridge Flip’ method), for those with good fine motor skills, as it allows the fingers to move freely; so, the writer can form the letters more smoothly.

2. The Quadrupod Grip, this grip is a little more restrictive because the fingers cannot move as freely as they would if using the Tripod grip.

3. The Adaptive Tripod Grip, developed by the Belgian Neurologist Callewaert in 1963 (cited, Ann-Sofie Selin 2003) is a functional though not conventional grip for handwriting. This grip is often more appropriate to use with children who have low muscle tone or hyper mobility of the finger joints. It can also benefit older children who continue to hold a pencil too tightly, or who hold the pencil lightly using just their fingertips (often writing using whole arm movements), as well as those children who hold a pencil with their thumb wrapped around and across the pencil and index finger.

Bibliography

Ann-Sofie Selin, 2003: Pencil Grip A Descriptive Model and Four Empirical Studies; Abo Akademi University Press

A Wagenteld, J Kaldenberg (co-editors), 2005: Foundation of Paediatric Practice for the Occupational Therapy Assistant; Pub: Slack Incorporated, ISBN-10:1-55642-629-1

Web-sites:

https://www.ot-mom-learning-activities.com/correct-pencil-grasp.html

https://www.otplan.com/articles/pencil-grasp-patterns.aspx

https://www.pediastaff.com/resources-pencil-grasp-patterns–may-2009

The Most Efficient Pencil Grip for #Handwriting – Tripod Grip

The Dynamic Tripod Grip is still the most efficient grip for handwriting, for those with good fine motor skills, as it allows the fingers to move freely; so, the writer can form the letters more smoothly.

The following link will take you to the grip section of our ‘Parents’ section of the teachhandwriting.co.uk website where you will find information on the tripod grip for left and right-handed writer: https://teachhandwriting.co.uk/tripod-pencil-grip.html

The Drawbridge Flip Method is a simple way of helping a child pick up a pencil and hold it correctly in the tripod grip for handwriting. This can also be used as a whole class approach to support correct pencil grip development for handwriting.

Follow this link for an instructional video for both left and right-handed writers on how to use the Drawbridge Flip method: https://teachhandwriting.co.uk/whole-class-tripod-pencil-grip-teaching-ks1.html

Drawbridge Flip instructions:

  • Place the pencil on the table in front of the writing hand, so it forms a straight line up the table with the writing tip of the pencil pointing towards you.
  • Then using your thumb and index finger pinch the pencil either side of the shaft about 2 cm up from the tip for a right-handed writer and about 3 cm up for a left-handed writer. Dots or sticker may be placed on the pencil to help thumb and finger placement.
  • Pick the pencil up off the table and place the fingernail of the middle finger on to the pencil just above the tip.
  • Keep the ring and little finger gently curled in.
  • Push down with the middle finger so that the pencil moves up and over like a drawbridge, keep pushing until the pencil is supported in the cup (web of skin that joins the thumb, hand and index finger) and the pencil is resting on the inner edge of middle finger.
  • When writing, the end of the pencil will be angled towards the shoulder for right-handed writers and the elbow for left-handed writers.

Alternative Pencil Grips for Handwriting

We thought we would re-run this article due to the number of questions we receive regarding pencil grips and what is OK or NOT.

What is an efficient pencil grip?

“A pencil hold that provides speed, legibility is comfortable and will not cause harm to the joints of the hand over time. If a hold satisfies these criteria there is no need to change it”

(Benrow 2002, cited: Foundation of Paediatric Practice for the Occupational Therapy Assistant, 2005)

The above publication, and those listed at the end of the articles, explain that there are three efficient pencil grips for handwriting:

1. The Dynamic Tripod Grip is still the most appropriate grip for handwriting (we looked at this last week using our ‘Drawbridge Flip’ method), for those with good fine motor skills, as it allows the fingers to move freely; so, the writer can form the letters more smoothly.

2. The Quadrupod Grip, this grip is a little more restrictive because the fingers cannot move as freely as they would if using the Tripod grip.

3. The Adaptive Tripod Grip, developed by the Belgian Neurologist Callewaert in 1963 (cited, Ann-Sofie Selin 2003) is a functional though not conventional grip for handwriting. This grip is often more appropriate to use with children who have low muscle tone or hyper mobility of the finger joints. It can also benefit older children who continue to hold a pencil too tightly, or who hold the pencil lightly using just their fingertips (often writing using whole arm movements), as well as those children who hold a pencil with their thumb wrapped around and across the pencil and index finger.

Bibliography

Ann-Sofie Selin, 2003: Pencil Grip A Descriptive Model and Four Empirical Studies; Abo Akademi University Press

A Wagenteld, J Kaldenberg (co-editors), 2005: Foundation of Paediatric Practice for the Occupational Therapy Assistant; Pub: Slack Incorporated, ISBN-10:1-55642-629-1

The Adaptive Tripod Pencil Grip for #Handwriting

The Adaptive Tripod pencil grip is identical to the Dynamic Tripod grip (still considered the most appropriate for handwriting) in that the pencil is held between the tip of the thumb and index finger and rests on the middle finger. The main difference is that the shaft of the pencil rests in the ‘V between the index and middle finger. This gives an open web space which allows the fingers to move freely so that a fluid handwriting style can be achieved.

This grip is often more appropriate for children who have low muscle tone or hyper mobility of the finger joints. It can also benefit older children who:

  • Continue to hold a pencil too tightly
  • Hold the pencil lightly using just their fingertips (often writing using whole arm movements)
  • Hold a pencil with their thumb wrapped around and across the pencil and index finger.

Changing to the Adaptive Tripod grip is not a quick fix for children who have poor hand and finger strength. These strengths still need to be developed to make handwriting more comfortable.

How to form the Adaptive Tripod Grip for Right & Left-handed Writers

From the research I have done I cannot find any information that the grip needs to be adapted for left-handed writers. So, our step by step guide applies to both left and right-handed writers and can be accessed using the following link and scrolling down the page:  http://bit.ly/2XpuI8I