Hand Dominance!

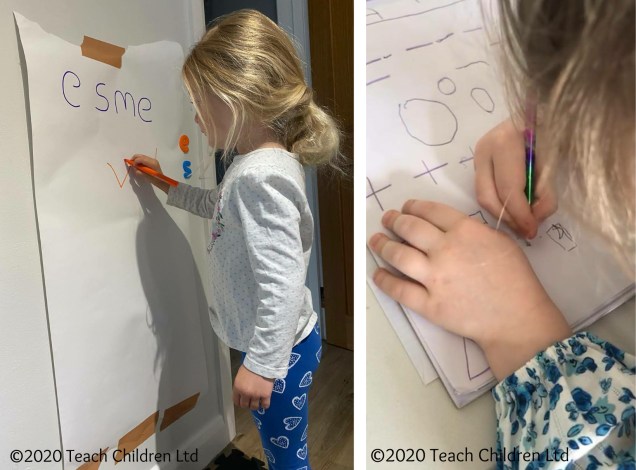
Hand dominance is where one hand has more influence or control than the other. This is sometimes referred to as hand preference, where one hand is preferred or chosen over the other, as it is more reliable in performing a range of skilled activities (handedness).

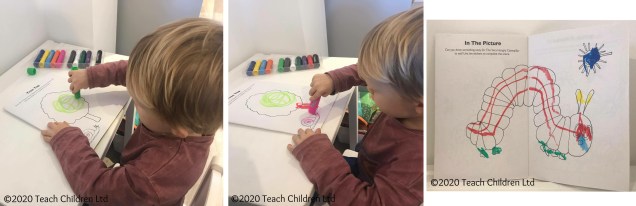
Children tend to develop hand dominance between the ages of 3-5 years old, for some it may be slightly later and for a few it does not become a subconscious decision until they are 8 or 9 years old. Many children will naturally develop a clear right or left-hand dominance which is greatly influenced by their genetics.

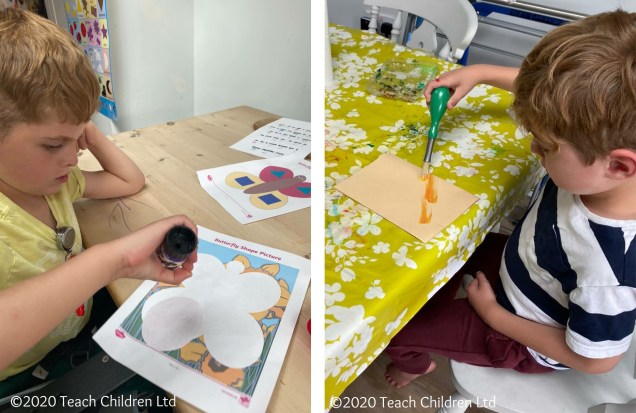
Some can develop a mixed dominance; this is where a child finds they have more control and greater skills for handwriting with say the left hand but prefer and display more precise skills with the right hand in tasks such as using scissors. Studies have shown handedness can be based on the type of muscles used in controlling gross and fine motor skills for completing particular tasks. The control of various muscle types is located in different hemispheres of the brain. Those relating to dexterity (fine motor skills), required for writing, are strongly related to hand dominance, whereas the larger muscle groups (gross motor skills), involving strength, rely less on hand dominance.

Whether a child is right or left-handed does not affect their academic ability or progress, if they have developed and been taught the appropriate key skills. The important thing is not to force particular hand dominance on a child. It will never feel natural for them and the acquisition of gross and fine motor skills will feel awkward and may well appear clumsy, delaying their development, skills ability, confidence and self-esteem.

Only about 1% of the population are truly ambidextrous, which means they are able to perform tasks using either hand with equal skill and proficiency; a rare trait indeed.

Our link to games ideas to help develop and support hand dominance: https://teachhandwriting.co.uk/hand-dominance.html

The Five Stages of Pencil Grip Development

There are 5 developmental stages, that a child needs to go through, before they can successfully use a mature tripod grip. They need to work through each stage and as their hand, shoulder and arm strength and mobility increases so does their ability to move to the next developmental stage of the grip. Children develop through these grip stages over time with new experiences using different tools and drawing/writing mediums especially in the early years (0 to 4 years old).

You will find that young children will move between, or have slightly different versions of, the grips depending on the task or the effect they are trying to achieve. This is exactly what we want to happen.

Stage 1. Palmer-supinate grasp

Holds the crayon/pencil in fist (whole hand) like a dagger. They use whole arm movements from the shoulder to mark-make. Due to this whole arm movement they prefer to work on a vertical surface.

Stage 2. Palmer or digital-pronate grasp

Holds a crayon/pencil with the palm of the hand facing down towards the paper. The crayon/pencil is held by all finger and the thumb. The movement comes from the shoulder and elbow. Again, due to the way the arm moves a vertical surface is preferred.

Stage 3. Four finger and thumb grip

Holds the crayon/pencil between the thumb and four fingers with the crayon/pencil nearly vertical up right position. Movement comes from the elbow and wrist.

Stage 4. Static Quadruped or tripod grip

Holds the pencil in very nearly in the correct position however the web space is narrower than it would be if held in a mature tripod grip. This means that the movement is coming from the wrist and large finger movements.

Stage 5. Mature/Dynamic tripod grip

This is traditionally considered the most appropriate pencil grip for handwriting. Holding the pencil between the thumb and index finger with pencil supported on the middle finger. The ring and little fingers are gently curled inwards. This gives an open wide web space which means the movement comes from the fingers.

For more information on the five stages of pencil grip development click on the following link: https://teachhandwriting.co.uk/grip-development.html    

Case Studies

For example, young Billy here is using a variation of a stage 1 – 3 throughout these colouring activities:

In this example it might look as if Billy has gone backwards in his grip development but he has not, he has learnt that the grip he is using offers him greater control:

Young William here is using different variations of stages 2 and 3 for gluing and painting activities:

Esme and Issy have both moved to stage 4 although for some activities such as drawing/painting they may use a different grip, but that is what we would expect to see.

How Poor Eye Tracking and Spatial Awareness Skills Impact on #Handwriting!

Eye tracking and/or spatial awareness difficulties can have a dramatic effect on a child’s handwriting ability.  Weak skills in these key areas make it difficult for children to form letters correctly (curves and lines often not joining to complete the letter shape), as well as being unable to appropriately space letters in words and words in sentences. Other poor presentation skills include being unable to write on lines and often missing lines out when following on with a sentence.

It is also worth pointing out that a child with poor eye tracking and/or spatial awareness skills will also find reading difficult.

Eye tracking is the ability to control and coordinate the fine eye movements needed:

  • For left to right eye movements, without moving the head, needed to follow a line of writing as the letters are formed or for reading a line of print.
  • To focus and move the eyes to follow an object without moving the head, in all directions.
  • To track/follow objects near and far.
  • To focus on one object without moving the eyes.

Poor eye tracking skills can make handwriting very difficult, causing letter formation, spacing and positioning problems, leading to poor presentation. Often words are missed out or repeated, causing composition and legibility issues.

Activities that help to build these strengths and skills are: Swing Ball, target games and catching games.

Game idea: Goal post skittles

You need: Posts/marker, large plastic drink bottles/skittles and a range of ball sizes.

How to do it:

Place the posts about 2 metres away from the start position and about half a metre apart. Place the skittles about half a metre behind the posts but directly between them. The child starts by rolling a large ball through the posts to knock the skittles over. Before they roll the ball explain to get a maximum score, they need to knock all the skittles over in one roll and that the best way to do this is to look directly ahead through the posts at the skittles, NOT at the ball or their hand.

It may take a little practise, as they improve, they can use a different size ball or move the skittles so that they form different patterns which means they have to be more accurate with the roll.

This game can also be used as a foot and eye activity, the same rules apply, they must look to where they want the ball to end up not at their feet or the ball, tricky!

Spatial awareness is the ability to be aware of:

  • The space around you and your position in that space.
  • The position and relationship of other objects in relation to one another and yourself.

Poor spatial awareness skills make handwriting difficult as it affects the ability to understand and produce the directional pushes and pulls required to form letters; as well as difficulties with spacing and positioning. Combined, these difficulties can cause poor presentation and possible legibility issues.

Activities that help to build these strengths and skills are: games such as ‘Twister’ or ‘Simon Says’ and jigsaws and pattern making.

Games idea: Pattern making

You need: Beads, building blocks, Lego or shapes.

How to do it:

Talk through the process of making the same pattern as shown on a card or already produced; for instance, the red square goes on the right of the blue square and the yellow square is below the blue square. Ask the child to verbalise what they see and are doing to recreate the pattern.

Patterns can be created and copied with all sorts of items – beads, building blocks, Lego and shapes.

As skill levels improve tessellation (a pattern of shapes that fit perfectly together) activities and square or patterned paper for colouring and creating their own pattern designs are enjoyable.

Why do children often find it difficult to start the next line of writing at the margin?

Always starting the next line of writing at the margin can be a real challenge for many children.

It doesn’t matter how many times we explain to the children that they need to start each line at, or close to, the margin as they write further down the page the further away from the margin they seem to get!

In desperation we may even start to put coloured dots into the margin to show them were to go back too, but again this seldom works. Why is this?

Well often it is because the child has not tilted their paper and is not moving the paper up the table as they write.

This means that, as the child writes their writing hand movies down the page (often until they reach the end of the table) and their elbow moves back behind their body.  As this happens, they will also tend to move back away from the table slightly.  The result being that as they move down to the next line their body is physically starting to blocking them from returning to the margin. So, they start to write at a point that they physically are able to reach, moving further away from the margin the further down the page they go.

Once a child is taught to tilt and move the paper up the table with the writing hand under the writing line, this cannot happen as the writing hand stays in virtually the same position throughout the writing task. Which means they can see where they have finished a line and the margin of the line underneath.

Handwriting Really Starts with Play

Learning to handwrite does not start with pen and paper but through play, as children explore shape and motion (how the body moves) through their senses – touch, sight and body awareness. Play is such an important element of your child’s physical, emotional, social and academic development.

Young children learn many of the directional pushes, pulls and changes in direction, required for handwriting, on a much larger scale, long before they pick up a pencil, through playing with cars or pretending to cook. These movements become the drawings/scribbles which young children form once they start mark-making, initially as big uncontrolled movements then becoming more controlled and smaller as their gross and fine motor skills develop.

It is through play that you can really engage your child in learning how to correctly form pre-handwriting patterns and letters (the start points, orientation, directional movements and finish points).

Our non-pencil – ‘Big to Small’ activities are an easy fun way to start developing these skills early on through play: https://teachhandwriting.co.uk/big-to-small.html   

Young children love seeing their name so it is a great way to introduce letter formation; here are some other fun ideas:

  • This activity can be done indoors on large sheets of paper or using chalk on a path or patio (the beach is also a great place to do this). Write your child’s name very big and make a mark on each letter that represents a start point (an arrow showing the direction of travel can also help). Remember to use a capital letter for the first letter of their name and we would suggest lower case letters for the remaining letters. Use the letters as a track for racing cars or toys. If you make the letters big enough your child could walk, hop, jump or skip around the letters. To help them remember the letters, once they have finished a letter, encourage them to say that letter‘s alphabet name (NOT a sound the letter can make).
  • Collect stones, twigs, leaves, etc…  Use them to make the letters of your child’s name. They may only make one or two of the letters, before making a hedgehog house, nest or den for their toys becomes more interesting, but this does not matter, it is all part of the adventure.
  • Feely bag games are a fun way to explore shape and form. Try placing the letters of your child’s name into a bag or box they cannot see into. It is useful to talk through the letter shapes beforehand so they can see them as they move them about in their hands; then place them in the bag. Ask them to put their hands in (both hands, if possible, but if not, then use the dominant hand) the bag, picks up a letter, feels it, identifies it and pulls it out to check only AFTER identifying it. If correct, they get to “keep” it, if wrong, you get to “keep” it. The winner is the one with the most letters at the end. For some children it can help to have another set of the letters outside the bag to help them identify the shape they are handling in the bag. Again, encourage them to use the alphabet name of the letter.
  • Play-dough, clay and Plasticine activities are great for developing hand strength for handwriting and learning how to form letter shapes.

Your child will love these sort of activities as they see it as just playing and they get your undivided attention. You will enjoy it as you are sharing quality time with your child helping them to develop more than just their letter formation ability but also their communication and social skills.

Learning through play is a powerful way of supporting your child’s development. So have fun and play!

For links and more fun Ideas go to: https://teachhandwriting.blog/

Different Types of Play and their Importance

We are always being shown how important play is in the development of young animals’ survival and hunting skills. How many times have you thought how cute or lovely when watching kittens, puppies or polar bears playing?

Humans are also animals which thrive and develop through play; in fact, play is so important the United Nations High Commission for Human Rights state it as a right for every child (Ginsburg, 2013).

We often think of play as a frivolous pastime rather than a practical and meaningful one. However, here at Teach Children we see play as a vital part of a child’s physical, emotional, social and intellectual growth and well-being.

There has been considerable research over the years on play, which supports our point of view, with the consensus being that children need to experience five different types of play (Dr.D Whitebread, 2012). These five types of play are roughly based on the developmental opportunities they provide, especially if it is child driven rather than adult lead:

Physical Play – active exercise (running, jumping, skipping etc..), rough & tumble and fine motor skills activities to develop whole body and hand and eye co-ordination strength and endurance. The outdoor element of such play develops independence, resourcefulness and self-regulation while the fine motor skills activities support the development of concentration and perseverance.

Play with Objects – starts as soon as a child can grasp and hold an object; mouthing, biting, turning, stroking, hitting and dropping. It’s how we all learn through the exploration of our senses (sensory-motor play). This type of play develops our abilities to; physically manipulate items, think, reason and problem solve, to set challenges and goals as well as to monitor our own progress.

Symbolic Play – refers to the development of spoken language, visual symbols such as letters and numbers, music, painting, drawing and other media used for communication of thought and ideas. This type of play allows children to develop the abilities to express and reflect on experiences, ideas and emotions. Sound and language play develops phonological awareness required for literacy, while number play that relates to real life situations supports numeracy skills.

Pretence/socio-dramatic Play – Pretend play provides the opportunity to develop cognitive, social, self-regulatory and academic skills. This kind of play means children have to learn and pick up on unspoken rules of interaction, taking on the role of a character and playing within the expected confines of that role.

Games with Rules – physical games such as chase, hide & seek, sport, board and computer games. Develop social skills and the emotional skills of taking turns, winning and losing as well as other people’s perspectives.

                                                             So, to play is to learn!

Bibliography

Kenneth R. Ginsburg, MD, MSEd, 25/07/2013; ‘The Importance of Play in Promoting Healthy Child Development and Maintaining Strong Parent-Child Bonds’: THE AMERICAN ACADEMY OF PEDIATRICS: http://pediatrics.aappublications.org/content/119/1/182.full

Dr.D. Whitebread, April 2012: ‘The Importance of Play’; Commissioned for the Toy Industries of Europe:  http://www.importanceofplay.eu/IMG/pdf/dr_david_whitebread_-_the_importance_of_play.pdf                            

The Appropriate Equipment at the Right Time!

As with learning any new skill the right equipment at the right time can make a real difference to the whole learning experience as well as the outcome. Learning to handwrite is no different.

Young children, due to their gross and fine motor skills ability, require chunky shafted tools so that they can grip them effectively. This means they have a greater control over the tool and can achieve a more satisfactory outcome. If they are using a tool that is too thin, they will find gripping it difficult and have to keep changing their grip. They will have less control of the tool making the experience disappointing at best and off-putting at worst.

As children begin a more formal approach to learning to form their letters correctly then appropriately sized and lead grade pencils are the best tool for the job. Pencils come in all widths, lengths and shapes. The key is to find the style of pencil which best suits the child and their stage of pencil grip development. Remember one size doesn’t fit all!

When a child has learnt to join their letters and has a good and consistent letter size, places all their letters on the writing line correctly and in relation to each other, then it maybe they are ready to be moved to pen. It is important before moving a child to pen that they are writing with speed (appropriate for their age) and fluidity (comfortable writing all the letters of the alphabet lower and upper case correctly). A child whose handwriting is slow and laboured may need additional support and time before being moved on to pen.

Vertical to Horizontal Surfaces for Handwriting

Young children, due to the stage of their physical development, draw from the shoulder rather than the elbow and wrist using large arm movements. At this stage they often prefer vertical drawing and painting surfaces as it allows a free range of movements. This is often why young children will write on walls, not because they are being naughty but because it just feels comfortable and so more enjoyable.

Drawing and writing on a vertical surface is important at this stage; as it helps young children develop the wrist strength and flexibility they will need later on to hold a pencil correctly for handwriting.

The jump from a vertical to a horizontal writing surface can seem too great for some children; due to their stage of development. These children may benefit from the paper being positioned on a sloped board.

If you are not sure whether a child needs a sloped board for handwriting, instead of buying a specialist board, you could make one. Try using a ring binder or lever arch file stuffed with magazines and newspaper to make a sloped board. Tape the edges to stop the papers falling out; you could cover it in sticky back plastic to give a smoother finish to the board. The advantage of this is that you can make them to any angle of slope. Try a few to see which, if any, the child prefers.

A homemade sloped board is just as effective as a bought one. Often a child only requires one for a short amount of time and quickly moves to writing on a horizontal surface. For a few children a sloped surface may be required for a few years, or indefinitely, in which case a purpose bought sloped writing board is a sounder investment.

Using Different Types of Textured Surfaces and Paper

To help young children to store pattern and letter shape formations into their motor memory it is important that the tools used provide a resistance rather than one that flows effortlessly over the writing/drawing surface. The greater the resistance the more the body can neurologically acknowledge (feel) the movement and help to send appropriate information to the brain.

Some of the best surfaces/papers and tools for young children to begin learning to draw patterns, shapes and correctly write letters:

  • Chalk on boards, walls or paths
  • Flip chart pens or large felt tips on course paper such as sugar paper
  • Using appropriately sized paint brushes on course paper (such as sand paper) or surfaces
  • Finger painting or finger drawing in sand, paint or cornflour mix
  • Finger tracing and then trying to draw the pattern, shape or letter straight afterwards.
  • Try chalking the shape or letter onto a blackboard and have the child use a damp sponge to wipe it off again (make sure the child starts in the correct place and moves correctly around the shape or letter to the correct finish point).
  • Appropriately sized crayons and pencils on course paper or card (non-shiny side of cereal boxes and corrugated card can be good fun and different to use).

School Reports – Handwriting Improvements Needed!

So, the school report has been received and you have been told that your child needs to improve their handwriting.

This is all well and good, but what exactly needs improving?

What are they finding difficult and how on earth do you write a continuous cursive z? 

So, you eventually get some handwriting practice sheets home or off the web. But no amount of time spent doing them seems to make much difference. It seemed to take longer to get them started than they spent practising handwriting. In fact they seemed worse because they were unhappy and frustrated with their own progress, so the more you try to push them the more resistant they become. Eventually you think there has to be a better way than this?

Doing more of what you are already struggling with is not always the answer. Handwriting is a complex skill to learn and there are a number of reasons why a child may be struggling.

There is a lot of information and free resources on our ‘Parent’ page which has been designed to help you: https://teachhandwriting.co.uk/parents.html

Try not to get over whelm, take things slowly and keep it simple.

Some things you might want to check and work on first before thinking about your child’s letter or join formation:

  • How are they sitting, is it a good position, it makes a difference;
  • Paper position and tilt can have a real impact especially if they are left-handed writers;
  • Are they using an efficient pencil grip for their age.

If your child is finding some or all of these elements difficult it might be that you need to work on their physical strength as well. Again, you will find information and games to help build this at the same time. And with the summer holidays coming up it is a great time for you to play games and do activities which then help them to develop the strengths and skills which may be holding them back and making handwriting a difficult task to master.

It is important to check and know which letter formations are being taught in school and that this is what you teach at home. Otherwise, you will only be causing more frustration and stress for your child.

Please note that if the letter formation being shown in the @Parent@ section is not the one being taught in school, check our @Teacher@ section of the website as you may find it there: https://teachhandwriting.co.uk/key-stage-1-handwriting-routes.html

Making it Easier to Copy from the Board

Copying accurately and quickly from a board at the front of a classroom can be a challenge at the best of times. For young children and those with specific learning difficulties it can be near on impossible. It is amazing how many children lose some, if not all, of a break time because they could not complete the copying task quickly enough in the lesson time.

The practise of taking information off the board has its uses and there are times when there is just no other alternative but it can be made more manageable, here are a few ideas which may help.

  • Make sure the child is sitting facing the board.
  • That they can see the board clearly.
  • That light is not reflecting off the board so that the writing disappears.
  • Try using a different colour marker pen for each line of writing (this way a child will be able to quickly locate the line they were copying from).
  • Or try numbering the lines so the child can more effectively find their way around the text.
  • Leave more of a gap between each line of writing so that each line is clearly visible from the back of the room.
  • Ask those children, who struggle copying, to start the first line of writing as you transfer the text to a smaller board which can then be placed at a more appropriate distance and level for them to continue copying from.
  • If you know the information that will need to be transferred to the child’s book then pre-prepare a text that can be given to the child to copy from. It may be in a different order or layout to that on the board; but it is the information and the child’s ability to access it, that is important.
  • Is a full sentence explanation always required or could the information be presented in another way such as a mind map or diagram which would be equally, or even more, useful to the child.

It can be surprising how frustrating and upsetting being asked to copy from the board can be for many children. So, anything that can help to alleviate these emotions and difficulties has got to be worth a try!