Aids to support good pencil grip can be very useful for some pupils. However, one of the issues with their use is that, when a pupil has not got the pencil grips to hand, they revert back to the original poor grip position.
Pencil grip aids generally do not correct the grip, they just force the hand and fingers into the correct position for writing. To correct the grip permanently the physical factors that have created the incorrect grip need to be addressed.
The use of grips can encourage a pupil to write more fluently, building their self-esteem, whilst you work on correcting the factors that have caused a poor grip to form. The long-term aim must always be to get the pupil to grip the pencil correctly without the use of aids.
There are 5 developmental stages, that a child needs to go through, before they can successfully use a mature tripod grip. They need to work through each stage and as their hand, shoulder and arm strength and mobility increases so does their ability to move to the next developmental stage of the grip. Children develop through these grip stages over time with new experiences using different tools and drawing/writing mediums especially in the early years (0 to 4 years old).
You will find that young children will move between, or have slightly different versions of, the grips depending on the task or the effect they are trying to achieve. This is exactly what we want to happen.
Stage 1. Palmer-supinate grasp
Holds the crayon/pencil in fist (whole hand) like a dagger. They use whole arm movements from the shoulder to mark-make. Due to this whole arm movement they prefer to work on a vertical surface.
Stage 2. Palmer or digital-pronate grasp
Holds a crayon/pencil with the palm of the hand facing down towards the paper. The crayon/pencil is held by all finger and the thumb. The movement comes from the shoulder and elbow. Again, due to the way the arm moves a vertical surface is preferred.
Stage 3. Four finger and thumb grip
Holds the crayon/pencil between the thumb and four fingers with the crayon/pencil nearly vertical up right position. Movement comes from the elbow and wrist.
Stage 4. Static Quadruped or tripod grip
Holds the pencil in very nearly in the correct position however the web space is narrower than it would be if held in a mature tripod grip. This means that the movement is coming from the wrist and large finger movements.
Stage 5. Mature/Dynamic tripod grip
This is traditionally considered the most appropriate pencil grip for handwriting. Holding the pencil between the thumb and index finger with pencil supported on the middle finger. The ring and little fingers are gently curled inwards. This give an open wide web space which means the movement comes from the fingers.
For example, young Billy here is using a variation of a stage 1 – 3 throughout these colouring activities:
In this example it might look as if Billy has gone backwards in his grip development but he has not, he has learnt that the grip he is using offers him greater control:
Young William here is using different variations of stages 2 and 3 for gluing and painting activities:
Esme and Issy have both moved to stage 4 although for some activities such as drawing/painting they may use a different grip, but that is what we would expect to see:
We often talk about the most appropriate grip for handwriting being the tripod grip; but this usually only refers to finger position. It is easy to forget the importance of the actual hand position in relation to the pen and paper for handwriting.
The ideal position is for the hand, wrist and elbow to be below the tip of the pencil and under the writing line for both left and right-handed writers.
Some children will hold the pencil in a tripod grip but develop a hooked hand position or move the elbow too far up the table, causing the forearm and wrist to be nearly horizontal with the table edge, because they feel they can see what they are writing more clearly.
A hooked grip puts unnecessary strain on the hand ligaments and forces the body into a poor sitting position, again putting extra strain on the body. This in turn makes handwriting a tiring and uncomfortable task, impacting on a child’s overall learning experience.
It takes time to correct a poor hand position but it is well worth the perseverance as it will enable a child to write freely and more comfortably.
When writing normally, encourage children to angle the paper appropriately as this will also help to correct a poor hand position. With the correct paper tilt they will always be able to see what they are writing. If the paper is tilted at the correct angle for them, they will find a hooked hand position, or having their forearm further up the table, more difficult and uncomfortable to maintain.
Some children will find writing on a sloped desk helpful. Not all are comfortable writing or drawing on a flat surface and may benefit from the paper being positioned on an angled or sloped board. If you are not sure, instead of buying a specialist board, you could make one. Try using a ring binder or lever arch file stuffed with magazines and newspaper to make a sloped board. Tape the edges to stop the papers falling out or you could cover it in sticky back plastic to give a smoother finish to the board. The advantage of this is that you can make them to any angle of slope. Try a few to see which, if any, your child prefers. You may find that they only need the sloped board for a short while. It may also help to reduce the angle of the slope over time so that they gradually get used to moving from a sloped to horizontal writing plane.
We thought we would re-run this series of articles due to the number of questions we receive regarding pencil grips and what is OK or NOT.
What is an efficient pencil grip?
“A pencil hold that provides speed, legibility is comfortable and will not cause harm to the joints of the hand over time. If a hold satisfies these criteria there is no need to change it”
(Benrow 2002, cited: Foundation of Paediatric Practice for the Occupational Therapy Assistant, 2005)
The above publication, and those listed at the end of the articles, explain that there are three efficient pencil grips for handwriting:
1. The Dynamic Tripod Grip is still the most appropriate grip for handwriting (we looked at this last week using our ‘Drawbridge Flip’ method), for those with good fine motor skills, as it allows the fingers to move freely; so the writer can form the letters more smoothly.
2. The Quadrupod Grip, this grip is a little more restrictive because the fingers cannot move as freely as they would if using the Tripod grip.
3. The Adaptive Tripod Grip, developed by the Belgian Neurologist Callewaert in 1963 (cited, Ann-Sofie Selin 2003) is a functional though not conventional grip for handwriting. This grip is often more appropriate to use with children who have low muscle tone or hyper mobility of the finger joints. It can also benefit older children who continue to hold a pencil too tightly, or who hold the pencil lightly using just their fingertips (often writing using whole arm movements), as well as those children who hold a pencil with their thumb wrapped around and across the pencil and index finger.
Bibliography
Ann-Sofie Selin, 2003: Pencil Grip A Descriptive Model and Four Empirical Studies; Abo Akademi University Press
A Wagenteld, J Kaldenberg (co-editors), 2005: Foundation of Paediatric Practice for the Occupational Therapy Assistant; Pub: Slack Incorporated, ISBN-10:1-55642-629-1
The Dynamic Tripod Grip is still the most efficient grip for handwriting, for those with good fine motor skills, as it allows the fingers to move freely; so, the writer can form the letters more smoothly.
The following link will take you to the grip section of our ‘Parents’ section of the teachhandwriting.co.uk website where you will find information on the tripod grip for left and right-handed writer: https://teachhandwriting.co.uk/tripod-pencil-grip.html
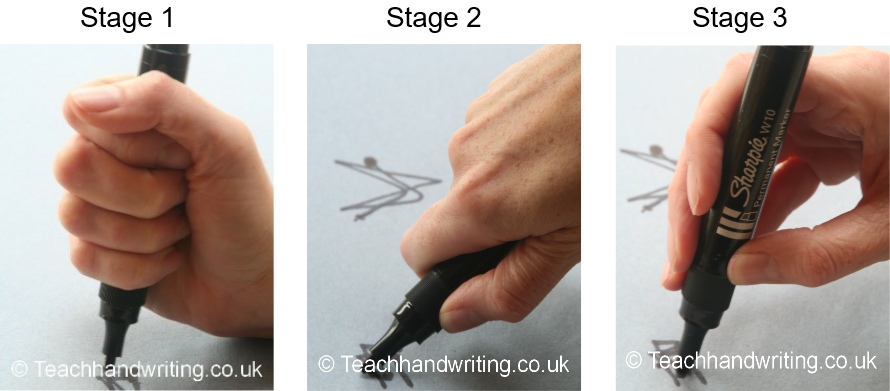
The Drawbridge Flip Method is a simple way of helping a child pick up a pencil and hold it correctly in the tripod grip for handwriting. This can also be used as a whole class approach to support correct pencil grip development for handwriting.
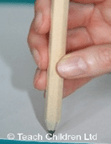
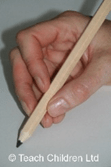
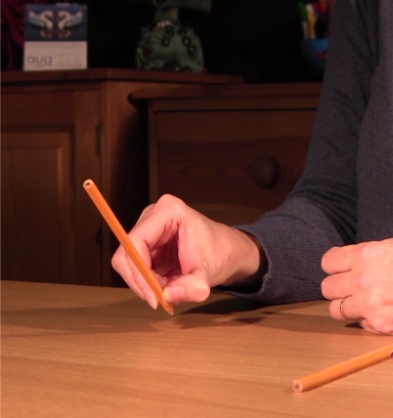
• Place the pencil on the table in front of the writing hand, so it forms a straight line up the table with the writing tip of the pencil pointing towards you.
• Then using your thumb and index finger pinch the pencil either side of the shaft about 2 cm up from the tip for a right-handed writer and about 3 cm up for a left-handed writer. Dots or sticker may be placed on the pencil to help thumb and finger placement.
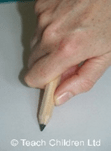
• Pick the pencil up off the table and place the fingernail of the middle finger on to the pencil just above the tip.
• Keep the ring and little finger gently curled in.
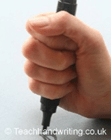
• Push down with the middle finger so that the pencil moves up and over like a drawbridge, keep pushing until the pencil is supported in the cup (web of skin that joins the thumb, hand and index finger) and the pencil is resting on the inner edge of middle finger.
• Then writing, the end of the pencil will be angled towards the shoulder for right-handed writers and the elbow for left-handed writers.
Young children’s first experience on the handwriting journey is through mark-making and simple drawings, whether it is with finger-paints, writing in sand or with pencils and crayons.
From about the age of 2, children start to move from a simple grasping (primitive) grip to one that secures the writing tool between the fingers and the thumb. In the early stages of mark-making and drawing young children will try different grips and holds, which is part of their normal development for handwriting and drawing.
As young children’s body (gross motor skills), hand strength and dexterity (fine motor skills) are developing they need a range of pencil, crayon and paint brush thicknesses. Young children need the thicker drawing tools as they can grip them more easily, helping them to mark-make. If the pencil is too thin, they find it difficult to grasp and have little control over it, making the drawing experience unsuccessful, which can lead to frustration and discourage them from trying again.
Due to the stage of their physical development young children use large movements to draw (from the shoulder rather than the wrist) which often creates larger shapes and lines.
During the early stages a vertical drawing and painting surface is important as it allows the child the freedom of movement to fully explore their mark-making potential. It also helps young children to develop the wrist strength and flexibility which they will need later to hold a pencil correctly for handwriting.
Using plain paper and surfaces is considered best for young children as they find it less restrictive. It has been widely acknowledged that a child who is forced to hold a writing tool using the dynamic tripod grip, before they are developmentally ready, can be turned off engaging in the drawing/writing process as well as developing a poor pencil grip later on. Remember some children do not develop the ability to use the dynamic tripod grip until the age of 5/6 years old.
As a child’s gross and fine motor skills develop so does their pencil grip and ability to draw and write at a small scale moving more from the elbow and wrist and progressing through the grip stages.
“A pencil hold that provides speed, legibility is comfortable and will not cause harm to the joints of the hand over time. If a hold satisfies these criteria there is no need to change it”
(Benrow 2002, cited: Foundation of Paediatric Practice for the Occupational Therapy Assistant, 2005)
The above publication, and those listed at the end of the articles, explain that there are three efficient pencil grips for handwriting:
1. The Dynamic Tripod Grip is still the most appropriate grip for handwriting (we looked at this last week using our ‘Drawbridge Flip’ method), for those with good fine motor skills, as it allows the fingers to move freely; so, the writer can form the letters more smoothly.
2. The Quadrupod Grip, this grip is a little more restrictive because the fingers cannot move as freely as they would if using the Tripod grip.
3. The Adaptive Tripod Grip, developed by the Belgian Neurologist Callewaert in 1963 (cited, Ann-Sofie Selin 2003) is a functional though not conventional grip for handwriting. This grip is often more appropriate to use with children who have low muscle tone or hyper mobility of the finger joints. It can also benefit older children who continue to hold a pencil too tightly, or who hold the pencil lightly using just their fingertips (often writing using whole arm movements), as well as those children who hold a pencil with their thumb wrapped around and across the pencil and index finger.
Bibliography
Ann-Sofie Selin, 2003: Pencil Grip A Descriptive Model and Four Empirical Studies; Abo Akademi University Press
A Wagenteld, J Kaldenberg (co-editors), 2005: Foundation of Paediatric Practice for the Occupational Therapy Assistant; Pub: Slack Incorporated, ISBN-10:1-55642-629-1
We often talk about the most appropriate grip for handwriting being the tripod grip; but this usually only refers to finger position. It is easy to forget the importance of the actual hand position in relation to the pen and paper for handwriting.
The ideal position is for the hand, wrist and elbow to be below the tip of the pencil and under the writing line for both left and right-handed writers.
Some children will hold the pencil in a tripod grip but develop a hooked hand position or move the elbow too far up the table, causing the forearm and wrist to be nearly horizontal with the table edge, because they feel they can see what they are writing more clearly.
A hooked grip puts unnecessary strain on the hand ligaments and forces the body into a poor sitting position, again putting extra strain on the body. This in turn makes handwriting a tiring and uncomfortable task, impacting on a child’s overall learning experience.
It takes time to correct a poor hand position but it is well worth the perseverance as it will enable a child to write freely and more comfortably.
When writing normally, encourage children to angle the paper appropriately as this will also help to correct a poor hand position. With the correct paper tilt they will always be able to see what they are writing. If the paper is tilted at the correct angle for them, they will find a hooked hand position, or having their forearm further up the table, more difficult and uncomfortable to maintain.
Some children will find writing on a sloped desk helpful. Not all are comfortable writing or drawing on a flat surface and may benefit from the paper being positioned on an angled or sloped board. If you are not sure, instead of buying a specialist board, you could make one. Try using a ring binder or lever arch file stuffed with magazines and newspaper to make a sloped board. Tape the edges to stop the papers falling out or you could cover it in sticky back plastic to give a smoother finish to the board. The advantage of this is that you can make them to any angle of slope. Try a few to see which, if any, your child prefers. You may find that they only need the sloped board for a short while. It may also help to reduce the angle of the slope over time so that they gradually get used to moving from a sloped to horizontal writing plane.
A poor pencil grip sometimes dramatically referred to as the “death grip”, is define by Occupational Therapists and Handwriting Teachers as any that causes a closed web space, restricting the movement of the fingers and wrist, making handwriting hard work.
The most effective grip recommended for children by Occupational Therapists and Handwriting Specialists worldwide is the tripod grip, which gives an open web space. This allows the fingers to move freely so that a fluid handwriting style can be achieved.
There are 5 developmental stages, that a child needs to go through, before they can successfully use a mature tripod grip. They need to work through each stage and as their hand, shoulder and arm strength and mobility increases so does their ability to move to the next developmental stage of the grip. Children develop through these grip stages over time with new experiences using different tools and drawing/writing mediums especially in the early years (0 to 4 years old).
You will find that young children will move between, or have slightly different versions of, the grips depending on the task or the effect they are trying to achieve. This is exactly what we want to happen.
Stage 1. Palmer-supinate grasp
Holds the crayon/pencil in fist (whole hand) like a dagger. They use whole arm movements from the shoulder to mark-make. Due to this whole arm movement they prefer to work on a vertical surface.
Stage 2. Palmer or digital-pronate grasp
Holds a crayon/pencil with the palm of the hand facing down towards the paper. The crayon/pencil is held by all finger and the thumb. The movement comes from the shoulder and elbow. Again, due to the way the arm moves a vertical surface is preferred.
Stage 3. Four finger and thumb grip
Holds the crayon/pencil between the thumb and four fingers with the crayon/pencil nearly vertical up right position. Movement comes from the elbow and wrist.
Stage 4. Static Quadruped or tripod grip
Holds the pencil in very nearly in the correct position however the web space is narrower than it would be if held in a mature tripod grip. This means that the movement is coming from the wrist and large finger movements.
Stage 5. Mature/Dynamic tripod grip
This is traditionally considered the most appropriate pencil grip for handwriting. Holding the pencil between the thumb and index finger with pencil supported on the middle finger. The ring and little fingers are gently curled inwards. This give an open wide web space which means the movement comes from the fingers. For more information on the five stages of pencil grip development click on the following link: https://teachhandwriting.co.uk/pencil-grip-development-foundation-stage.html
Case Studies
For example, young Billy here is using a variation of a stage 1 – 3 throughout these colouring activities:
In this example it might look as if Billy has gone backwards in his grip development but he has not, he has learnt that the grip he is using offers him greater control:
Young William here is using different variations of stages 2 and 3 for gluing and painting activities:
Esme and Issy have both moved to stage 4 although for some activities such as drawing/painting they may use a different grip, but that is what we would expect to see.