Poor hand position can cause a poor pen grip

We often talk about the most appropriate grip for handwriting being the tripod grip; but this usually only refers to finger position. It is easy to forget the importance of the actual hand position in relation to the pen and paper for handwriting.

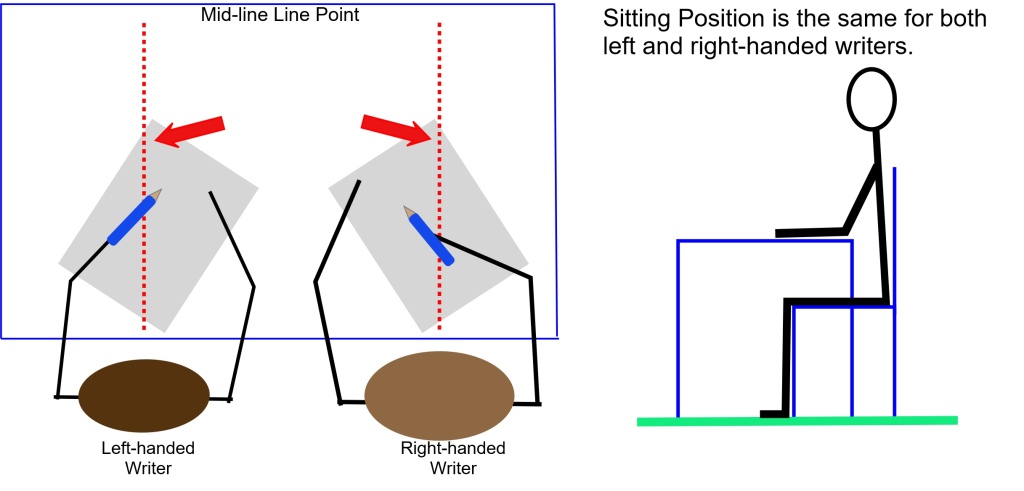
The ideal position is for the hand, wrist and elbow to be below the tip of the pencil and under the writing line for both left and right-handed writers.

Some children will hold the pencil in a tripod grip but develop a hooked hand position or move the elbow too far up the table, causing the forearm and wrist to be nearly horizontal with the table edge, because they feel they can see what they are writing more clearly.

A hooked grip puts unnecessary strain on the hand ligaments and forces the body into a poor sitting position, again putting extra strain on the body. This in turn makes handwriting a tiring and uncomfortable task, impacting on a child’s overall learning experience.

It takes time to correct a poor hand position but it is well worth the perseverance as it will enable a child to write freely and more comfortably.

When writing normally, encourage children to angle the paper appropriately as this will also help to correct a poor hand position. With the correct paper tilt they will always be able to see what they are writing. If the paper is tilted at the correct angle for them, they will find a hooked hand position, or having their forearm further up the table, more difficult and uncomfortable to maintain.

Some children will find writing on a sloped desk helpful. Not all are comfortable writing or drawing on a flat surface and may benefit from the paper being positioned on an angled or sloped board. If you are not sure, instead of buying a specialist board, you could make one. Try using a ring binder or lever arch file stuffed with magazines and newspaper to make a sloped board. Tape the edges to stop the papers falling out or you could cover it in sticky back plastic to give a smoother finish to the board. The advantage of this is that you can make them to any angle of slope. Try a few to see which, if any, your child prefers. You may find that they only need the sloped board for a short while. It may also help to reduce the angle of the slope over time so that they gradually get used to moving from a sloped to horizontal writing plane.

Alternative Pencil Grips for Handwriting

We thought we would re-run this series of articles due to the number of questions we receive regarding pencil grips and what is OK or NOT.

What is an efficient pencil grip?

“A pencil hold that provides speed, legibility is comfortable and will not cause harm to the joints of the hand over time. If a hold satisfies these criteria there is no need to change it”

(Benrow 2002, cited: Foundation of Paediatric Practice for the Occupational Therapy Assistant, 2005)

The above publication, and those listed at the end of the articles, explain that there are three efficient pencil grips for handwriting:

1. The Dynamic Tripod Grip is still the most appropriate grip for handwriting (we looked at this last week using our ‘Drawbridge Flip’ method), for those with good fine motor skills, as it allows the fingers to move freely; so the writer can form the letters more smoothly.

2. The Quadrupod Grip, this grip is a little more restrictive because the fingers cannot move as freely as they would if using the Tripod grip.

3. The Adaptive Tripod Grip, developed by the Belgian Neurologist Callewaert in 1963 (cited, Ann-Sofie Selin 2003) is a functional though not conventional grip for handwriting. This grip is often more appropriate to use with children who have low muscle tone or hyper mobility of the finger joints. It can also benefit older children who continue to hold a pencil too tightly, or who hold the pencil lightly using just their fingertips (often writing using whole arm movements), as well as those children who hold a pencil with their thumb wrapped around and across the pencil and index finger.

Bibliography

Ann-Sofie Selin, 2003: Pencil Grip A Descriptive Model and Four Empirical Studies; Abo Akademi University Press

A Wagenteld, J Kaldenberg (co-editors), 2005: Foundation of Paediatric Practice for the Occupational Therapy Assistant; Pub: Slack Incorporated, ISBN-10:1-55642-629-1

Web-sites:

https://www.ot-mom-learning-activities.com/correct-pencil-grasp.html

https://www.otplan.com/articles/pencil-grasp-patterns.aspx

Handwriting is a Physical Activity

Handwriting with fluidity, speed, accuracy and over longer periods of time requires a complex range of whole body and hand strengths and skills. So it is not surprising that many children find handwriting challenging.

For a good handwriting style children need to develop their:

  • Gross Motor Skills – so they can sit correctly for periods of time.
  • Fine Motor Skills – so that they can hold and control the pencil and move the paper up the table as they write.
  • Motor Memory Skills – so they can recall how to form the letters.
  • Visual Memory Skills – so they recall what a particular letter looks like.
  • Spatial Awareness Skills– so they can place the letters correctly on the paper and in relation to one another.
  • Eye Tracking Skills– scanning from left to right so that the letters are formed and placed correctly.

If a child is struggling with handwriting it is important to take a closer look at their physical abilities. If they do not have all the appropriate key physical strengths to support their handwriting development getting them to do more of the paper and pencil activities is not the answer.

Our assessments are simple to complete and do not need any specialist equipment. The important elements are; your knowledge of the child and your observations of them at play and while they are engaged in normal day to day task.

For information on how to assess your child at home follow this link: https://teachhandwriting.co.uk/parent-assessment.html   

For information on how to assess at child at school follow this link: https://teachhandwriting.co.uk/teacher-assessment.html

A better understanding of a child’s key skills abilities enables you to focus more effectively, through targeted physical games and activities, to help them build and develop their skills.

You will find ‘Games to build gross and fine motor skills’ here: https://teachhandwriting.co.uk/games.html

Handwriting is such an important skill as it engages the neurological pathways and working memory in a way that pressing a keyboard just doesn’t; so once mastered it helps to open up the doorways to other literacy skills such as phonics, reading, spelling and composition.

The Best Type of Paper for Teaching Handwriting

Just as the writing tool used by your child changes as they develop, so does the paper they write on.

Informal Pre-handwriting Pattern and Initial Letter Development

If your child is just starting out on the handwriting adventure then any type of plain paper (no ruled lines) is considered the best option, as many children find it less restrictive.

Young children, due to the stage of their physical development, use large movements to draw (from the shoulder rather than the wrist) which often creates larger shapes and lines; you don’t want to restrict this movement as it can cause handwriting difficulties later. As their gross and fine motor skills develop so does their pencil grip and ability to draw and write at a smaller scale, moving more from the shoulder to elbow and wrist.

Formal Pre-handwriting Pattern and Letter Development

When your child is ready to refine their pre-handwriting pattern skills, or move on to forming letters, it is a good idea to use plain paper. The aim at this stage is to learn how to form the letters correctly, not size or neatness as that comes later (Remember, Big is Beautiful).

Before moving to lined paper, to help your child begin to appreciate letter proportions and positioning, paper with picture clues can be used.

On our website the free writing paper and animations reinforce the idea of letter proportions and positioning by splitting the backgrounds into three colour zones to represent the sky, grass and earth. There are a number of reasons why this can be beneficial:

  • It can create a sub-conscious memory in your child’s mind of where particular letters sit in relation to others without the constraints of lines or obvious boundaries, especially as the picture can be any size. Children remember where to place the sun, grass or worms in their drawings; so why not letters?
  • It can be easier to talk through the formation of how a shape or letter is formed with pictorial and colour clues to guide and inform the direction of the movements required.     
  • As your child’s fine motor skills develop so the size of the picture/colour clues can be reduced to match their progress.

As your child’s fine motor skills develop it enables them to form smaller more refined versions of the letters and this is when it is more appropriate to use lined paper.

Tips for Supporting #Left-handed Writers

Surprisingly there are few differences when teaching left and right-handed children to handwrite. A left-handed child needs a slightly different pencil grip, and needs to hold the pencil slightly higher up the shaft, as well as a different paper position and tilt. Some left-handed children do find handwriting challenging to start with because they naturally want to draw straight lines right to left rather than left to right.

Check out our Left-handed Writers Page for more information and tips on how to support them: https://teachhandwriting.co.uk/left-handed.html

The Most Efficient Pencil Grip for #Handwriting – Tripod Grip

The Dynamic Tripod Grip is still the most efficient grip for handwriting, for those with good fine motor skills, as it allows the fingers to move freely; so, the writer can form the letters more smoothly.

The following link will take you to the grip section of our ‘Parents’ section of the teachhandwriting.co.uk website where you will find information on the tripod grip for left and right-handed writer: https://teachhandwriting.co.uk/tripod-pencil-grip.html

The Drawbridge Flip Method is a simple way of helping a child pick up a pencil and hold it correctly in the tripod grip for handwriting. This can also be used as a whole class approach to support correct pencil grip development for handwriting.

Follow this link for an instructional video for both left and right-handed writers on how to use the Drawbridge Flip method: https://teachhandwriting.co.uk/whole-class-tripod-pencil-grip-teaching-ks1.html

Drawbridge Flip instructions:

• Place the pencil on the table in front of the writing hand, so it forms a straight line up the table with the writing tip of the pencil pointing towards you.

• Then using your thumb and index finger pinch the pencil either side of the shaft about 2 cm up from the tip for a right-handed writer and about 3 cm up for a left-handed writer. Dots or sticker may be placed on the pencil to help thumb and finger placement.

• Pick the pencil up off the table and place the fingernail of the middle finger on to the pencil just above the tip.

• Keep the ring and little finger gently curled in.

• Push down with the middle finger so that the pencil moves up and over like a drawbridge, keep pushing until the pencil is supported in the cup (web of skin that joins the thumb, hand and index finger) and the pencil is resting on the inner edge of middle finger.

• Then writing, the end of the pencil will be angled towards the shoulder for right-handed writers and the elbow for left-handed writers.

Teaching Letter Joins – A Systematic Approach

We would recommend teaching joins in join type groups, whether your child has learnt cursive or continuous cursive single letter fonts.

Teaching the join types in their groups helps a child to understand the directional pushes and pulls required to successfully join the different letter combinations.

There are 4 main groups of letter joins; bottom joins, bottom to “c” shape joins, “e” joins (top and bottom join strokes) and top joins.

Moving from Cursive Single Letters to Joining

There are seven join strokes to be taught. Most children will find the bottom joins the easiest to achieve, as it only requires the extension of the exit stroke they already put on the letters. The bottom to “c” shape joins can be tricky at first but soon mastered. The joins that tend to cause the most confusion and difficulty are the “e” joiners and top exit joiners.

I would recommend teaching the bottom joins first, then the ‘e’ joins and finally the top exit letter joins.

Moving from Continuous Cursive Single Letters to Joining

There are three join strokes to be taught. The easiest is the bottom exit letters (the majority of the letters), all a child has to do is write the letters closer together without lifting their pencil off the paper. Only the top to “e” and top joiners need to be taught for continuous cursive, as the nature of the font style means that the lead-in and exit strokes needed to join the majority of letter combinations have already been taught.

I would recommend teaching the bottom joins first, then the top exit to ‘e’ join and finally the top exit letter joins.

The ultimate aim is for a child to develop a good handwriting style; which means;

  • They can produce and maintain a good speed
  • Have a fluid hand movement that is comfortable
  • Letters are of a consistent and appropriate size, positioned correctly
  • Handwriting is legible (so others can read it easily).

It is important to remember that for some children (mainly SEND pupils) this may mean that they will always print or use a single letter form of writing as learning to join is just not appropriate. But that does not mean they will not comply with the bullet points above.

Have you got your Free Join Animations & Worksheets?

For Teachers: https://teachhandwriting.co.uk/key-stage-2-handwriting-routes.html

For Parents: https://teachhandwriting.co.uk/parents.html

Stage 3 to #Handwriting Success – Joining

Here at Teach Children we believe that a child is only ready to start learning to join their handwriting when:

  • They have learnt to form all 26 lower-case letters correctly.
  • Letters are of a consistent and suitable size (not necessarily the perfect size, remember big is beautiful).
  • Letters are positioned appropriately on the writing line as well as in relation to one another.

Children generally begin to join letters between the ages of 6 to 7 years old, depending on the handwriting font style being taught. Those taught a continuous cursive font style from the beginning tend to join much earlier due to the nature of this font (for some by the end of their Reception Year).

Children do not need to be able to remember how to correctly form all their capital letters before they are taught how to join their letters. This is because capital letters never join to the lower-case letters in a word. However, for these children correct capital letter formation needs to be taught alongside the introduction of letter joins.

We would recommend teaching joins in join type groups, whether your child has learnt cursive or continuous cursive single letter fonts.

Teaching the join types in their groups helps a child to understand the directional pushes and pulls required to successfully join the different letter combinations.

We would recommend teaching the bottom joins first, then the top exit to ‘e’ join and finally the top exit letter joins.

Have you got your Free Join Animations & Worksheets?

For Teachers: https://teachhandwriting.co.uk/key-stage-2-handwriting-routes.html

For Parents: https://teachhandwriting.co.uk/parents.html

Why it is Important to Teach Correct Letter Formation!

It can often be assumed children will pick up how to write letters if they see them often enough (by osmosis). This is just not the case.  Correct letter formation has to be taught. Seeing a completed letter or word or watching it being typed up and appear on a screen does not show children how to form the letters.

For children to develop a good handwriting style it is important to learn how to form letters correctly to begin with as this makes the transition from single letter formation to joined letter handwriting much easier. This enables them to develop a speedy, fluid and legible handwriting style.

Letters are created through joining lines and curve shapes in a particular way. They have a designated start point and set directional pushes and pulls of the pencil to reach the designated finish point. This is why at Teach Handwriting we teach letter formation in groups/families rather than in alphabetical order. Certain groups use the same, or similar, shape and directional push and pulls of the pencil to form the letter, for instance the letter c has the same start point and anti-clockwise directional movement shape that is needed to create the letters a, d, g, o and, though a little more complicated, the letters s and e. Teaching letters in groups and families can also help to limit letter reversals such as b and d.

Due to how handwriting has or hasn’t been taught over the generations we all have our own way of handwriting. When supporting and teaching young children we need to develop a consistent approach so that they do not get confused or frustrated by adults giving them conflicting information.

For parents this means finding out from your child’s school which letter font they are teaching so that you can support them more effectively at home. This may mean that you have to learn a new way of writing some letters. This also applies to teachers and teaching assistants. As the adults in the situation, we have to accept that it is for us to make the changes. Just because something is different from the way we were taught, or do it, doesn’t mean it is wrong, it is just different! 

Our free letter animations are not just to support children with their learning but also to provide parents and teachers (all adults really) with the knowledge and support to help children develop a consistent handwriting style.

Parent animation link: https://teachhandwriting.co.uk/parents.html

Teacher animation link – click through on the Key Stage you are teaching: https://teachhandwriting.co.uk/teach-handwriting-teachers.html

Art Activities to support the Understanding of Pressure

Crayoning and printing activities are great ways for a child to experience and experiment with pressure and the amount needed to create different effects. These activities will also encourage and support a child in helping them to understand, and for you to model, the language associated with pressure and how the pressure used feels. By linking the words used to the feelings and the outcome of using the pressure they can start to understand what is needed when asked to press gently or to press harder. 

When supporting a child to understand what we want when we ask them to press harder, we need to model how our body reacts to make this happen. You may need to exaggerate the actions but as you do this you also need to talk about what your body is doing and how it feels. Then point out the effect that this has had on the crayoning for instance.

When we press hard, we tend to lean our body forward over the table slightly as this allows us to put more force down on to the paper through the crayon. We may feel our arm and hand tense and often the movements made are slower and in small strokes. If it is something we are not used to doing it can make our hand and fingers ache and it will feel like hard work. The crayon marks will be thick and dark.

When we want to be gentler with the crayon, so that the crayoning is lighter in texture and colour, we tend to sit back away from the table. This way the hand moves across the paper more easily and often the strokes are longer and quicker, which sometimes feels as if we have less control over the colouring. This is why young children tend to be a bit heavy handed initially with colouring because their fine motor control skills have not reached a point that enables them to have control.

There are many creative ideas to be found on the internet and in books published by companies such as Usborne.

This crayon technique can be used to create a vast range of pictures. Here are just a couple of ideas to get you started:

The same technique can also be used to create great firework pictures:

It is also worth remembering that drawing also helps to develop a range of different line formations, also needed for developing a good handwriting style.

Have FUN!