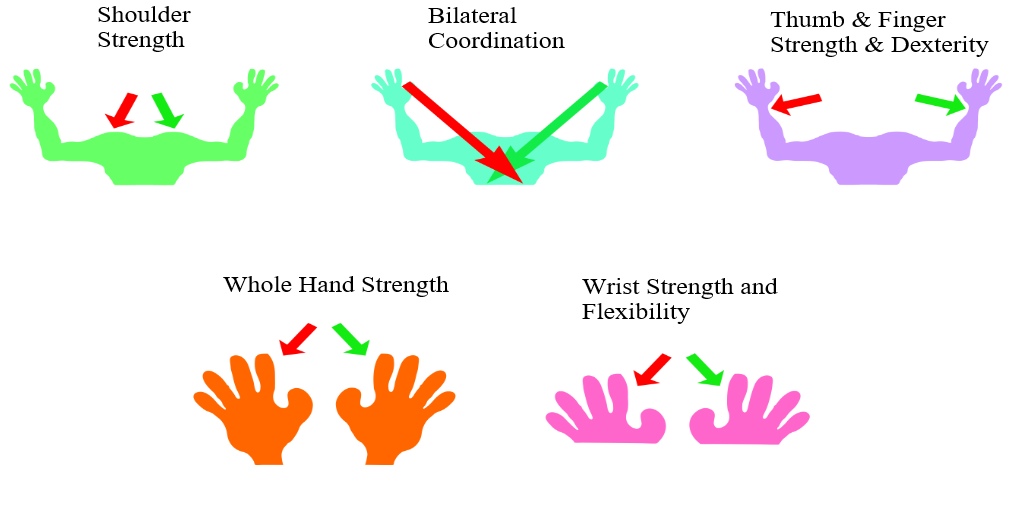
So, before you try to encourage your little darlings to sit and write, get them to do a few physical handwriting ‘Warm Up Exercises’. Not only do they help to prepare the hands and fingers for the task ahead, they also help to release any tension that has built up. They are fun to do, which usually brings a smile and often laughter, an added tonic to any learning experience. The warm up exercises can be accessed through a number of ways:
The warm up exercises can be accessed through a number of ways:
Teachers through the content section for the Key Stage you are teaching:
Handwriting skills don’t start with pencil and paper they begin with earlier play opportunities. Using play-dough type modelling materials is great for developing hand and finger strength, bilateral coordination, sensory perception and for learning and perfecting different grips for using tools.
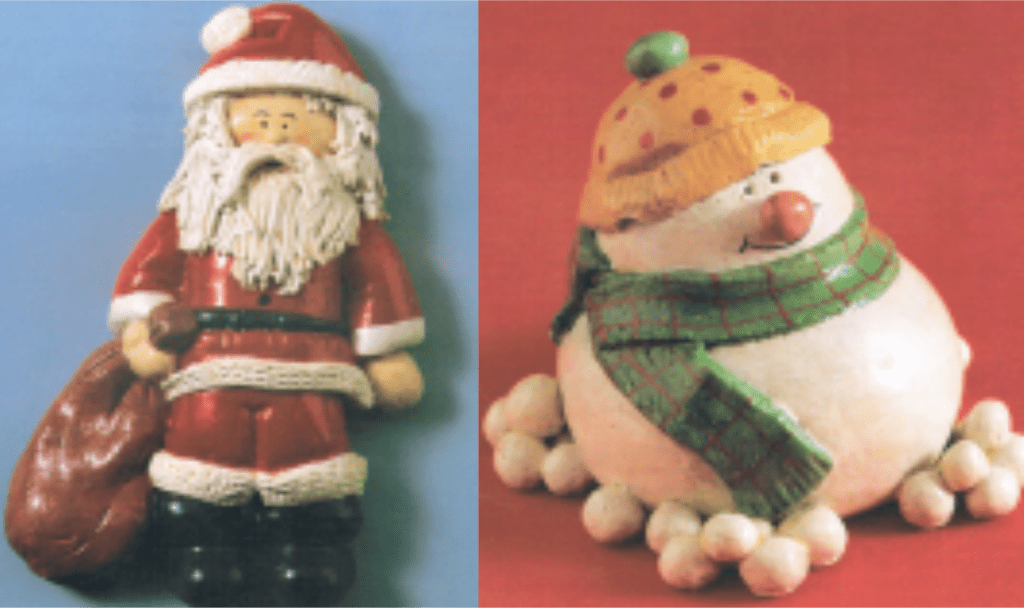
Salt Dough
So, why not make some great salt dough Christmas gifts and tree decorations with your child. Not only will they melt the hearts of those who receive them but you will be developing your child’s fine motor skills (needed for good handwriting) while having fun, can’t be bad!
Go to our ‘More fun handwriting activities’ page (https://teachhandwriting.co.uk/more-activities.html ) in our Resources section for a salt dough recipe, that I have found good to use with children, and just download the ‘Salt Dough Modelling’ pdf.
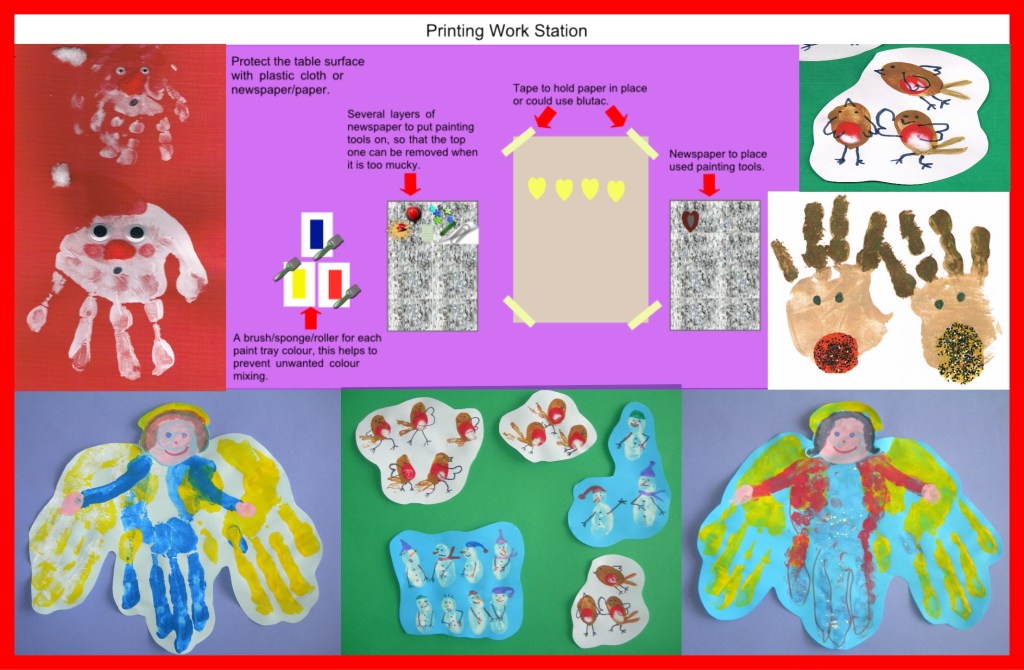
Hand and finger printing can be a fun way of getting your child used to touching and using different textured mediums. The creative element can help some children to cope with, and learn to overcome, some sensory tactile defence difficulties. Being happy holding objects allows them to hold a pencil comfortably, leading to better handwriting.
Handwriting requires a child to apply the right amount of pressure to get the pencil marks of the letters on to the page. Too little pressure and the writing is often faint and wriggly in appearance (like a spider has walked across the page). Too heavy and the marks are very dark and can tear the paper; often the writing looks big, angular and laboured. Not being able to apply the correct pressure also affects how a child holds the pencil, which can cause the hand and fingers to tire more quickly, making writing tasks challenging.
Printing activities help your child to start to become aware of how to control the amount of pressure they use and the effect that this has on the quality of the work produced. Learning to control the amount of pressure exerted and how it feels can be very difficult for some children and it takes time and a range of experiences to develop these skills.
There are some fabulous printing ideas out on the internet; one of my favourite art resources is The Usborne Art Idea Books. Hand and finger printing can create some amazing artwork which can be used to make wonderful personalised Christmas cards, tags and paper.
Who could not be charmed by these fun thumb and fingertip snowmen or robins or delighted by a hand print angel?
For other useful tips on printing and setting up a printing work station, check out our ‘More fun handwriting activities’ in our Parents section under Learning Through Play: https://teachhandwriting.co.uk/more-activities.html
Young children love drawing on walls due to the stage of their physical development. They draw from the shoulder, rather than the elbow and wrist, using large arm movements. At this stage they prefer vertical drawing and painting surfaces as it allows a free range of movements. This is why they will write on walls (often newly decorated), not because they are meaning to be naughty but because it just feels comfortable and so more enjoyable.
Drawing and writing on a vertical surface is important at this stage as it helps young children develop the wrist strength and flexibility needed later to hold a pencil correctly for handwriting. Having the freedom to move more instinctively without restrictions means that a child is free to focus on other aspects, such as feeling the movement as they make shapes and gaining the confidence to have a go without fear of getting it wrong.
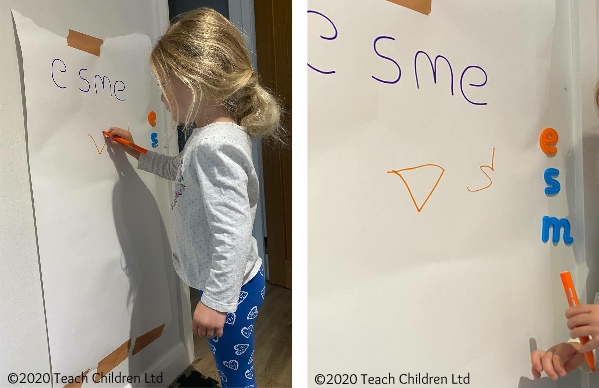
Case Study
Esme at the age of 3yrs 9mths was very happy to draw (more scribbling) and colour sitting at the table but Mum was not quite sure how to move her on. So, the following idea was suggested; to tape some large pieces of plain paper up on a suitable wall for her to draw on with appropriately sized pens, crayons or chalks.
This was the response:
Message from Mum was:
“She’s loving this idea. She did a triangle and a ‘s’ all on her own with no encouragement.” As the day went on Esme revisited the drawing wall and later on that day this photo arrived:
Message from Mum: “She just did her name.” This had been the first time she had done this.
An easel was then ordered!
The jump from a vertical to a horizontal writing surface can seem too great for some children; due to their stage of development. If they are still using some large whole arm and/or big elbow movements then they may benefit from the paper being positioned on a sloped board.
We would recommend teaching joins in join type groups, whether your child has learnt cursive or continuous cursive single letter fonts.
Teaching the join types in their groups helps a child to understand the directional pushes and pulls required to successfully join the different letter combinations.
There are 4 main groups of letter joins; bottom joins, bottom to “c” shape joins, “e” joins (top and bottom join strokes) and top joins.
Moving from Cursive Single Letters to Joining
There are seven join strokes to be taught. Most children will find the bottom joins the easiest to achieve, as it only requires the extension of the exit stroke they already put on the letters. The bottom to “c” shape joins can be tricky at first but soon mastered. The joins that tend to cause the most confusion and difficulty are the “e” joiners and top exit joiners.
I would recommend teaching the bottom joins first, then the ‘e’ joins and finally the top exit letter joins.
Moving from Continuous Cursive Single Letters to Joining
There are three join strokes to be taught. The easiest is the bottom exit letters (the majority of the letters), all a child has to do is write the letters closer together without lifting their pencil off the paper. Only the top to “e” and top joiners need to be taught for continuous cursive, as the nature of the font style means that the lead-in and exit strokes needed to join the majority of letter combinations have already been taught.
I would recommend teaching the bottom joins first, then the top exit to ‘e’ join and finally the top exit letter joins.
The ultimate aim is for a child to develop a good handwriting style; which means;
They can produce and maintain a good speed
Have a fluid hand movement that is comfortable
Letters are of a consistent and appropriate size, positioned correctly
Handwriting is legible (so others can read it easily).
It is important to remember that for some children (mainly SEND pupils) this may mean that they will always print or use a single letter form of writing as learning to join is just not appropriate. But that does not mean they will not comply with the bullet points above.
Have you got your Free Join Animations & Worksheets?
It can often be assumed children will pick up how to write letters if they see them often enough (by osmosis). This is just not the case. Correct letter formation has to be taught. Seeing a completed letter or word or watching it being typed up and appear on a screen does not show children how to form the letters.
For children to develop a good handwriting style it is important to learn how to form letters correctly to begin with as this makes the transition from single letter formation to joined letter handwriting much easier. This enables them to develop a speedy, fluid and legible handwriting style.
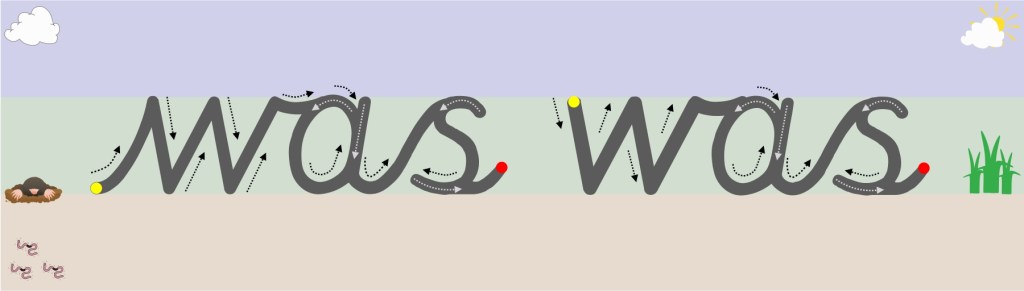
Letters are created through joining lines and curve shapes in a particular way. They have a designated start point and set directional pushes and pulls of the pencil to reach the designated finish point. This is why at Teach Handwriting we teach letter formation in groups/families rather than in alphabetical order. Certain groups use the same, or similar, shape and directional push and pulls of the pencil to form the letter, for instance the letter c has the same start point and anti-clockwise directional movement shape that is needed to create the letters a, d, g, o and, though a little more complicated, the letters s and e. Teaching letters in groups and families can also help to limit letter reversals such as b and d.
Due to how handwriting has or hasn’t been taught over the generations we all have our own way of handwriting. When supporting and teaching young children we need to develop a consistent approach so that they do not get confused or frustrated by adults giving them conflicting information.
For parents this means finding out from your child’s school which letter font they are teaching so that you can support them more effectively at home. This may mean that you have to learn a new way of writing some letters. This also applies to teachers and teaching assistants. As the adults in the situation, we have to accept that it is for us to make the changes. Just because something is different from the way we were taught, or do it, doesn’t mean it is wrong, it is just different!
Our free letter animations are not just to support children with their learning but also to provide parents and teachers (all adults really) with the knowledge and support to help children develop a consistent handwriting style.
Here at Teach Children we believe that a child is only ready to start learning to join their handwriting when:
They have learnt to form all 26 lower-case letters correctly.
Letters are of a consistent and suitable size (not necessarily the perfect size, remember big is beautiful).
Letters are positioned appropriately on the writing line as well as in relation to one another.
Children generally begin to join letters between the ages of 6 to 7 years old, depending on the handwriting font style being taught. Those taught a continuous cursive font style from the beginning tend to join much earlier due to the nature of this font (for some by the end of their Reception Year).
Children do not need to be able to remember how to correctly form all their capital letters before they are taught how to join their letters. This is because capital letters never join to the lower-case letters in a word. However, for these children correct capital letter formation needs to be taught alongside the introduction of letter joins.
We would recommend teaching joins in join type groups, whether your child has learnt cursive or continuous cursive single letter fonts.
Teaching the join types in their groups helps a child to understand the directional pushes and pulls required to successfully join the different letter combinations.
We would recommend teaching the bottom joins first, then the top exit to ‘e’ join and finally the top exit letter joins.
Have you got your Free Join Animations & Worksheets?
Last week we explained that pre-handwriting patterns are the first stage of learning to handwrite. Once a child has mastered theses, they are ready to start learning how to form letters.
But where do you start?
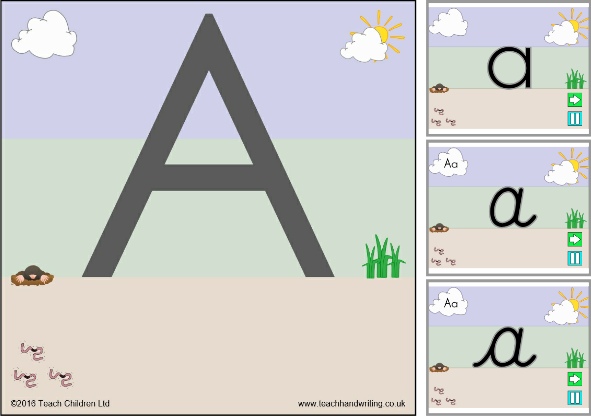
Our view is to focus on lower-case letters first and only the capital letters for the first letter in a child’s, examples: Peter Rabbit, Sally Green, George Blue or Mary Shell.
Why?
One reason is that about 95% of what children write, and are exposed to, is in a lower-case form and only 5% in capital.
Lower-case letters are far less complicated, requiring fewer pencil lifts to complete the letters.
As both lower-case and capital letters require a child to form curved lines, a skill which most children have to practise, writing lower-case letters is no more difficult than writing capitals.
In a young child’s writing all the letters are initially the same size, whether they are capitals or lower case; it is part of the normal developmental path of handwriting. So, the view that teaching capitals letters is easier because they are bigger is not true.
Young children who have learnt mostly capital letters first find it difficult to stop, as it is so ingrained into the memory, often using them half way through words and sentences. Even when they are older this inappropriate use of capitals creeps back into their work especially if they are tired or concentrating hard on composing their work.
Have you got your Free Letter Animations and Worksheets?
A child’s first major achievement, in their eyes, is to write their name. So, although concentrating on lower-case letters, teach them how to form the capital letter for the first letters of their name to get them excited about handwriting.
As they master the lower-case letters introduce the remainder of the capital letters. It is important that both are taught so that a child can develop a speedy, fluid and legible handwriting style.
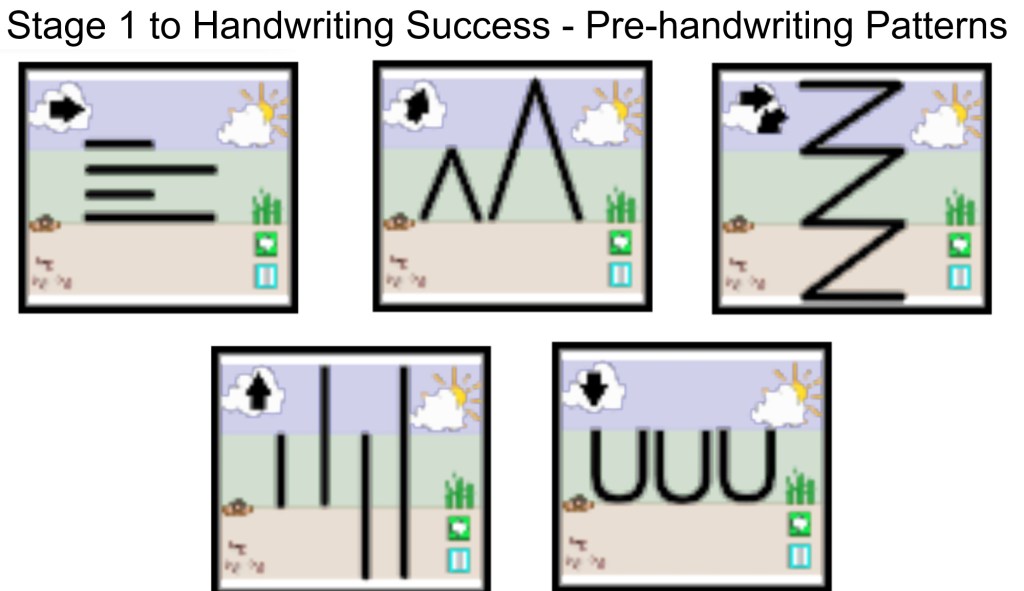
Pre-handwriting patterns are the first stage in supporting a child to handwriting success. They help the child to learn the shapes and directional pushes and pulls required to form letters. All letters are a combination of these shapes and lines.
Young children can start to learn these patterns through their play, long before they are ready to pick up a pencil, moving toys back and forth across the floor or whirling them around in the air. To a child it is just play and fun, but you are doing something far more powerful and constructive by helping them to develop the motor memory patterns and directional movement skills they will need for handwriting.
Later, as their coordination and gross motor skills develop, they make more controlled and varied movement patterns in their play. Changing directions, speed and size are all prerequisite skills needed for learning pre-handwriting patterns.
These handwriting patterns do not need to be taught as worksheet activities (though they do help to perfect shape and pattern formation), drawing pictures and patterns in sand, paint and with other writing tools are all fun ways to practise.
Teaching the handwriting patterns in groups helps to further develop the specific movements (pushes and pulls) required to form them and help commit them to the motor memory. A child can then recall these motor memories to support them as they begin to form letters.
Pre-handwriting patterns that encourage a child to move their pencil from left to right are very important for left-handed writers. They need to be taught this so that they can make the cross motion in the H, T, J, G and I from left to right, as their natural instinct is to go from right to left. If this is not corrected when writing E and F the cross lines will not be “anchored” to the letter.
Once the handwriting patterns have been mastered a child will have the confidence and skills base necessary to start forming letters, numbers and symbols.
Have you got your Free Pre-handwriting Pattern Animations & Worksheets?
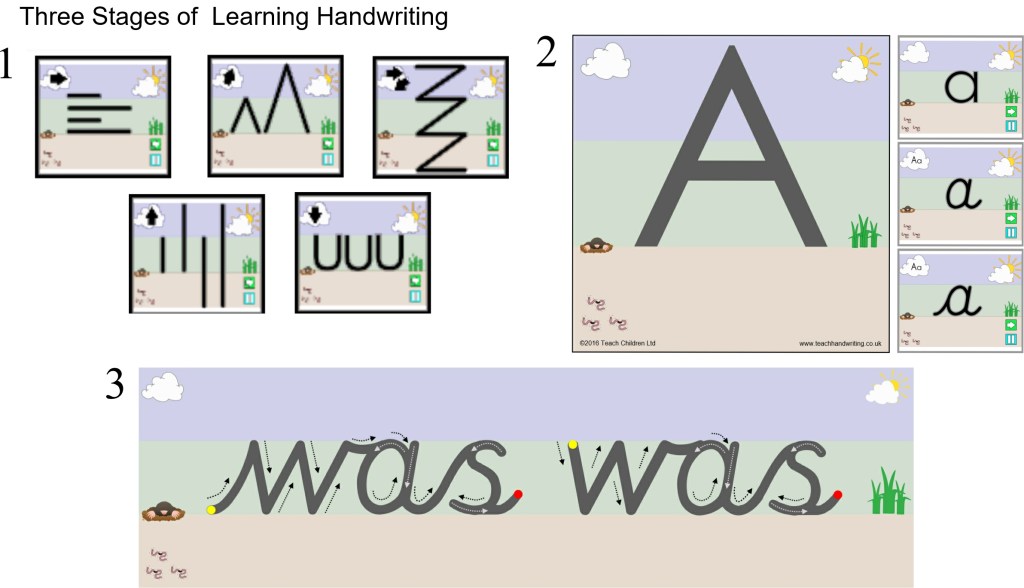
There are three distinct stages for children to progress through to develop a good handwriting style:
Stage 1 – Pre-handwriting Patterns
Pre-handwriting patterns support a child towards handwriting success. They help the them to learn the shapes and directional pushes and pulls required to form letters. All letters are a combination of these shapes and lines.
Stage 2 – Single Letter Formation
For children to develop a good handwriting style it is important to learn how to form the letters correctly.
Beginning with lower-case letters and only the capital letters for the first letter in a child’s name, examples: Peter Rabbit, Sally Green, George Blue or Mary Shell.
Learning the correct lower-case letter formation also makes the transition from single letter formation to joined letter handwriting much easier.
Stage 3 – Joined Handwriting
Learning to join letters for handwriting enables children to develop a speedy, fluid and legible handwriting style.