Why it is Important to Teach Correct Letter Formation!

It can often be assumed children will pick up how to write letters if they see them often enough (by osmosis). This is just not the case.  Correct letter formation has to be taught. Seeing a completed letter or word or watching it being typed up and appear on a screen does not show children how to form the letters.

For children to develop a good handwriting style it is important to learn how to form letters correctly to begin with as this makes the transition from single letter formation to joined letter handwriting much easier. This enables them to develop a speedy, fluid and legible handwriting style.

Department of Education; The writing framework: July 2025; page32 & 33; https://www.gov.uk/government/publications/the-writing-framework now recognizes and highlights the importance of teaching correct letter formation from the very beginning, so, starting in foundation stage:

“It should be:

  • • daily, until pupils can write legibly and easily
  • • taught in small steps, with lots of opportunity for practice
  • • cumulative: teachers should build on what pupils have learned previously 
  • • consolidated before teaching moves on so that pupils do not practise letters incorrectly
  • • revisited when further practice is needed
  • • demonstrated by the teacher
  • • additional to any handwriting that forms part of teaching phonics”

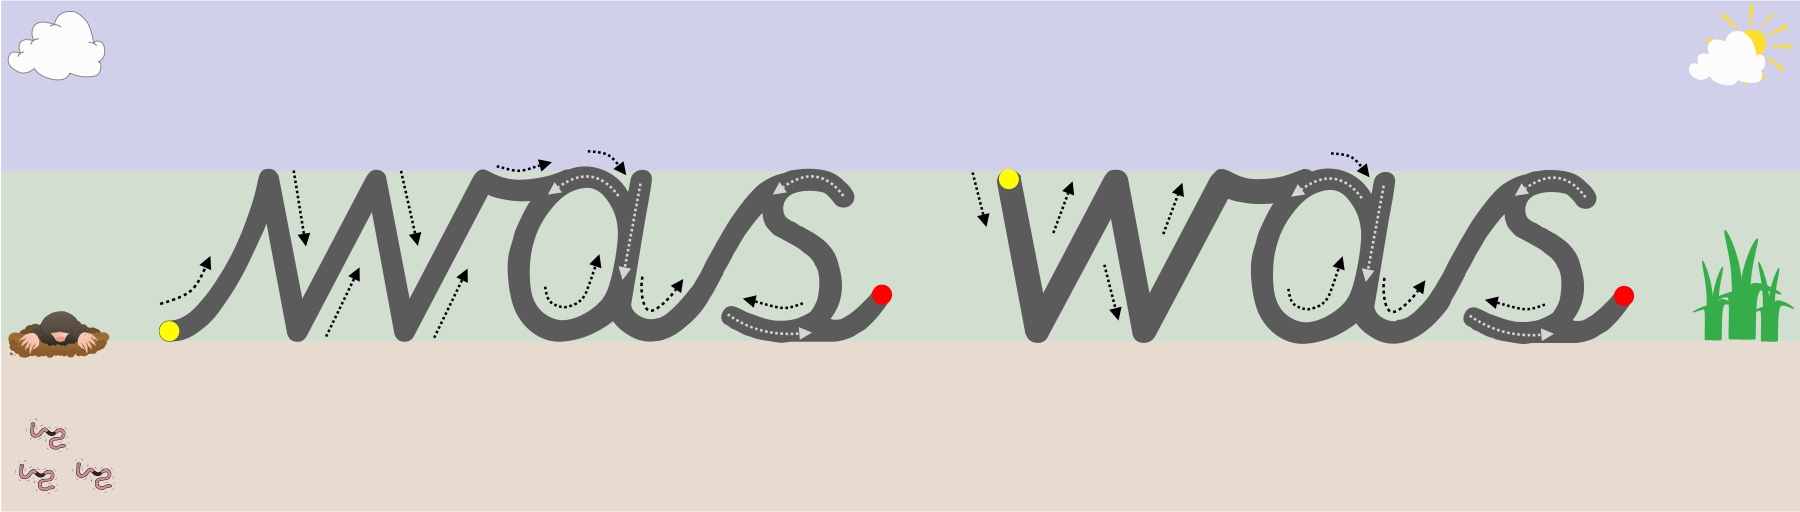
Letters are created through joining lines and curve shapes in a particular way. They have a designated start point and set directional pushes and pulls of the pencil to reach the designated finish point. This is why from the very start (2012) Teach Handwriting has always taught letter formation in groups/families rather than in alphabetical order (a Year 1 national curriculum statutory requirement in 2015). Certain groups use the same, or similar, shape and directional push and pulls of the pencil to form the letter, for instance the letter c has the same start point and anti-clockwise directional movement shape that is needed to create the letters a, d, g, o and, though a little more complicated, the letters s and e. Teaching letters in groups and families can also help to limit letter reversals such as b and d.

Another interesting and very important useful point included in the Department of Education; The writing framework: July 2025; page 33; https://www.gov.uk/government/publications/the-writing-framework, for Year 1 is that:

“Wide-lined paper is essential at this stage. Mid-line guides can also help pupils to position letters. Pupils should be introduced to paper with narrower lines once they can write legibly and easily on wide-lined paper.”

Which I believe, acknowledging the fact that children can form their letters correctly if taught correctly but may not be ready for narrow line height paper due to their developmental stage of their fine motor skill.

Also, it explains how in Year 2:

“To join letters easily and legibly, pupils first need to form the shape of each letter correctly, starting and finishing each one at the correct point and ensuring that its size is properly related to other letters in the same family.”

Due to how handwriting has or hasn’t been taught over the generations we all have our own way of handwriting. When supporting and teaching young children we need to develop a consistent approach so that they do not get confused or frustrated by adults giving them conflicting information.

For parents this means finding out from your child’s school which letter font they are teaching so that you can support them more effectively at home. This may mean that you have to learn a new way of writing some letters.

This also applies to teachers and teaching assistants; “Department of Education; The writing framework: July 2025; page 32; https://www.gov.uk/government/publications/the-writing-framework states:

“Teachers’ own handwriting should provide a model of high standards, across the curriculum and not just in handwriting lessons, but particularly when pupils are learning to write.”

As the adults in the situation, we have to accept that it is for us to make the changes. Just because something is different to the way we were taught, or do it, doesn’t mean it is wrong, it is just different! 

Our free letter animations are not just to support children with their learning but also to provide parents and teachers (all adults really) with the knowledge and support to help children develop a consistent handwriting style.

Parent animation link: https://teachhandwriting.co.uk/parents.html

Teacher animation link – click through on the Key Stage you are teaching: https://teachhandwriting.co.uk/teach-handwriting-teachers.html

Stage 2 to #Handwriting Success – Single Letter Formation (non-pencil activities)

Over the last couple of weeks, we explained that pre-handwriting patterns are the first stage of learning to handwrite. Once a child has mastered these, they are ready to start learning how to form letters.

But where do you start?

Our view is to focus on lower-case letters first and only the capital letters for the first letter in a child’s, examples: Peter Rabbit, Sally Green, George Blue or Mary Shell.

Why?

  • One reason is that about 95% of what children write, and are exposed to, is in a lower-case form and only 5% in capital.
  • Lower-case letters are far less complicated, requiring fewer pencil lifts to complete the letters.
  • As both lower-case and capital letters require a child to form curved lines, a skill which most children have to practice, writing lower-case letters is no more difficult than writing capitals.
  • In a young child’s writing, all the letters are initially the same size, whether they are capitals or lower case; it is part of the normal developmental path of handwriting. So, the view that teaching capitals letters is easier because they are bigger is not true.
  • Young children who have learnt mostly capital letters first find it difficult to stop, as it is so ingrained into the memory, often using them half way through words and sentences. Even when they are older this inappropriate use of capitals creeps back into their work especially if they are tired or concentrating hard on composing their work.

A child’s first major achievement, in their eyes, is to write their name. So, although concentrating on lower-case letters, teach them how to form the capital letter for the first letters of their name to get them excited about handwriting.

As they master the lower-case letters introduce the remainder of the capital letters. It is important that both are taught so that a child can develop a speedy, fluid and legible handwriting style.

As with the pre-handwriting patterns, part one of learning correct letter formation is through non-pencil activities. This is because it supports the storage of the larger gross motor memory movements; the stage of development that EYFS are working at. They can then tap into those gross motor memory movements as their fine motor skills are developing; taking the stored large movement to a smaller and smaller scale.  

Once again ‘The writing framework’ acknowledges that:

“On joining reception, some children may need teaching and practice in using and manoeuvring their thumb, wrist and shoulder muscles in the way they need for handwriting. Initially, handwriting lessons could include learning the movements needed to form letters, practising these movements at a range of sizes…”

Department of Education; The writing framework: July 2025; page 24; https://www.gov.uk/government/publications/the-writing-framework

It is through play that you can really engage a child in learning how to correctly form their letters, and has always been an important foundation stone in our Foundation Stage Teach Handwriting Scheme (https://www.teachhandwriting.co.uk/handwriting-teaching-manuals.html#hs-fs ) and strongly promoted on our website https://www.teachhandwriting.co.uk ) and blog (https://teachhandwriting.blog/ ) since 2012.  

Our non-pencil – ‘Big to Small’ activities are an easy fun way to start developing these skills early on through play: https://teachhandwriting.co.uk/big-to-small.html

Stage 1 to #Handwriting Success – Pre-handwriting Patterns

Last week we looked at non-pencil pre-handwriting pattern development, working on large scale movements through play activities.

The next stage in the progression is to move to pencil and paper activities.

Again ‘The writing framework’ states that:

“Teaching should then progress to specific handwriting lessons and practice. This might initially include systematic teaching of and practice in moving the pencil to master the horizontal, diagonal, vertical and circular strokes needed for writing.”

Department of Education; The writing framework: July 2025; page 25; https://www.gov.uk/government/publications/the-writing-framework

Here at Teach Children Ltd we always recommend teaching the handwriting patterns in groups, as this helps to further develop the specific movements (pushes and pulls) required to form the patterns and helps commit them to the motor memory. A child can then recall these motor memories to support them as they begin to form letters.

Pre-handwriting patterns that encourage a child to move their pencil from left to right are very important for left-handed writers. They need to be taught this so that they can make the cross motion in the H, T, J, G and I from left to right, as their natural instinct is to go from right to left. If this is not corrected when writing E and F the cross lines will not be “anchored” to the letter.

Once the handwriting patterns have been mastered a child will have the confidence and skills base necessary to start forming letters, numbers and symbols.

Have you got your Free Pre-handwriting Pattern Animations & Worksheets?

For Teachers: https://teachhandwriting.co.uk/pre-handwriting-patterns.html

For Parents: https://teachhandwriting.co.uk/patterns.html

Stage 1 to #Handwriting Success – Non-pencil – Pre-handwriting Patterns

Learning to handwrite does not start with pen and paper but through play (non-pencil activities), as children explore shape and motion (how the body moves) through their senses – touch, sight and body awareness. Play is such an important element of your child’s physical, emotional, social and academic development.

Pre-handwriting patterns are the first stage in supporting a child to handwriting success. They help the child to learn the shapes and directional pushes and pulls required to form letters. All letters are a combination of these shapes and lines.

Young children can start to learn these patterns through their play, long before they are ready to pick up a pencil, moving toys back and forth across the floor or whirling them around in the air. To a child it is just play and fun, but you are doing something far more powerful and constructive by helping them to develop the motor memory patterns and directional movement skills they will need for handwriting.

Later, as their coordination and gross motor skills develop, they make more controlled and varied movement patterns in their play. Changing directions, speed and size are all prerequisite skills needed for learning pre-handwriting patterns.

Once again ‘The writing framework’ acknowledges that:

“On joining reception, some children may need teaching and practice in using and manoeuvring their thumb, wrist and shoulder muscles in the way they need for handwriting. Initially, handwriting lessons could include learning the movements needed to form letters, practising these movements at a range of sizes…”

Department of Education; The writing framework: July 2025; page 24; https://www.gov.uk/government/publications/the-writing-framework

It is through play that you can really engage a child in learning how to correctly form these movements, or what we refer to as Pre-handwriting Patterns, that have always been an important foundation stone in our Foundation Stage Teach Handwriting Scheme (https://www.teachhandwriting.co.uk/handwriting-teaching-manuals.html#hs-fs ) and strongly promoted on our website 😦 https://www.teachhandwriting.co.uk/index.html ) and blog (https://teachhandwriting.blog/ ) since 2012.  

Our non-pencil – ‘Big to Small’ activities are an easy fun way to start developing these skills early on through play: https://teachhandwriting.co.uk/big-to-small.html

The Three Stages to Learning #Handwriting

There are three distinct stages for children to progress through to develop a good handwriting style:

Stage 1 – Pre-handwriting Patterns

Pre-handwriting patterns support a child towards handwriting success. They help the them to learn the shapes and directional pushes and pulls required to form letters. All letters are a combination of these shapes and lines.

Stage 2 – Single Letter Formation

For children to develop a good handwriting style it is important to learn how to form the letters correctly.

Beginning with lower-case letters and only the capital letters for the first letter in a child’s name, examples: Peter Rabbit, Sally Green, George Blue or Mary Shell.

Learning the correct lower-case letter formation also makes the transition from single letter formation to joined letter handwriting much easier.

Stage 3 – Joined Handwriting

Learning to join letters for handwriting enables children to develop a speedy, fluid and legible handwriting style.

Handwriting Really Starts with Play

Learning to handwrite does not start with pen and paper but through play, as children explore shape and motion (how the body moves) through their senses – touch, sight and body awareness. Play is such an important element of your child’s physical, emotional, social and academic development.

Young children learn many of the directional pushes, pulls and changes in direction, required for handwriting, on a much larger scale, long before they pick up a pencil, through playing with cars or pretending to cook. These movements become the drawings/scribbles which young children form once they start mark-making, initially as big uncontrolled movements then becoming more controlled and smaller as their gross and fine motor skills develop.

It is through play that you can really engage your child in learning how to correctly form pre-handwriting patterns and letters (the start points, orientation, directional movements and finish points).

Our non-pencil – ‘Big to Small’ activities are an easy fun way to start developing these skills early on through play: https://teachhandwriting.co.uk/big-to-small.html   

Young children love seeing their name so it is a great way to introduce letter formation; here are some other fun ideas:

  • This activity can be done indoors on large sheets of paper or using chalk on a path or patio (the beach is also a great place to do this). Write your child’s name very big and make a mark on each letter that represents a start point (an arrow showing the direction of travel can also help). Remember to use a capital letter for the first letter of their name and we would suggest lower case letters for the remaining letters. Use the letters as a track for racing cars or toys. If you make the letters big enough your child could walk, hop, jump or skip around the letters. To help them remember the letters, once they have finished a letter, encourage them to say that letter‘s alphabet name (NOT a sound the letter can make).
  • Collect stones, twigs, leaves, etc…  Use them to make the letters of your child’s name. They may only make one or two of the letters, before making a hedgehog house, nest or den for their toys becomes more interesting, but this does not matter, it is all part of the adventure.
  • Feely bag games are a fun way to explore shape and form. Try placing the letters of your child’s name into a bag or box they cannot see into. It is useful to talk through the letter shapes beforehand so they can see them as they move them about in their hands; then place them in the bag. Ask them to put their hands in (both hands, if possible, but if not, then use the dominant hand) the bag, picks up a letter, feels it, identifies it and pulls it out to check only AFTER identifying it. If correct, they get to “keep” it, if wrong, you get to “keep” it. The winner is the one with the most letters at the end. For some children it can help to have another set of the letters outside the bag to help them identify the shape they are handling in the bag. Again, encourage them to use the alphabet name of the letter.
  • Play-dough, clay and Plasticine activities are great for developing hand strength for handwriting and learning how to form letter shapes.

Your child will love these sort of activities as they see it as just playing and they get your undivided attention. You will enjoy it as you are sharing quality time with your child helping them to develop more than just their letter formation ability but also their communication and social skills.

Learning through play is a powerful way of supporting your child’s development. So have fun and play!

For links and more fun Ideas go to: https://teachhandwriting.blog/

Different Types of Play and their Importance

We are always being shown how important play is in the development of young animals’ survival and hunting skills. How many times have you thought how cute or lovely when watching kittens, puppies or polar bears playing?

Humans are also animals which thrive and develop through play; in fact, play is so important the United Nations High Commission for Human Rights state it as a right for every child (Ginsburg, 2013).

We often think of play as a frivolous pastime rather than a practical and meaningful one. However, here at Teach Children we see play as a vital part of a child’s physical, emotional, social and intellectual growth and well-being.

There has been considerable research over the years on play, which supports our point of view, with the consensus being that children need to experience five different types of play (Dr.D Whitebread, 2012). These five types of play are roughly based on the developmental opportunities they provide, especially if it is child driven rather than adult lead:

Physical Play – active exercise (running, jumping, skipping etc..), rough & tumble and fine motor skills activities to develop whole body and hand and eye co-ordination strength and endurance. The outdoor element of such play develops independence, resourcefulness and self-regulation while the fine motor skills activities support the development of concentration and perseverance.

Play with Objects – starts as soon as a child can grasp and hold an object; mouthing, biting, turning, stroking, hitting and dropping. It’s how we all learn through the exploration of our senses (sensory-motor play). This type of play develops our abilities to; physically manipulate items, think, reason and problem solve, to set challenges and goals as well as to monitor our own progress.

Symbolic Play – refers to the development of spoken language, visual symbols such as letters and numbers, music, painting, drawing and other media used for communication of thought and ideas. This type of play allows children to develop the abilities to express and reflect on experiences, ideas and emotions. Sound and language play develops phonological awareness required for literacy, while number play that relates to real life situations supports numeracy skills.

Pretence/socio-dramatic Play – Pretend play provides the opportunity to develop cognitive, social, self-regulatory and academic skills. This kind of play means children have to learn and pick up on unspoken rules of interaction, taking on the role of a character and playing within the expected confines of that role.

Games with Rules – physical games such as chase, hide & seek, sport, board and computer games. Develop social skills and the emotional skills of taking turns, winning and losing as well as other people’s perspectives.

                                                             So, to play is to learn!

Bibliography

Kenneth R. Ginsburg, MD, MSEd, 25/07/2013; ‘The Importance of Play in Promoting Healthy Child Development and Maintaining Strong Parent-Child Bonds’: THE AMERICAN ACADEMY OF PEDIATRICS: http://pediatrics.aappublications.org/content/119/1/182.full

Dr.D. Whitebread, April 2012: ‘The Importance of Play’; Commissioned for the Toy Industries of Europe:  http://www.importanceofplay.eu/IMG/pdf/dr_david_whitebread_-_the_importance_of_play.pdf                            

The Appropriate Equipment at the Right Time!

As with learning any new skill the right equipment at the right time can make a real difference to the whole learning experience as well as the outcome. Learning to handwrite is no different.

Young children, due to their gross and fine motor skills ability, require chunky shafted tools so that they can grip them effectively. This means they have a greater control over the tool and can achieve a more satisfactory outcome. If they are using a tool that is too thin, they will find gripping it difficult and have to keep changing their grip. They will have less control of the tool making the experience disappointing at best and off-putting at worst.

As children begin a more formal approach to learning to form their letters correctly then appropriately sized and lead grade pencils are the best tool for the job. Pencils come in all widths, lengths and shapes. The key is to find the style of pencil which best suits the child and their stage of pencil grip development. Remember one size doesn’t fit all!

When a child has learnt to join their letters and has a good and consistent letter size, places all their letters on the writing line correctly and in relation to each other, then it maybe they are ready to be moved to pen. It is important before moving a child to pen that they are writing with speed (appropriate for their age) and fluidity (comfortable writing all the letters of the alphabet lower and upper case correctly). A child whose handwriting is slow and laboured may need additional support and time before being moved on to pen.

Vertical to Horizontal Surfaces for Handwriting

Young children, due to the stage of their physical development, draw from the shoulder rather than the elbow and wrist using large arm movements. At this stage they often prefer vertical drawing and painting surfaces as it allows a free range of movements. This is often why young children will write on walls, not because they are being naughty but because it just feels comfortable and so more enjoyable.

Drawing and writing on a vertical surface is important at this stage; as it helps young children develop the wrist strength and flexibility they will need later on to hold a pencil correctly for handwriting.

The jump from a vertical to a horizontal writing surface can seem too great for some children; due to their stage of development. These children may benefit from the paper being positioned on a sloped board.

If you are not sure whether a child needs a sloped board for handwriting, instead of buying a specialist board, you could make one. Try using a ring binder or lever arch file stuffed with magazines and newspaper to make a sloped board. Tape the edges to stop the papers falling out; you could cover it in sticky back plastic to give a smoother finish to the board. The advantage of this is that you can make them to any angle of slope. Try a few to see which, if any, the child prefers.

A homemade sloped board is just as effective as a bought one. Often a child only requires one for a short amount of time and quickly moves to writing on a horizontal surface. For a few children a sloped surface may be required for a few years, or indefinitely, in which case a purpose bought sloped writing board is a sounder investment.

Using Different Types of Textured Surfaces and Paper

To help young children to store pattern and letter shape formations into their motor memory it is important that the tools used provide a resistance rather than one that flows effortlessly over the writing/drawing surface. The greater the resistance the more the body can neurologically acknowledge (feel) the movement and help to send appropriate information to the brain.

Some of the best surfaces/papers and tools for young children to begin learning to draw patterns, shapes and correctly write letters:

  • Chalk on boards, walls or paths
  • Flip chart pens or large felt tips on course paper such as sugar paper
  • Using appropriately sized paint brushes on course paper (such as sand paper) or surfaces
  • Finger painting or finger drawing in sand, paint or cornflour mix
  • Finger tracing and then trying to draw the pattern, shape or letter straight afterwards.
  • Try chalking the shape or letter onto a blackboard and have the child use a damp sponge to wipe it off again (make sure the child starts in the correct place and moves correctly around the shape or letter to the correct finish point).
  • Appropriately sized crayons and pencils on course paper or card (non-shiny side of cereal boxes and corrugated card can be good fun and different to use).

School Reports – Handwriting Improvements Needed!

So, the school report has been received and you have been told that your child needs to improve their handwriting.

This is all well and good, but what exactly needs improving?

What are they finding difficult and how on earth do you write a continuous cursive z? 

So, you eventually get some handwriting practice sheets home or off the web. But no amount of time spent doing them seems to make much difference. It seemed to take longer to get them started than they spent practising handwriting. In fact they seemed worse because they were unhappy and frustrated with their own progress, so the more you try to push them the more resistant they become. Eventually you think there has to be a better way than this?

Doing more of what you are already struggling with is not always the answer. Handwriting is a complex skill to learn and there are a number of reasons why a child may be struggling.

There is a lot of information and free resources on our ‘Parent’ page which has been designed to help you: https://teachhandwriting.co.uk/parents.html

Try not to get over whelm, take things slowly and keep it simple.

Some things you might want to check and work on first before thinking about your child’s letter or join formation:

  • How are they sitting, is it a good position, it makes a difference;
  • Paper position and tilt can have a real impact especially if they are left-handed writers;
  • Are they using an efficient pencil grip for their age.

If your child is finding some or all of these elements difficult it might be that you need to work on their physical strength as well. Again, you will find information and games to help build this at the same time. And with the summer holidays coming up it is a great time for you to play games and do activities which then help them to develop the strengths and skills which may be holding them back and making handwriting a difficult task to master.

It is important to check and know which letter formations are being taught in school and that this is what you teach at home. Otherwise, you will only be causing more frustration and stress for your child.

Please note that if the letter formation being shown in the @Parent@ section is not the one being taught in school, check our @Teacher@ section of the website as you may find it there: https://teachhandwriting.co.uk/key-stage-1-handwriting-routes.html

The Move from Pencil to Pen

Last week we looked at why pencils, rather than pens, are a good first tool for learning to handwrite.

Children can’t wait however for that magic day when the teacher moves them from pencil to pen. It really is a big moment and means more than just “I can write neatly”, for them it is an acknowledgement of their maturity (growing up) and a status symbol of intellect and ability in their eyes and those of their peers.

Moving from pencil to pen can have a dramatic effect on a child’s confidence and self-esteem.  I have seen how moving a child from pencil to pen can give them a new found confidence and self-belief in their own ability, because I showed my belief in them by making that gesture. They may not have had the perfect font style in pencil but moving to pen did improve their ability to form letters more freely and become more consistent in their formation.

It is difficult to put an age on when a child should move from pencil to pen because every child is different. Schools have different policies on when this should happen, with most tending to make the move at around the age of 8/9 years old. It should really depend on the child’s ability rather than their age, as well as the potential benefits the move may have to confidence and self-esteem.

It does not make sense to keep a child working with pencil until they have a perfect handwriting style because that may never happen. For many a neat, beautiful handwriting style may never be a reality.

Advantages of pens:

  • A good quality pen will give an even ink flow.
  • A more consistent hand pressure is required, helping to develop and maintain a fluid handwriting style (reducing hand strain).
  • Fibre tip and roller pens can give the same look and writing experience as a good quality fountain pen, but are far less messy (especially for left-handed people).
  • With the right pen everyone’s handwriting can look good, (I love my fountain pen for that reason).

Limitations:

  • Cheap biro pens require a lot of hand pressure and give an inconsistent ink flow (so not very different from pencils).
  • Cheap fountain pens can be scratchy and messy
  • Some schools will insist on using a particular type of pen which is not always good for all.

My tip would be to test a few pen types and weights to find out which ones your child finds the most comfortable and enjoyable to use. I realise this can be an issue if your child’s school insist on one type of pen. But if you can prove your child’s handwriting ability is great with a different style, I think it is worth talking to them about it.

Moving from pencil to pen is an important point in a child’s education, affecting their confidence and self-esteem, and like any transition stage it should be approached with thought and care.