Tips for Supporting #Left-handed Writers

Surprisingly there are few differences when teaching left and right-handed children to handwrite. A left-handed child needs a slightly different pencil grip, and needs to hold the pencil slightly higher up the shaft, as well as a different paper position and tilt. Some left-handed children do find handwriting challenging to start with because they naturally want to draw straight lines right to left rather than left to right.

Check out our Left-handed Writers Page for more information and tips on how to support them: https://teachhandwriting.co.uk/left-handed.html

Paper Position & Tilt are Important for Good Handwriting

The paper position and tilt on the desk, for both right and left-handed writers, can make a big difference to a child’s handwriting experience and comfort and yet it is an element which is often neglected.

The correct paper position and tilt enables your child to handwrite comfortably while being able to see what they are writing. It also allows the non-writing hand to move the paper up the table so that the writing hand elbow can stay in the same position. The aim is to have the paper move up the table, rather than the writing hand moving down and eventually off the table.

With the non-writing hand moving the paper up the table the writing line stays in the same place which means eye movements are less, helping to make the writing experience less tiring and stressful.

If the paper is positioned and tilted correctly, with their writing hand under the writing line, they will also be able to see more easily what they have just written and where to place the next letter, word or section of text on the page. This is especially important for left-handed writers.

The most appropriate paper tilt angle is generally suggested as anywhere between 20 to 45 degrees anti-clockwise for right-handed writers and 30 to 45 degrees clockwise for left-handed writers.

For more tips and advice on developing a good paper position and tilt:

For Parents: https://teachhandwriting.co.uk/paper-position.html

For Teachers: https://teachhandwriting.co.uk/paper-position-for-comfortable-handwriting.html

School Reports – Handwriting Improvements Needed!

So, the school report has been received and you have been told that your child needs to improve their handwriting.

This is all well and good, but what exactly needs improving?

What are they finding difficult and how on earth do you write a continuous cursive z? 

So, you eventually get some handwriting practice sheets home or off the web. But no amount of time spent doing them seems to make much difference. It seemed to take longer to get them started than they spent practising handwriting. In fact they seemed worse because they were unhappy and frustrated with their own progress, so the more you try to push them the more resistant they become. Eventually you think there has to be a better way than this?

Doing more of what you are already struggling with is not always the answer. Handwriting is a complex skill to learn and there are a number of reasons why a child may be struggling.

There is a lot of information and free resources on our ‘Parent’ page which has been designed to help you: https://teachhandwriting.co.uk/parents.html

Try not to get over whelm, take things slowly and keep it simple.

Some things you might want to check and work on first before thinking about your child’s letter or join formation:

  • How are they sitting, is it a good position, it makes a difference;
  • Paper position and tilt can have a real impact especially if they are left-handed writers;
  • Are they using an efficient pencil grip for their age.

If your child is finding some or all of these elements difficult it might be that you need to work on their physical strength as well. Again, you will find information and games to help build this at the same time. And with the summer holidays coming up it is a great time for you to play games and do activities which then help them to develop the strengths and skills which may be holding them back and making handwriting a difficult task to master.

It is important to check and know which letter formations are being taught in school and that this is what you teach at home. Otherwise, you will only be causing more frustration and stress for your child.

Please note that if the letter formation being shown in the @Parent@ section is not the one being taught in school, check our @Teacher@ section of the website as you may find it there: https://teachhandwriting.co.uk/key-stage-1-handwriting-routes.html

Why do children often find it difficult to start the next line of writing at the margin?

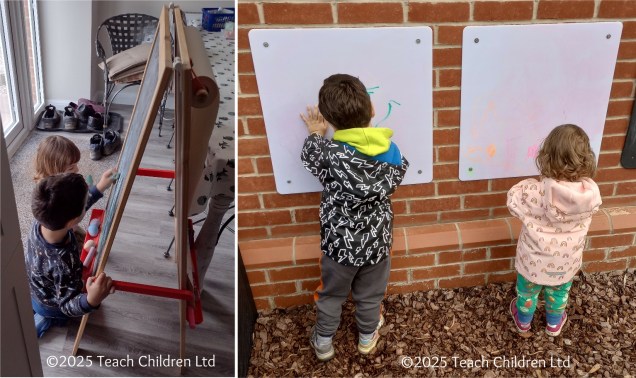
Always starting the next line of writing at the margin can be a real challenge for many children.

It doesn’t matter how many times we explain to the children that they need to start each line at, or close to, the margin as they write further down the page the further away from the margin they seem to get!

In desperation we may even start to put coloured dots into the margin to show them were to go back too, but again this seldom works. Why is this?

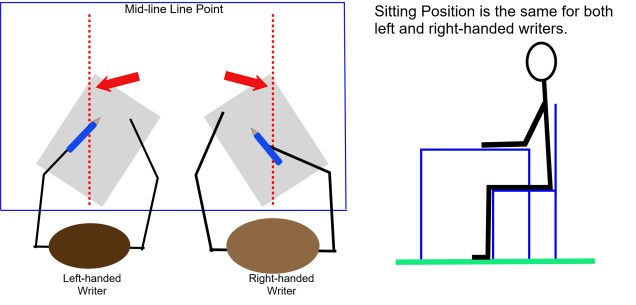
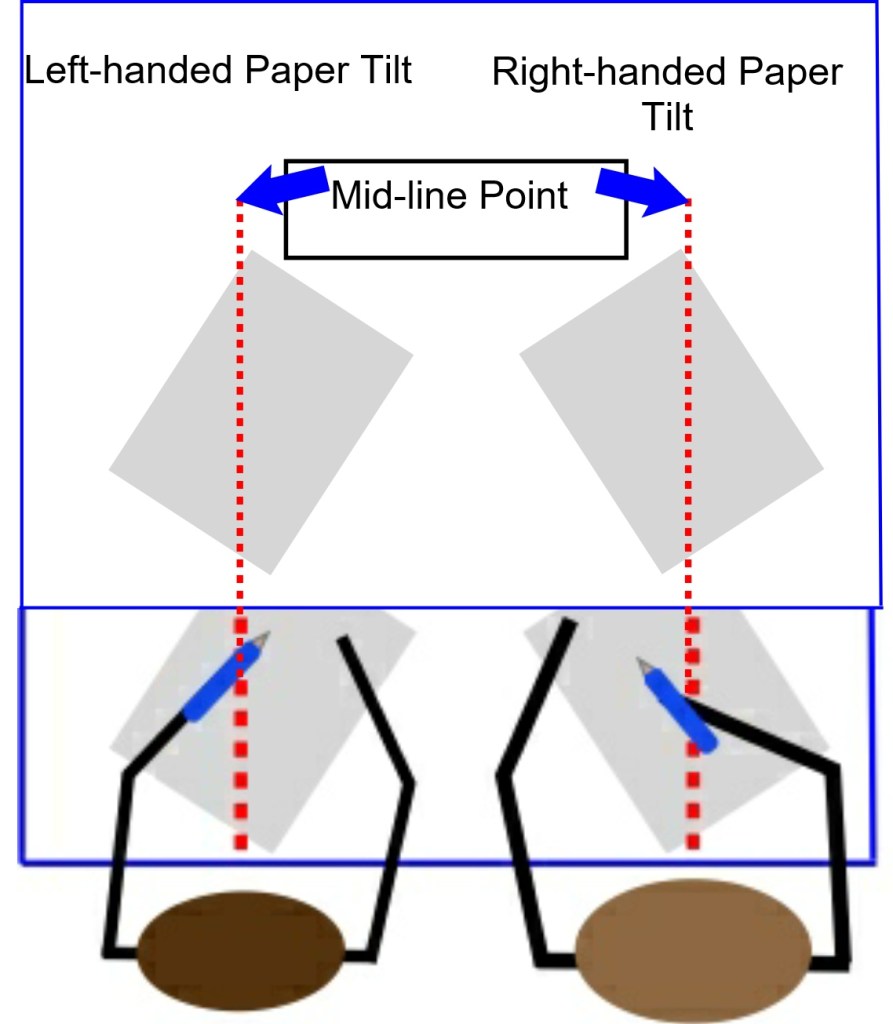
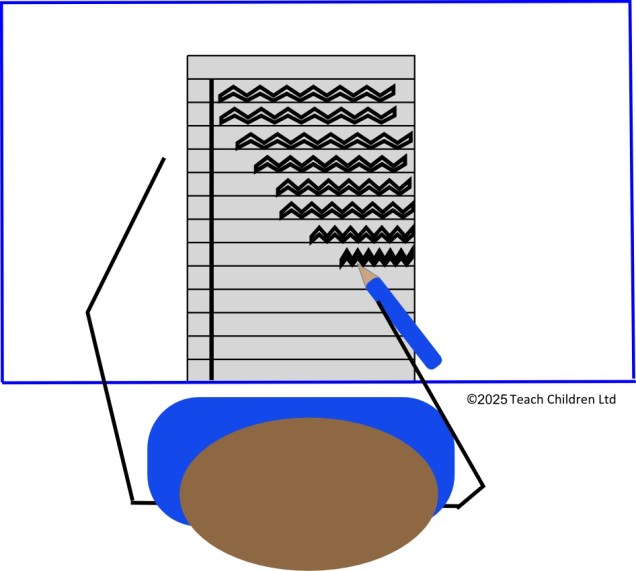
Well often it is because the child has not tilted their paper and is not moving the paper up the table as they write.

This means that, as the child writes their writing hand movies down the page (often until they reach the end of the table) and their elbow moves back behind their body.  As this happens, they will also tend to move back away from the table slightly.  The result being that as they move down to the next line their body is physically starting to blocking them from returning to the margin. So, they start to write at a point that they physically are able to reach, moving further away from the margin the further down the page they go.

Once a child is taught to tilt and move the paper up the table with the writing hand under the writing line, this cannot happen as the writing hand stays in virtually the same position throughout the writing task. Which means they can see where they have finished a line and the margin of the line underneath.

Paper Position & Tilt are Important for Good Handwriting

The paper position and tilt on the desk, for both right and left-handed writers, can make a big difference to a child’s handwriting experience and comfort and yet it is an element which is often neglected.

The correct paper position and tilt enables your child to handwrite comfortably while being able to see what they are writing. It also allows the non-writing hand to move the paper up the table so that the writing hand elbow can stay in the same position. The aim is to have the paper move up the table, rather than the writing hand moving down and eventually off the table.

With the non-writing hand moving the paper up the table the writing line stays in the same place which means eye movements are less, helping to make the writing experience less tiring and stressful.

If the paper is positioned and tilted correctly, with their writing hand under the writing line, they will also be able to see more easily what they have just written and where to place the next letter, word or section of text on the page. This is especially important for left-handed writers.

The most appropriate paper tilt angle is generally suggested as anywhere between 20 to 45 degrees anti-clockwise for right-handed writers and 30 to 45 degrees clockwise for left-handed writers.

For more tips and advice on developing a good paper position and tilt:

For Parents: https://teachhandwriting.co.uk/paper-position.html

For Teachers: https://teachhandwriting.co.uk/paper-position-for-comfortable-handwriting.html

Good Sitting Position for #HandwritingPaper Position & Tilt are Important for Good

The paper position and tilt on the desk, for both right and left-handed writers, can make a big difference to a child’s handwriting experience and comfort and yet it is an element which is often neglected.

The correct paper position and tilt enables your child to handwrite comfortably while being able to see what they are writing. It also allows the non-writing hand to move the paper up the table so that the writing hand elbow can stay in the same position. The aim is to have the paper move up the table, rather than the writing hand moving down and eventually off the table.

With the non-writing hand moving the paper up the table the writing line stays in the same place which means eye movements are less, helping to make the writing experience less tiring and stressful.

If the paper is positioned and tilted correctly, with their writing hand under the writing line, they will also be able to see more easily what they have just written and where to place the next letter, word or section of text on the page. This is especially important for left-handed writers.

The most appropriate paper tilt angle is generally suggested as anywhere between 20 to 45 degrees anti-clockwise for right-handed writers and 30 to 45 degrees clockwise for left-handed writers.

For more tips and advice on developing a good paper position and tilt:

For Parents: https://teachhandwriting.co.uk/paper-position.html

For Teachers: https://teachhandwriting.co.uk/paper-position-for-comfortable-handwriting.html

Vertical to Horizontal Surfaces for Handwriting

Young children, due to the stage of their physical development, draw from the shoulder rather than the elbow and wrist using large arm movements. At this stage they often prefer vertical drawing and painting surfaces as it allows a free range of movements. This is often why young children will write on walls, not because they are being naughty but because it just feels comfortable and so more enjoyable.

Drawing and writing on a vertical surface is important at this stage; as it helps young children develop the wrist strength and flexibility they will need later on to hold a pencil correctly for handwriting.

The jump from a vertical to a horizontal writing surface can seem too great for some children; due to their stage of development. These children may benefit from the paper being positioned on a sloped board.

If you are not sure whether a child needs a sloped board for handwriting, instead of buying a specialist board, you could make one. Try using a ring binder or lever arch file stuffed with magazines and newspaper to make a sloped board. Tape the edges to stop the papers falling out; you could cover it in sticky back plastic to give a smoother finish to the board. The advantage of this is that you can make them to any angle of slope. Try a few to see which, if any, the child prefers.

A homemade sloped board is just as effective as a bought one. Often a child only requires one for a short amount of time and quickly moves to writing on a horizontal surface. For a few children a sloped surface may be required for a few years, or indefinitely, in which case a purpose bought sloped writing board is a sounder investment.

Paper Position & Tilt are Important for Good Handwriting

The paper position and tilt on the desk, for both right and left-handed writers, can make a big difference to a child’s handwriting experience and comfort and yet it is an element which is often neglected.

The correct paper position and tilt enables your child to handwrite comfortably while being able to see what they are writing. It also allows the non-writing hand to move the paper up the table so that the writing hand elbow can stay in the same position. The aim is to have the paper move up the table, rather than the writing hand moving down and eventually off the table.

With the non-writing hand moving the paper up the table the writing line stays in the same place which means eye movements are less, helping to make the writing experience less tiring and stressful.

If the paper is positioned and tilted correctly, with their writing hand under the writing line, they will also be able to see more easily what they have just written and where to place the next letter, word or section of text on the page. This is especially important for left-handed writers.

The most appropriate paper tilt angle is generally suggested as anywhere between 20 to 45 degrees anti-clockwise for right-handed writers and 30 to 45 degrees clockwise for left-handed writers.

For more tips and advice on developing a good paper position and tilt:

For Parents: https://teachhandwriting.co.uk/paper-position.html

For Teachers: https://teachhandwriting.co.uk/paper-position-for-comfortable-handwriting.html

Why do young children love to draw on walls?

Young children love drawing on walls due to the stage of their physical development. They draw from the shoulder, rather than the elbow and wrist, using large arm movements. At this stage they prefer vertical drawing and painting surfaces as it allows a free range of movements. This is why they will write on walls (often newly decorated), not because they are meaning to be naughty but because it just feels comfortable and so more enjoyable.

Drawing and writing on a vertical surface is important at this stage as it helps young children develop the wrist strength and flexibility needed later to hold a pencil correctly for handwriting. Having the freedom to move more instinctively without restrictions means that a child is free to focus on other aspects, such as feeling the movement as they make shapes and gaining the confidence to have a go without fear of getting it wrong.

Case Study

Esme at the age of 3yrs 9mths was very happy to draw (more scribbling) and colour sitting at the table but Mum was not quite sure how to move her on. So, the following idea was suggested; to tape some large pieces of plain paper up on a suitable wall for her to draw on with appropriately sized pens, crayons or chalks.

This was the response:

Message from Mum was:

“She’s loving this idea. She did a triangle and a ‘s’ all on her own with no encouragement.” As the day went on Esme revisited the drawing wall and later on that day this photo arrived: 

Message from Mum: “She just did her name.” This had been the first time she had done this.

An easel was then ordered!

The jump from a vertical to a horizontal writing surface can seem too great for some children; due to their stage of development. If they are still using some large whole arm and/or big elbow movements then they may benefit from the paper being positioned on a sloped board.