Handwriting Begins with Mark Making & Simple Drawings

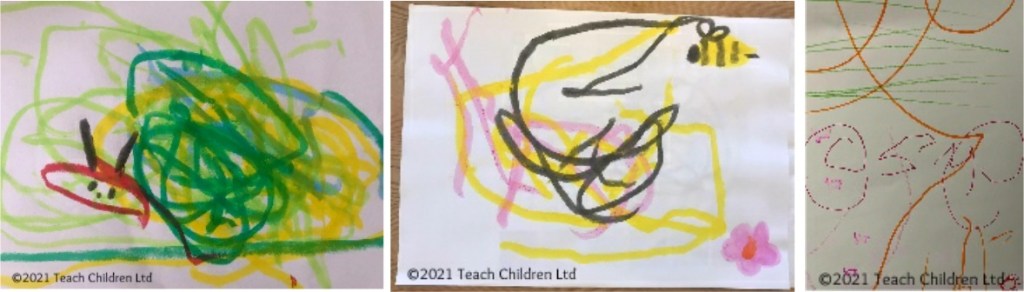
Young children’s first experience on the handwriting journey is through mark-making and simple drawings, whether it is with finger-paints, writing in sand or with pencils and crayons.

From about the age of 2, children start to move from a simple grasping (primitive) grip to one that secures the writing tool between the fingers and the thumb. In the early stages of mark-making and drawing young children will try different grips and holds, which is part of their normal development for handwriting and drawing.

As young children’s body (gross motor skills), hand strength and dexterity (fine motor skills) are developing they need a range of pencil, crayon and paint brush thicknesses. Young children need the thicker drawing tools as they can grip them more easily, helping them to mark-make. If the pencil is too thin, they find it difficult to grasp and have little control over it, making the drawing experience unsuccessful, which can lead to frustration and discourage them from trying again.

Due to the stage of their physical development young children use large movements to draw (from the shoulder rather than the wrist) which often creates larger shapes and lines.

During the early stages a vertical drawing and painting surface is important as it allows the child the freedom of movement to fully explore their mark-making potential. It also helps young children to develop the wrist strength and flexibility which they will need later to hold a pencil correctly for handwriting.

Using plain paper and surfaces is considered best for young children as they find it less restrictive.

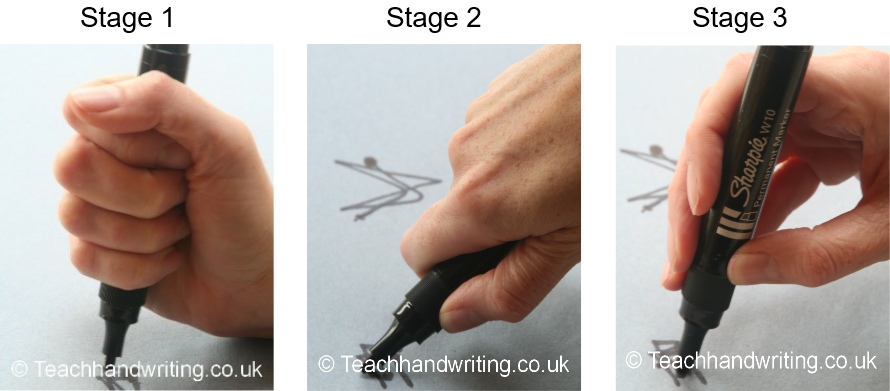
It has been widely acknowledged that a child who is forced to hold a writing tool using the dynamic tripod grip, before they are developmentally ready, can be turned off engaging in the drawing/writing process as well as developing a poor pencil grip later on. Remember some children do not develop the ability to use the dynamic tripod grip until the age of 5/6 years old.

As a child’s gross and fine motor skills develop so does their pencil grip and ability to draw and write at a small scale moving more from the elbow and wrist and progressing through the grip stages.

For more information on pencil grip development use this link: https://teachhandwriting.co.uk/grip-development.html

Drawing – a Pre-skill for Handwriting

Drawing pictures is a great way to help your child develop their pre-handwriting strokes and shape forming skills. It is amazing how, by using these simple shapes, you and your child can create fantastic picture.

Try using basic shapes such as circles, rectangles and triangles to begin with and then add some swirls, curves and spiral to give extra detail.

Spring/Easter Drawing Activity Ideas – Supporting Language & Pre-handwriting Pattern Development

The Easter holiday break is upon us!

We have put together some quick step by step Easter and farm drawing ideas for you to try, using basic shapes such as circles, rectangles and triangles. It is amazing how, by using these simple shapes, you and your child can create fantastic Spring/Easter: cards, pictures mobiles or bunting. Just follow this link and scroll down the page: https://teachhandwriting.co.uk/more-activities.html

Drawing pictures is a great way to help your child develop their pre-handwriting strokes and shape forming skills. As well as supporting shape, colour, pattern and language development.

Stage 1 to #Handwriting Success – Pre-handwriting Patterns

Pre-handwriting patterns are the first stage in supporting a child to handwriting success. They help the child to learn the shapes and directional pushes and pulls required to form letters. All letters are a combination of these shapes and lines.

Young children can start to learn these patterns through their play, long before they are ready to pick up a pencil, moving toys back and forth across the floor or whirling them around in the air. To a child it is just play and fun, but you are doing something far more powerful and constructive by helping them to develop the motor memory patterns and directional movement skills they will need for handwriting.

Later, as their coordination and gross motor skills develop, they make more controlled and varied movement patterns in their play. Changing directions, speed and size are all prerequisite skills needed for learning pre-handwriting patterns.

These handwriting patterns do not need to be taught as worksheet activities (though they do help to perfect shape and pattern formation), drawing pictures and patterns in sand, paint and with other writing tools are all fun ways to practise.

Teaching the handwriting patterns in groups helps to further develop the specific movements (pushes and pulls) required to form them and help commit them to the motor memory. A child can then recall these motor memories to support them as they begin to form letters.

Pre-handwriting patterns that encourage a child to move their pencil from left to right are very important for left-handed writers. They need to be taught this so that they can make the cross motion in the H, T, J, G and I from left to right, as their natural instinct is to go from right to left. If this is not corrected when writing E and F the cross lines will not be “anchored” to the letter.

Once the handwriting patterns have been mastered a child will have the confidence and skills base necessary to start forming letters, numbers and symbols.

Have you got your Free Pre-handwriting Pattern Animations & Worksheets?

For Teachers: https://teachhandwriting.co.uk/pre-handwriting-patterns.html

For Parents: https://teachhandwriting.co.uk/patterns.html

The Three Stages to Learning Handwriting

There are three distinct stages for children to progress through to develop a good handwriting style:

Stage 1 – Pre-handwriting Patterns

Pre-handwriting patterns support a child towards handwriting success. They help the them to learn the shapes and directional pushes and pulls required to form letters. All letters are a combination of these shapes and lines.

Stage 2 – Single Letter Formation

For children to develop a good handwriting style it is important to learn how to form the letters correctly.

Beginning with lower-case letters and only the capital letters for the first letter in a child’s name, examples: Peter Rabbit, Sally Green, George Blue or Mary Shell.

Learning the correct lower-case letter formation also makes the transition from single letter formation to joined letter handwriting much easier.

Stage 3 – Joined Handwriting

Learning to join letters for handwriting enables children to develop a speedy, fluid and legible handwriting style.

Why Placement (Preposition) and Directional Vocabulary is Important!

Teaching your child the vocabulary related to placement (preposition) and direction is import in supporting them to understand and follow instructions, as well as sharing information themselves, such as; ‘put your cup on the table’ or to say ‘teddy in car’.

We also use this placement (preposition) and directional language to explain how to draw shapes, patterns and write letters and numbers.

We have created three sets of picture cards and games to help you support your child in developing and using positional (preposition) and directional vocabulary.

You can find these free resources on our Phonics website by following this link: https://www.teachphonics.co.uk/phonics-resources.html

You can find these free resources in Parent section of the Teach Handwriting website by following this link: https://teachhandwriting.co.uk/more-activities.html

What are prepositions?

A word used with a noun or pronoun to show place, position, time or means, e.g. at home, in the hall, on Sunday, by train.” Definition from Oxford School Dictionary, third edition 2002.

Here are just some preposition and directional phrases you might like to use:

On the … On top of the … Above the … Over the…

Under the… Below the … Beneath … Underneath …

Behind the …

In front of the…

Next to …Beside the … On the right of … To the right of … On the right-hand side … On the left of … To the left of … On the left-hand side… Before the … After the …

In the…  Inside the …

Out of the … Outside of the …

Between the … In between the … In the middle … In the center …

Going up the ….  Going down the … Going towards the… Going away from …

Spring/Easter Drawing Activity Ideas – Supporting Language & Pre-handwriting Pattern Development

Easter holiday break starts next week!

So, we have put together some quick step by step Easter drawing ideas for you to try, using basic shapes such as circles, rectangles and triangles. It is amazing how, by using these simple shapes, you and your child can create fantastic Spring/Easter: cards, pictures mobiles or bunting: https://teachhandwriting.co.uk/more-activities.html

Drawing pictures is a great way to help your child develop their pre-handwriting strokes and shape forming skills. As well as supporting language development by sharing and using words and phrases as you draw, colour, paint or stick with your child. Here are some suggestions for you: next to, above, underneath, on top of, on the left of, on the right of, different colour names, different shape names and line style such as straight, curved, wiggly, thick, thin, short or long.

Have fun!

How to get your child interested in drawing and colouring!

Not all children enjoy drawing and colouring and it can be difficult to encourage them. There are a number of reasons why some children seem reluctant to draw, paint or colour. For instance, some will not like the smell of the paint or crayons, while others may find the pencils, brushes or crayons too thin, long or heavy. Others may be reluctant due to past negative experiences. It can be tricky to work out exactly why a child doesn’t want to draw or write.

Here we have some tips and ideas that may help you to get started:

Paper Size– Some children like large pieces of paper to work on while others can be daunted by the prospect. Start off by having a range of paper sizes and colours for your child to choose from, this way you can find out which size of paper they prefer to work on.

Vertical surface – Having the paper pinned vertically on a drawing board or wall may also help encourage your child to have a go at drawing more than if the paper is laid flat on a table.

Drawing & Writing Tools – Have a range of pencil and crayon thicknesses, lengths and colours so that your child can choose the ones they feel most comfortable using. Try to make sure that the pencils are sharp enough to be used effectively as picking up and using a blunt pencil can be a negative experience which can turn a child off drawing or writing.

You could try using different drawing tools to start with such as chalks or special glass pens (which are great fun and designed to clean off easily).

Draw Together – Before you start drawing think about the kind of things that will interest your child, for instance drawing a train may be ideal for your little boy but not necessarily for your little girl. Use simple shapes to draw the objects so that over time your child will be able to copy so they too can draw successfully the train, cat or car. Practise by yourself so that when you are doing the drawing with your child it comes easily to you so that you can talk through what you are doing.

We have created some new drawings using simple shapes which you may find helps you to get started. Follow this link and scroll down the page a little you will find them under the ‘Activities to help hand development’:  https://teachhandwriting.co.uk/more-activities.html

Tips:

Pick a time and place where you can start to draw in the same room/area as your child is playing. Start off by just sitting and drawing without actively involving your child. It is surprising how often a child will come to checkout and ask you what you are doing. They may just stand and watch for a while and go back to playing, just carry on and complete the picture without them. Leave the picture for them to see, you could let them know you have drawn it for them and have a little chat about it.

It may take a few goes but hopefully you will find that your child will watch for longer, maybe even asking you to draw different things in the picture, use certain colours, or want to help you colour or draw things.

At this stage it can help to explain what you are doing, for instance, if you are drawing a straight line or a wavy line to make a shape or pattern.

Other language you may use:

Straight, short, long, diagonal, up towards …, down towards …, across, curvy, wavey, zig zag, squiggly, swirling, dots, dashes.

A couple of weeks ago we talked about placement (preposition) and directional vocabulary which would also be great to use and help your child to develop as part of drawing activities.

By sharing and showing your child how to draw shapes and make pictures it gives them a positive and successful drawing experience, which encourages and gives them confidence to have ago for themself.

Stage 1 to #Handwriting Success – Pre-handwriting Patterns

Pre-handwriting patterns are the first stage in supporting a child to handwriting success. They help the child to learn the shapes and directional pushes and pulls required to form letters. All letters are a combination of these shapes and lines.

Young children can start to learn these patterns through their play, long before they are ready to pick up a pencil, moving toys back and forth across the floor or whirling them around in the air. To a child it is just play and fun, but you are doing something far more powerful and constructive by helping them to develop the motor memory patterns and directional movement skills they will need for handwriting.

Later, as their coordination and gross motor skills develop, they make more controlled and varied movement patterns in their play. Changing directions, speed and size are all prerequisite skills needed for learning pre-handwriting patterns.

These handwriting patterns do not need to be taught as worksheet activities (though they do help to perfect shape and pattern formation), drawing pictures and patterns in sand, paint and with other writing tools are all fun ways to practise.

Teaching the handwriting patterns in groups helps to further develop the specific movements (pushes and pulls) required to form them and help commit them to the motor memory. A child can then recall these motor memories to support them as they begin to form letters.

Pre-handwriting patterns that encourage a child to move their pencil from left to right are very important for left-handed writers. They need to be taught this so that they can make the cross motion in the H, T, J, G and I from left to right, as their natural instinct is to go from right to left. If this is not corrected when writing E and F the cross lines will not be “anchored” to the letter.

Once the handwriting patterns have been mastered a child will have the confidence and skills base necessary to start forming letters, numbers and symbols.

Have you got your Free Pre-handwriting Pattern Animations & Worksheets?

For Teachers: https://teachhandwriting.co.uk/pre-handwriting-patterns.html

For Parents: https://teachhandwriting.co.uk/patterns.html

Stage 1 to #Handwriting Success – Pre-handwriting Patterns

Pre-handwriting patterns are the first stage in supporting a child to handwriting success. They help the child to learn the shapes and directional pushes and pulls required to form letters. All letters are a combination of these shapes and lines.

Young children can start to learn these patterns through their play, long before they are ready to pick up a pencil, moving toys back and forth across the floor or whirling them around in the air. To a child it is just play and fun, but you are doing something far more powerful and constructive by helping them to develop the motor memory patterns and directional movement skills they will need for handwriting.

Later, as their coordination and gross motor skills develop, they make more controlled and varied movement patterns in their play. Changing directions, speed and size are all prerequisite skills needed for learning pre-handwriting patterns.

These handwriting patterns do not need to be taught as worksheet activities (though they do help to perfect shape and pattern formation), drawing pictures and patterns in sand, paint and with other writing tools are all fun ways to practise.

Teaching the handwriting patterns in groups helps to further develop the specific movements (pushes and pulls) required to form them and help commit them to the motor memory. A child can then recall these motor memories to support them as they begin to form letters.

Pre-handwriting patterns that encourage a child to move their pencil from left to right are very important for left-handed writers. They need to be taught this so that they can make the cross motion in the H, T, J, G and I from left to right, as their natural instinct is to go from right to left. If this is not corrected when writing E and F the cross lines will not be “anchored” to the letter.

Once the handwriting patterns have been mastered a child will have the confidence and skills base necessary to start forming letters, numbers and symbols.

Have you got your Free Pre-handwriting Pattern Animations & Worksheets?

For Teachers: https://teachhandwriting.co.uk/pre-handwriting-patterns.html

For Parents: https://teachhandwriting.co.uk/patterns.html