Turn Taking Skills for Play

This week we will look at turn taking in play a skill children need to learn to take part in meaningful interaction with others. These interactions are a vital part of children’s physical, emotional, social and intellectual growth and wellbeing.

Children need to learn the importance of waiting for their turn when playing with others, something many find hard to understand to begin with. 

Like most skills it needs to be taught and practised and is part of our phonological awareness development as it requires us to learn an associated vocabulary along with facial and other physical cue.

A child who is taught and given lots of practise at taking turns will find interacting and playing with others easier later on.

Turn taking is easy to implement into everyday activities and play and something you probably do anyway, without even thinking about it

Here are some ideas to help you to support your child:

  • Try to use the phrase “My turn”, “Your turn” or “Daddy’s turn” (name a third person) when playing or doing an activity such as sharing a book.
  • Toddlers have a short attention span so keep the turn short to start with.
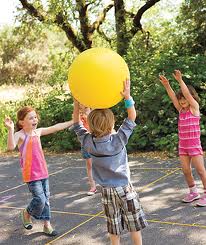
  • Physical games such as rolling and kicking a ball or running and jumping activities can help to encourage turn taking and learning to wait for your turn. Again, don’t make the turns too long and to help keep your child engaged while you have your turn, talk with them about what you are doing during your turn and when they are having theirs.
  • Count Down or Up – To help young children develop an understanding that if they wait, they will get their turn, explain that you will count to 10 and then it is time to swap and someone else has a turn, count to 10 again and return the toy or wanted object to your child. It won’t take long for them to understand that they will get their turn without a fuss.
  • Turn Time – As your child gets older try using a timer/clock to help them increase the time scale between taking turns. Try not to make the gaps between turns too long to start with, as young children find the concept of time very difficult, 1 minute might as well be an hour in their eyes. Show clearly a start point and the finish point for the time scale so your child can watch or come back and check the passing of time. Don’t be tempted to ignore the timer if it is your child’s turn, make sure they are offered the toy or turn that is due to them, otherwise they will feel cheated and some of the trust is lost.
  • As children get older, playing card and board games helps to further develop their turn taking skills.

Why Placement (Preposition) and Directional Vocabulary is Important!

Teaching your child the vocabulary related to placement (preposition) and direction is import in supporting them to understand and follow instructions, as well as sharing information themselves, such as; ‘put your cup on the table’ or to say ‘teddy in car’.

We also use this placement (preposition) and directional language to explain how to draw shapes, patterns and write letters and numbers.

We have created three sets of picture cards and games to help you support your child in developing and using positional (preposition) and directional vocabulary.

You can find these free resources on our Phonics website by following this link: https://www.teachphonics.co.uk/phonics-resources.html

You can find these free resources in Parent section of the Teach Handwriting website by following this link: https://teachhandwriting.co.uk/more-activities.html

What are prepositions?

A word used with a noun or pronoun to show place, position, time or means, e.g. at home, in the hall, on Sunday, by train.” Definition from Oxford School Dictionary, third edition 2002.

Here are just some preposition and directional phrases you might like to use:

On the … On top of the … Above the … Over the…

Under the… Below the … Beneath … Underneath …

Behind the …

In front of the…

Next to …Beside the … On the right of … To the right of … On the right-hand side … On the left of … To the left of … On the left-hand side… Before the … After the …

In the…  Inside the …

Out of the … Outside of the …

Between the … In between the … In the middle … In the center …

Going up the ….  Going down the … Going towards the… Going away from …

Leaf Investigation, Collecting and Printing

The weather this Autumn has been unseasonably warm, making it easier to go out and explore our local green and wild spaces.

It is amazing how much quality time you can spend with children just looking, talking about and collecting different leaves. The amount of language shared and new vocabulary introduced is invaluable.

It is suitable for all age groups and you don’t need a vast knowledge of plants and trees to make this fun; just remember not to take whole plants or leaves from endangered or dangerous plants and watch out for thorny, spikey and prickly leaves (if you are not sure leave the plant alone). Make sure when collecting leaves, you do not trespass on to other people’s property, or pick from their gardens!

The aim is to look at and talk about the different shapes, sizes, textures, colours and parts of the leaves. There are so many new words you can share. It is important to make sure the words used, especially if new, are age appropriate and help develop the child’s understanding:

  • Shape:  round, oval, heart shapes, oblong, fanned.
  • Size: small, big, tiny, large, bigger, biggest, smallest, smaller, huge.
  • Texture: rough, smooth, bumpy, fluffy, silky, soft, furry, shiny, glossy, feathery, spikey, prickly, thorny, scratchy, hard, stiff, ridged, flexible, bendy, veiny, ragged.
  • Colour: green, brown, tan, orange, yellow, silver, gold, bronze, purple, red.
  • Leaf: stalk (petiole), leaf base, mid-rib, veins, venules, leaf apex, margin (edge), leaf blade (lamina)

Leaf printing is fun and easy!

If you have been able to collect some leaves, they can be used to create lovely leaf print pictures and patterns.

The printing activity is a great way of helping children to understand, and for you to model, the language associated with pressure and to experience how the pressure used feels. By linking the words used to the feelings and the outcome of using the pressure they can start to understand what is needed when asked to press gently or harder.  

Materials:

Paper, child safe poster paints, brushes or sponges, leaves collected from walk

Method.

  • Protect the surface being used for painting and aprons for the children
  • Put paint in to trays/tubs
  • It can help to tape the corners of the paper down before you start printing to stop the paper lifting when you lift the painted leaf off.
  • Paint one side of the leaf. This is when we can talk about how much paint (not too thick) and how gentle we need to be. If the leaf tears, due to too much pressure being used, we can support by explaining and helping the child to try again; with maybe a different painting tool or using their finger to give a great sense of feeling.
  • Then pick up the leaf by the stalk, or at one end, and place it paint side down on the paper
  • Encourage the child to gently tap the leaf down on the paper. Help them, if necessary, by demonstrating.
  • Then using the stalk, or from one end, gently peal the leaf off the paper.

The important thing to remember is to chat about what you are doing and have fun!