Why Placement (Preposition) and Directional Vocabulary is Important!

Teaching your child the vocabulary related to placement (preposition) and direction is import in supporting them to understand and follow instructions, as well as sharing information themselves, such as; ‘put your cup on the table’ or to say ‘teddy in car’.

We also use this placement (preposition) and directional language to explain how to draw shapes, patterns and write letters and numbers.

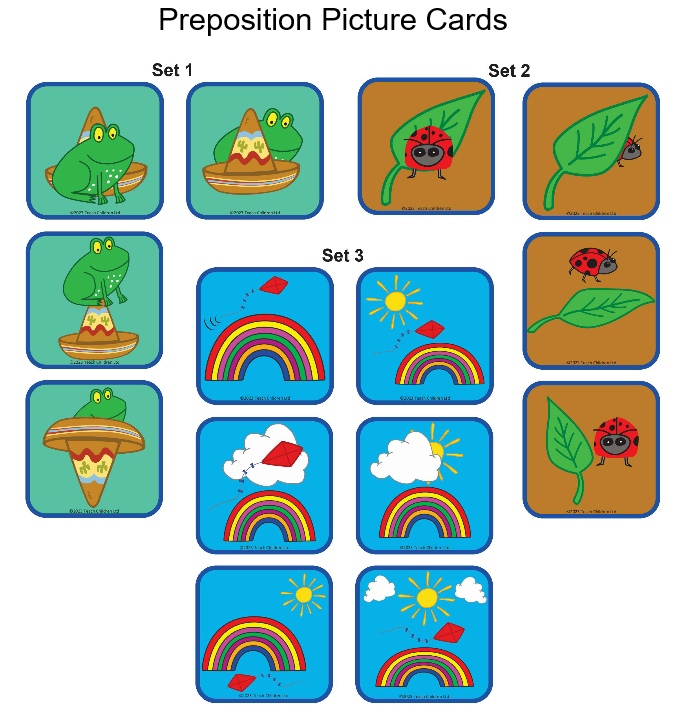
We have created three sets of picture cards and games to help you support your child in developing and using positional (preposition) and directional vocabulary.

You can find these free resources on our Phonics website by following this link: https://www.teachphonics.co.uk/phonics-resources.html

You can find these free resources in Parent section of the Teach Handwriting website by following this link: https://teachhandwriting.co.uk/more-activities.html

What are prepositions?

A word used with a noun or pronoun to show place, position, time or means, e.g. at home, in the hall, on Sunday, by train.” Definition from Oxford School Dictionary, third edition 2002.

Here are just some preposition and directional phrases you might like to use:

On the … On top of the … Above the … Over the…

Under the… Below the … Beneath … Underneath …

Behind the …

In front of the…

Next to …Beside the … On the right of … To the right of … On the right-hand side … On the left of … To the left of … On the left-hand side… Before the … After the …

In the…  Inside the …

Out of the … Outside of the …

Between the … In between the … In the middle … In the center …

Going up the ….  Going down the … Going towards the… Going away from …

How to get your child interested in drawing and colouring!

Not all children enjoy drawing and colouring and it can be difficult to encourage them. There are a number of reasons why some children seem reluctant to draw, paint or colour. For instance, some will not like the smell of the paint or crayons, while others may find the pencils, brushes or crayons too thin, long or heavy. Others may be reluctant due to past negative experiences. It can be tricky to work out exactly why a child doesn’t want to draw or write.

Here we have some tips and ideas that may help you to get started:

Paper Size– Some children like large pieces of paper to work on while others can be daunted by the prospect. Start off by having a range of paper sizes and colours for your child to choose from, this way you can find out which size of paper they prefer to work on.

Vertical surface – Having the paper pinned vertically on a drawing board or wall may also help encourage your child to have a go at drawing more than if the paper is laid flat on a table.

Drawing & Writing Tools – Have a range of pencil and crayon thicknesses, lengths and colours so that your child can choose the ones they feel most comfortable using. Try to make sure that the pencils are sharp enough to be used effectively as picking up and using a blunt pencil can be a negative experience which can turn a child off drawing or writing.

You could try using different drawing tools to start with such as chalks or special glass pens (which are great fun and designed to clean off easily).

Draw Together – Before you start drawing think about the kind of things that will interest your child, for instance drawing a train may be ideal for your little boy but not necessarily for your little girl. Use simple shapes to draw the objects so that over time your child will be able to copy so they too can draw successfully the train, cat or car. Practise by yourself so that when you are doing the drawing with your child it comes easily to you so that you can talk through what you are doing.

We have created some new drawings using simple shapes which you may find helps you to get started. Follow this link and scroll down the page a little you will find them under the ‘Activities to help hand development’:  https://teachhandwriting.co.uk/more-activities.html

Tips:

Pick a time and place where you can start to draw in the same room/area as your child is playing. Start off by just sitting and drawing without actively involving your child. It is surprising how often a child will come to checkout and ask you what you are doing. They may just stand and watch for a while and go back to playing, just carry on and complete the picture without them. Leave the picture for them to see, you could let them know you have drawn it for them and have a little chat about it.

Handwriting Begins with Mark Making & Simple Drawings

Young children’s first experience on the handwriting journey is through mark-making and simple drawings, whether it is with finger-paints, writing in sand or with pencils and crayons.

From about the age of 2, children start to move from a simple grasping (primitive) grip to one that secures the writing tool between the fingers and the thumb. In the early stages of mark-making and drawing young children will try different grips and holds, which is part of their normal development for handwriting and drawing.

As young children’s body (gross motor skills), hand strength and dexterity (fine motor skills) are developing they need a range of pencil, crayon and paint brush thicknesses. Young children need the thicker drawing tools as they can grip them more easily, helping them to mark-make. If the pencil is too thin, they find it difficult to grasp and have little control over it, making the drawing experience unsuccessful, which can lead to frustration and discourage them from trying again.

Due to the stage of their physical development young children use large movements to draw (from the shoulder rather than the wrist) which often creates larger shapes and lines.

During the early stages a vertical drawing and painting surface is important as it allows the child the freedom of movement to fully explore their mark-making potential. It also helps young children to develop the wrist strength and flexibility which they will need later to hold a pencil correctly for handwriting.

Using plain paper and surfaces is considered best for young children as they find it less restrictive.

It has been widely acknowledged that a child who is forced to hold a writing tool using the dynamic tripod grip, before they are developmentally ready, can be turned off engaging in the drawing/writing process as well as developing a poor pencil grip later on. Remember some children do not develop the ability to use the dynamic tripod grip until the age of 5/6 years old.

As a child’s gross and fine motor skills develop so does their pencil grip and ability to draw and write at a small scale moving more from the elbow and wrist and progressing through the grip stages.

For more information on pencil grip development use this link: https://teachhandwriting.co.uk/grip-development.html

The Importance of Using Letter Names for Developing Handwriting, Phonics and Reading Skills

Here at Teach Children we have always promoted the importance and power of teaching the correct letter names to begin with; through our Teach Handwriting website, Schemes and Teach Phonics website. Unfortunately, some schools, teacher and parents still seem to be concerned that this is not consistent with the teaching of phonics, which is just not correct.

Learning the unique letter names of the alphabet is a pre-phonics skill; as well as an early learning goal. It has to be remembered that a letter is a shape which only represents a sound when it is placed within a word or sentence (has a context). Also, a letter or combination of letters can represent more than one sound and so the only unique way of identifying alphabet letters when we talk about them is to use their names.

It is important to remember that just because a child can correctly recite the ‘Alphabet’ song it does not mean they know the letters of the alphabet. It is surprising how many children can do this but when shown letters from the alphabet cannot name them at all. They may be able to tell you the sound the letter makes but have no idea of the letters name.

Learning the correct letter names helps to reinforce that when talking about the letter ‘a’ (ay) for example it has a set shape regardless of the sound that it will be representing in the word. This further supports children’s handwriting development as the communication of your requirements is unambiguous.

Teaching the correct letter names is important when supporting handwriting as this can in turn affect a child’s phonics understanding later on. For example, it can seem very easy when explaining to a child which letter to write when they ask which one is making a ‘kuh’ sound in a word such as cat to say a ‘curly kuh’. There is no such letter in the alphabet called ‘curly kuh’ it is the letter ‘c’ (cee). By adding the ‘kuh’ sound to the letter it reinforces incorrect phonics knowledge. The letter ‘c’ does not make a ‘kuh’ sound in words such as: city, circle, cycle and centre.

Some children will then only ever refer to the letter ‘c’ as ‘curly kuh’ and the letter ‘k’ as’ kicking kuh’. As I say these are not letter names of the alphabet and also devalue the power of phonics at the same time.

How can the education establishment get hot under the collar about not using the correct terminology in the teaching of English in schools such as: phonemes, graphemes, digraphs, modal verbs etc… yet still refer to the letter’s ‘c’ and ‘k’ as ‘curly or kicking kuh’!

Phonics is a powerful decoding and encoding tool. However, so is the alphabet letter naming system. Both need to working side by side to support our children, especially in those early years of their educational journey.

The English phonic system is very complex but this is why our language is so rich. Young children need to use letter names as an additional tool, as it takes many years for them to be introduced to the more complex phonics coding system. Alphabet Name animation (scroll to the bottom of the page): https://www.teachphonics.co.uk/phonics-graphemes.html