A Good Sitting Position for #Handwriting

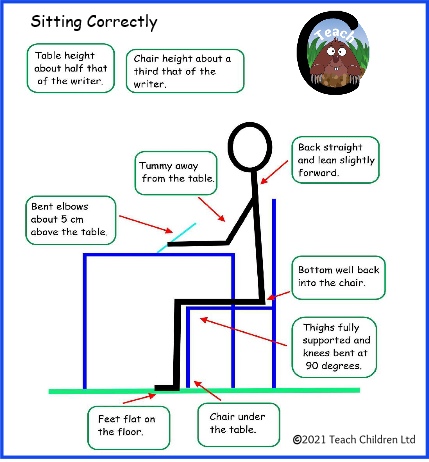
Learning to sit correctly at a table for handwriting type activities is not just important for developing a physically comfortable and maintainable sitting position; it also allows the arms and hands to move freely and enables the paper to be tilted and positioned correctly, helping to improve the quality of the handwriting.

Learning how to sit correctly, so that it becomes second nature, needs training and takes time. Many children do not sit correctly at a desk, when they are asked to do so, because they have not been taught or do not understand what they are meant to do.

For tips and ideas on how to help a child develop a good sitting posture and position for handwriting check out our ‘Sitting’ section on the website: https://www.teachhandwriting.co.uk/handwriting-sitting-position-desk.html

Some children find sitting correctly at a desk difficult because they have not acquired all the gross motor skills needed to sit correctly for long periods of time. These children may require additional posture base and bilateral coordination games and activities to help them build the appropriate gross motor skills.

For more information on developing a child’s core strengths check out the Key Strengths section of our website: https://teachhandwriting.co.uk/handwriting-motor-skills.html

Using Different Types of Textured Surfaces and Paper (texture resistance)

To help young children to store pattern and letter shape formations into their motor memory it is important that the tools used provide a resistance rather than one that flows effortlessly over the writing/drawing surface. The greater the resistance the more the body can neurologically acknowledge (feel) the movement and help to send appropriate information to the brain.

Some of the best surfaces/papers and tools for young children to begin learning to draw patterns, shapes and correctly write letters:

•  Chalk on boards, walls or paths

• Flip chart pens or large felt tips on course paper such as sugar paper

• Using appropriately sized paint brushes on course paper (such as sand paper) or surfaces

• Finger painting or finger drawing in sand, paint or corn flour mix

• Finger tracing and then trying to draw the pattern, shape or letter straight afterwards.

• Try chalking the shape or letter onto a blackboard and have the child use a damp sponge to wipe it off again (make sure the child starts in the correct place and moves correctly around the shape or letter to the correct finish point).

• Appropriately sized crayons and pencils on course paper or card (non-shiny side of cereal boxes and corrugated card can be good fun and different to use).